
User Manual
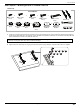
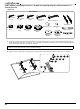
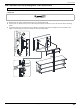
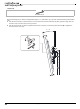
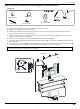
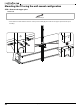

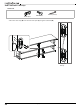

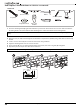
Table Of Contents
- Contents
- IMPORTANT SAFEGUARDS
- Features
- Package contents
- Tools needed
- Assembling your stand
- STEP 1: Attach the top panel to the spine
- STEP 2: Attach the top shelf support to the top panel and spine
- STEP 3: Attach the middle shelf to the spine
- STEP 4: Attach the bottom shelf to the spine
- STEP 5: Align and attach the right side frame to the shelves
- STEP 6: Attach the right side frame to the top panel
- STEP 7: Attach the left side frame to the shelves
- STEP 8: Fasten the left side frame to the top panel
- Mounting the TV using the swivel configuration
- STEP 1: Attach the swivel bracket to the mounting frame
- STEP 2: Attach the swivel bracket assembly to the spine
- STEP 3: Attach the cable clips
- STEP 4: Select the correct bolts, washers, and spacers for your TV
- STEP 5: Determine whether your TV has a flat back or an irregular or obstructed back or a curved screen
- STEP 6: Option 1 - Mounting brackets on a TV with a flat back
- STEP 6: Option 2: Mounting bracket on a TV with an irregularly shaped or obstructed back or a curved screen TV
- STEP 7: Attach the TV to the mounting frame on the swivel bracket
- STEP 8: Adjusting the tilt
- STEP 9: Position your TV stand and install the tipping restraint hardware kit
- Mounting the TV using the wall-mount configuration
- Mounting the TV using the tabletop configuration
- Maintaining your TV stand
- Specifications
- ONE-YEAR LIMITED WARRANTY

www.insigniaproducts.com
25
3-in-1 TV Stand
STEP 9: Position your TV stand and install the tipping restraint hardware kit
You need:
1 Position your assembled stand against a wall where you plan to use it.
2 Adjust the leveling feet to level your TV stand.
3 Align the spine (F) with a stud and mark the wall at the center point of the stud. The mark should be within 3 in.
(7.6 cm) of the bolt on the top of swivel bracket.
4 Using a 1/8" drill bit, drill a hole at the marked location and attach one metal bracket (A) using the long screw (C)
included inside the tipping restraint (Z).
5 Remove one 5/8" bolt with the washers installed on the top of swivel bracket (H).
6 Attach the other metal bracket included inside the tipping restraint (Z) to the swivel bracket (H) using the removed
bolt and washers.
7 Lace the end of the nylon strap (B) down through the mounting hole in each metal bracket. Bring both ends together
and slide the flat end through the locking end and draw it through until all slack is removed.
WARNING: The tipping restraint must be installed correctly. Failure to do this could result in your TV/stand assembly falling
forward, resulting in damage to equipment or personal injury.
Edge-to-edge stud finder
Level
Pencil
1/8" drill bit
Power drill
Z Tipping restraint hardware kit (1)
A Metal bracket (2)
C Long screw (1)
B Nylon strap (1)
D Short screw (1)
Wooden stud
Wall
Leveling feet
Long screw
Nylon strap