
User Manual
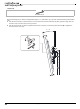
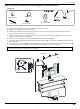
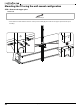

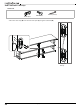

Table Of Contents
- Contents
- IMPORTANT SAFEGUARDS
- Features
- Package contents
- Tools needed
- Assembling your stand
- STEP 1: Attach the top panel to the spine
- STEP 2: Attach the top shelf support to the top panel and spine
- STEP 3: Attach the middle shelf to the spine
- STEP 4: Attach the bottom shelf to the spine
- STEP 5: Align and attach the right side frame to the shelves
- STEP 6: Attach the right side frame to the top panel
- STEP 7: Attach the left side frame to the shelves
- STEP 8: Fasten the left side frame to the top panel
- Mounting the TV using the swivel configuration
- STEP 1: Attach the swivel bracket to the mounting frame
- STEP 2: Attach the swivel bracket assembly to the spine
- STEP 3: Attach the cable clips
- STEP 4: Select the correct bolts, washers, and spacers for your TV
- STEP 5: Determine whether your TV has a flat back or an irregular or obstructed back or a curved screen
- STEP 6: Option 1 - Mounting brackets on a TV with a flat back
- STEP 6: Option 2: Mounting bracket on a TV with an irregularly shaped or obstructed back or a curved screen TV
- STEP 7: Attach the TV to the mounting frame on the swivel bracket
- STEP 8: Adjusting the tilt
- STEP 9: Position your TV stand and install the tipping restraint hardware kit
- Mounting the TV using the wall-mount configuration
- Mounting the TV using the tabletop configuration
- Maintaining your TV stand
- Specifications
- ONE-YEAR LIMITED WARRANTY

www.insigniaproducts.com
24
STEP 8: Adjusting the tilt
You need:
The TV brackets (J) let you make a tilt adjustment of up to 11° down and 5° up to provide optimum viewing and minimize
glare.
1 Turn the tension knobs counterclockwise to loosen the knobs on both TV brackets (J), then grasp the edge of the TV
and move it up or down to the position you want.
2 Turn the tension knob clockwise to tighten the brackets in position. Use the 4.8 mm hex wrench (X) to tighten the
tension knobs, if necessary.
X 4.8 mm Hex key (1)
-5° ~ 11°