User Guide 8" Digital Picture Frame NS-DPF8IP
NS-DPF8IP Digital Picture Frame Contents Introduction . . . . . . . . . . . . . . . . . . . . . . . . . . . . . . . . . . . .3 Safety information . . . . . . . . . . . . . . . . . . . . . . . . . . . . . .4 Features. . . . . . . . . . . . . . . . . . . . . . . . . . . . . . . . . . . . . . . .5 Setting up your frame . . . . . . . . . . . . . . . . . . . . . . . . . . .11 Using your frame . . . . . . . . . . . . . . . . . . . . . . . . . . . . . . .12 Maintaining . . . . . . . . . . . . . . . . . . . . . . .
NS-DPF8IP Safety information Always follow these basic safety precautions when using your digital picture frame. This will reduce the risk of fire, electric shock, and injury. Warnings To reduce the risk of fire or shock hazard, do not expose the frame to rain or moisture and unplug the frame during lightning storms. To prevent the risk of electric shock, do not remove the cover. There are no user-serviceable parts inside. Refer all servicing to qualified personnel.
Features • • • • • • • • • • • • iPod®/iPhone® docking with audio/video playback. 2 GB internal memory. Displays digital pictures and plays music and videos without a computer. Displays pictures directly from an inserted memory card or USB device (not included). Built-in alarm clock. Bright, clear TFT LCD screen.
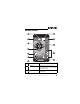
NS-DPF8IP Connectors Right side view Left side view Back view 8 9 6 # Description 1 Memory card slot, supports: • Secure Digital™ (SD) • SDHC™ • MultimediaCard (MMC™) • Memory Stick® • Memory Stick PRO Duo™ • xD™ • microSD™ 2 Memory card slot. Supports CompactFlash (CF) 3 Headphone jack (does not operate with iPhone) 4 iPod/iPhone dock 5 USB port 6 Mini USB port 7 Line in connector www.insigniaproducts.
# Description 8 DC 5 V power connector. 9 Remote control slot Top view You can access most of the frame’s features by using either the buttons on top of the frame or by using the remote control. Selecting files for copying, deleting, or viewing requires the remote control, and the instructions in this guide refer to remote control buttons (except where noted). 8 9 10 11 12 # Button Description 1 STANDBY/ON Press to turn your digital picture frame on. Press again to enter standby mode.
NS-DPF8IP # Button Description 4 Light sensor Adjusts the display brightness or auto standby to room lighting. 5 Back Press to return to the previous menu. 6 / / / Press to navigate through the menus or to select the next or previous picture/song/video. 7 (enter) 8 (play/ pause) During playback, press to pause or resume the video, audio, or iPod file slideshow.
Remote control # Button Description 1 DISPLAY Press to choose the display mode. Options are Normal, Multi-Image, and three different photo + clock or clock/ Date display modes. 2 BACK Press to go back a screen or to close setup menus. www.insigniaproducts.
NS-DPF8IP # Button 3 ENTER 4 5 Description / / Press to select the highlighted option. / Press to navigate through the menus or to select the next or previous picture/song/video. MENU Press to display the Setup menu. 6 SELECT Press to select a picture or file to copy or delete. 7 (play/pause) Press to pause or resume playback. 8 (thumbnail/folder) Press to enter Thumbnail mode, or to display files and folders. 9 HOME Press to return to the main menu.
Setting up your frame Setting up the remote control To set up the remote control: • Remove the plastic tab that extends past the bottom edge of the remote control. This tab protects the battery. The remote control will not work until it is removed. www.insigniaproducts.
NS-DPF8IP Setting up the frame To set up the frame: • Plug the AC power adapter into the frame’s DC power connector and into an AC power outlet.
Tip You can press (thumbnail/file list) to switch between thumbnail mode and file list mode. Thumbnail mode displays all files in the selected memory device, and file list mode displays files and folders. This button is disabled during iPod/ iPhone playback. Playing slideshows To play a slideshow with a memory card or USB already inserted: • The frame detects the inserted memory device and automatically displays the images according to your preference.
NS-DPF8IP 4 Press or to select an inserted memory card, USB device, or the internal memory, then press ENTER. 5 Press (Play/Pause). A slideshow begins that displays pictures contained in the memory device you selected. 6 Press (Play/Pause) to pause the slideshow on a specific picture. 7 8 Press (Play/Pause) again to resume the slideshow. Press (DISPLAY) to select the slideshow mode you want to view. Options include Normal, Multi-Image, or Clock display.
6 Press (DISPLAY) to select the slideshow mode you want to view while you listen to music. Options include Normal, Multi-Image, or Clock display. Listening to music Tip Make sure that there are audio files stored in the internal memory or on an inserted memory device if you want to listen to music. Listening to music from an inserted memory card, USB device, or the internal memory Your digital picture frame plays MP3, AAC (non-DRM), and WMA (non-DRM) music files.
NS-DPF8IP Listening to music from an external audio device You can listen to music from an external audio device, such as an MP3 player, using the line in connector. See “Playing music and videos from your iPod or iPhone” on page 17, for information on listening to music from your iPod or iPhone. To listen to music from an external device: 1 Plug the external audio device into the line in connector using a 3.5 mm stereo cable (not included). 2 3 4 Press (HOME) to return to the Home screen.
3 Press or to select an inserted memory card, USB device, or the internal memory, then press ENTER. 4 Press to toggle between song list view and folder view. If in folder view, press or to select a folder, then press ENTER. 5 Press or to play. to select a video file, then press ENTER Tip Make sure that there are video files stored in the internal memory or on an inserted memory device if you want to watch a video. When playing MPEG4 H.
NS-DPF8IP 6 Press or to navigate through the menus, then press ENTER to open a sub menu. 7 8 Press (Play/Pause) to play a selected media file. Press (Back) to move backward through the menus. Note The option to select media from the iPod screen is disabled if there is no iPod detected in the docking connector. Tip Make sure that there are media files stored in the iPod if you want to listen to music or watch a video.
8 Press (Back) to end the slideshow and return to the music playback screen. Using the remote control to navigate menus on your iPod or iPhone You can use the remote control (included) to control media playback functions and navigate menus on an iPod or iPhone using the iPod Direct Control mode. In this mode, the screen of the iPod/iPhone is active and is used as a reference while navigating menus and selecting media for playback.
NS-DPF8IP Setting up iPod/iPhone functionality To access iPod or iPhone setup options: 1 Plug your iPod or iPhone into the docking connector on the digital picture frame. 2 3 Press Press or ENTER. to select the iPod icon, then press 4 Press or ENTER. to select the SETUP icon, then press (HOME) to return to the Home screen. The following table shows iPod/iPhone setup options: Menu option Settings Description Auto Resume Enable Disable Auto sync.
Menu option Settings Description Fit to screen ON OFF When this option is set to ON, movies formatted for wide-screen will be converted to standard (4:3) format to fill the entire screen. When OFF, widescreen movies will be shown in their original format, with black bars shown on the top and bottom of the screen. Selecting the on-screen date/time display To select the date/time display: • Press (DISPLAY) repeatedly to cycle through the available clock displays until you find one that you like.
NS-DPF8IP Display mode Description Displays the time, date, and day, Small display with background with small-sized text in the bottom right corner of the screen image with full slideshow background images. Note: This is the only option available for video playback mode. Large display Displays the date, time and day of with dual images the week in full-screen mode with large-sized text. Dual slideshow images are shown under the clock display. Note: This option is not available for video playback mode.
To copy selected files to internal memory: (HOME) to return to the Home screen. 1 Press 2 Press or to select the type of files you want to copy (photo, music, or video), then press ENTER. 3 Press or to select the memory card or USB device you want to copy the files from, then press ENTER. 4 Press / / / to select a file you want to copy, then press (SELECT) to select the file. Notice that a check mark appears in the upper right corner of the file. 5 Repeat Step 4 to copy as many files as you want.
NS-DPF8IP 3 Navigate to “My Computer” (Windows operating systems). The frame's internal memory and any inserted memory cards or USB devices appear as “removable disks.” Each memory area appears as a separate removable disk, and are labeled SD, Internal Memory, and CF. 4 Use your computer's standard drag and drop or copy and paste procedures to move pictures on your computer to the frame's internal memory or a memory card you inserted in the frame.
Deleting media files from internal memory Note You cannot delete files from an inserted memory card or USB device using the frame alone. Because you cannot copy files from the frame to a memory card or USB device, the frame should not be considered your primary file storage method. Make sure that you have the files stored elsewhere (such as a memory card). To delete files from internal memory: 1 Press (HOME) to return to the Home screen.
NS-DPF8IP To completely erase internal memory: (HOME) to return to the Home screen. 1 Press 2 Press or to highlight the SETUP icon, then press ENTER. The Setup menu opens. 3 Press or to highlight Factory Settings, then press ENTER. A sub menu opens. 4 Press or to highlight Erase Internal Memory, then press ENTER. 5 Press or to select Yes, then press ENTER to completely erase the internal memory. To delete files with your PC: 1 Turn on your computer.
3 A disc icon appears on the desktop fo internal memory and any inserted media card. 4 Find and highlight the pictures you want to delete, then use your computer's standard procedures to delete pictures from the frame's internal memory or an inserted memory card. Customizing slideshows You can set up a slideshow using pictures you select. To set up a slideshow: Tip A slideshow of selected pictures can only be set up by using the remote control.
NS-DPF8IP 8 Press ENTER again. A slideshow of the selected pictures is played. 9 To end the slideshow and clear the selected items, press (BACK). This returns you to the Thumbnail screen. From there, you may select a photo to view or begin another slideshow using standard procedures. Customizing the picture display You can magnify, rotate, and display information about any picture that the frame displays. To magnify a picture: 1 While a picture is displayed full screen (not a thumbnail), press (ZOOM).
3 Press (PLAY/PAUSE) to continue the slideshow. Note When an image is rotated, the rotated view gets stored only for internal memory. This is not the case for photos on memory cards. We do not alter or store rotation of images for external devices. To display information about the picture: 1 While a picture is displayed full screen (not as a thumbnail), press 2 7 (MENU). Press or to select Image Information, then press ENTER.
NS-DPF8IP To turn the alarm On or Off: • Press or to select the alarm you want to turn on or off, then press ENTER. The display indicates that the alarm is ON or OFF. To set the alarm time: 1 With the desired alarm selected, press or to highlight the current alarm time, then press ENTER. The HOUR is selected. 2 3 Press 4 When the alarm time is set, press the main alarm setting menu. or to change the hour for the alarm.
To set the alarm sound: • With the desired alarm selected, press or to highlight the current alarm sound, then press or to change the sound. Several different tones are available, as well as a Custom tone. When selected, Custom asks you to select a music file from your internal memory. Setting viewing options You can change all of the viewing options in the Setup menu using the buttons on the top of the frame or by using the remote control. You can display the Setup menu at any time by pressing (MENU).
NS-DPF8IP To set the viewing options: 1 Press or to highlight an option, then press ENTER. A second menu opens, showing the available settings. The current setting is indicated by a square icon ( ) next to the setting. 2 Press or to select. 3 When you are finished, press the previous screen. to highlight a setting, then press ENTER (BACK) to return to Setting the sleep timer This feature is used to enable a timer to automaticity stop play of music or video file.
When the sleep timer is enabled, an hourglass icon appears on the bottom left of your screen. You can press the Sleep Timer button at any time to update or disable this mode. Make sure that playback mode or REPEAT mode is enabled. Exiting, stopping, or selecting a different media file to play will not disable the sleep timer. You can also press Sleep Timer during iPod playback of music or video files.
NS-DPF8IP Menu/Setup Settings option Description Slideshow transition Normal Random Motion Curtain Left-Right Curtain Top-Bottom Open-Door Cross-Comb Cross-Fade Motion Zoom Sets the special effects used to transition from one picture to the next in a slideshow. The Normal setting plays slideshows without any special transition effects. The Random setting cycles through the available special transition effects during slideshows. The Motion Zoom setting zooms and pans pictures.
Menu/Setup Settings option Description Picture display Normal format Zoom Adjusts how the image is sized to fit the screen. If the pictures you are viewing are in a format other than 4:3, black bars will appear on the top and bottom of the screen with the Normal setting enabled. Selecting Zoom will hide the black bars by zooming in on the image and cropping it. Date/Time stamp On Off Displays the date and time that a picture was taken. This feature is not available in multi-image display mode.
NS-DPF8IP Menu/Setup Settings option Power Management Description Auto Room Brightness When this setting is enabled, the frame’s screen brightness will automatically be adjusted based on the room’s lighting conditions. Room Light Standby When this setting is enabled, the frame automatically enters standby mode when room light dims to one lumen. The frame will automatically turn back on when room light increases to 3 lumens.
Maintaining Cleaning the digital picture frame Clean the outer surface of the digital picture frame with the included cleaning cloth. Replacing the remote control battery To replace the remote control battery: 1 Turn the remote control over. 2 While pressing down on the ridged area of the battery cover, slide the battery tray out and remove the old battery. 3 Place a new CR2025 (or equivalent) lithium battery in the tray, with the positive (+) side facing up.
NS-DPF8IP Replacing the backup battery The digital picture frame uses a backup battery to maintain the time and date while the unit is powered off. If the time and date is lost when the unit is powered off, this battery should be replaced. To replace the backup battery: 1 Unplug the AC power adapter from the unit and wall outlet. 38 2 With a screwdriver, open the battery cover door on the back of the unit.
Troubleshooting Problem Solution The frame will not turn on. The power adapter is not securely connected to the picture frame or to the wall power outlet. Check power adapter connections, then press the power button. The frame displays some pictures slower than others. Higher resolution pictures load more slowly. Try using lower resolution pictures or down-sampling (compressing or resizing) them.
NS-DPF8IP Problem Solution The remote control does not work. • • Be sure to remove the plastic tab from the remote control’s battery compartment before using the remote control for the first time. The battery is dead. Replace with a CR2025 battery, then pair with the frame as described below. Time setting is lost when the digital picture frame loses power. The backup battery is dead. To replace the backup battery see “Replacing the backup battery” on page 38.
Specifications Screen size 8" (203 mm) Screen format 4:3 Screen resolution 800 × 600 pixels Memory card formats • • • • • • • • Secure Digital™ (SD) SDHC™ CompactFlash® MultimediaCard (MMC™) Memory Stick® Memory Stick PRO Duo™ (requires included adapter) xD™ microSD™ (requires adapter - not included) File formats Standard JPEG MPEG4 (AVI and MOV), Motion JPEG (AVI and MOV), MPEG4 H.264 (AVI and MOV) MP3, AAC (non-DRM), WMA (non-DRM) USB USB (type A) port and Mini (type B) port Line in 3.
NS-DPF8IP FCC Part 15 This device complies with Part 15 of the FCC Rules. Operation is subject to the following two conditions: (1) this device may not cause harmful interference, and (2) this device must accept any interference received, including interference that may cause undesired operation. FCC warning Changes or modifications not expressly approved by the party responsible for compliance with the FCC Rules could void the user’s authority to operate this equipment.
Made for iPod® and iPhone® iPhone and iPod are trademarks of Apple Inc., registered in the U.S. and other countries. iPad is a trademark of Apple Inc. Open source software notice This product contains Xvid video codec: © 2010 Xvid. This software is subject to the GNU Public License Version 2 (GPL2). A full version of the GPL2 is published below. You can also obtain a copy of the GPL License from http://www.gnu.org/licenses/old-licenses/gpl-2.0.html.
NS-DPF8IP When we speak of free software, we are referring to freedom, not price. Our General Public Licenses are designed to make sure that you have the freedom to distribute copies of free software (and charge for this service if you wish), that you receive source code or can get it if you want it, that you can change the software or use pieces of it in new free programs; and that you know you can do these things.
Activities other than copying, distribution and modification are not covered by this License; they are outside its scope. The act of running the Program is not restricted, and the output from the Program is covered only if its contents constitute a work based on the Program (independent of having been made by running the Program). Whether that is true depends on what the Program does. 1.
NS-DPF8IP Thus, it is not the intent of this section to claim rights or contest your rights to work written entirely by you; rather, the intent is to exercise the right to control the distribution of derivative or collective works based on the Program. In addition, mere aggregation of another work not based on the Program with the Program (or with a work based on the Program) on a volume of a storage or distribution medium does not bring the other work under the scope of this License. 3.
However, parties who have received copies, or rights, from you under this License will not have their licenses terminated so long as such parties remain in full compliance. 5. You are not required to accept this License, since you have not signed it. However, nothing else grants you permission to modify or distribute the Program or its derivative works. These actions are prohibited by law if you do not accept this License.
NS-DPF8IP 8. If the distribution and/or use of the Program is restricted in certain countries either by patents or by copyrighted interfaces, the original copyright holder who places the Program under this License may add an explicit geographical distribution limitation excluding those countries, so that distribution is permitted only in or among countries not thus excluded. In such case, this License incorporates the limitation as if written in the body of this License. 9.
(INCLUDING BUT NOT LIMITED TO LOSS OF DATA OR DATA BEING RENDERED INACCURATE OR LOSSES SUSTAINED BY YOU OR THIRD PARTIES OR A FAILURE OF THE PROGRAM TO OPERATE WITH ANY OTHER PROGRAMS), EVEN IF SUCH HOLDER OR OTHER PARTY HAS BEEN ADVISED OF THE POSSIBILITY OF SUCH DAMAGES. END OF TERMS AND CONDITIONS www.insigniaproducts.
NS-DPF8IP 50 www.insigniaproducts.
6-month limited warranty Insignia Products (“Insignia”) warrants to you, the original purchaser of this new NS-DPF8IP (“Product”), that the Product shall be free of defects in the original manufacture of the material or workmanship for a period of 6 months from the date of your purchase of the Product (“Warranty Period”). This Product must be purchased from an authorized dealer of Insignia brand products and packaged with this warranty statement. This warranty does not cover refurbished Product.
NS-DPF8IP To obtain in-home warranty service for a television with a screen 25 inches or larger, call 1-888-BESTBUY. Call agents will diagnose and correct the issue over the phone or will have an Insignia-approved repair person dispatched to your home. Where is the warranty valid? This warranty is valid only to the original purchaser of the product in the United States, Canada, and Mexico.
THE WARRANTY PERIOD SET FORTH ABOVE AND NO WARRANTIES, WHETHER EXPRESS OR IMPLIED, WILL APPLY AFTER THE WARRANTY PERIOD. SOME STATES, PROVINCES AND JURISDICTIONS DO NOT ALLOW LIMITATIONS ON HOW LONG AN IMPLIED WARRANTY LASTS, SO THE ABOVE LIMITATION MAY NOT APPLY TO YOU. THIS WARRANTY GIVES YOU SPECIFIC LEGAL RIGHTS, AND YOU MAY ALSO HAVE OTHER RIGHTS, WHICH VARY FROM STATE TO STATE OR PROVINCE TO PROVINCE. Contact Insignia: For customer service please call 1-877-467-4289 www.insigniaproducts.
NS-DPF8IP 54 www.insigniaproducts.
www.insigniaproducts.
www.insigniaproducts.com Distributed by Best Buy Purchasing, LLC 7601 Penn Avenue South, Richfield, MN USA 55423-3645 © 2010 BBY Solutions, Inc. All rights reserved. INSIGNIA is a trademark of BBY Solutions, Inc. Registered in some countries. All other products and brand names are trademarks of their respective owners.