
User Manual

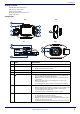
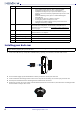
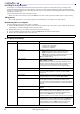
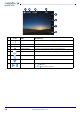
Table Of Contents

www.insigniaproducts.com
4
Installing your dash cam
1 Insert a MicroSD memory card (8 GB to 256 GB memory capacity) (not included) in the MicroSD card slot.
2 Clean and thoroughly dry the windshield area where you want to mount your dash cam.
3 Insert and slide the mounting bracket on the suction cup into the mounting slot on the top of your dash cam.
4 Peel the protective film from the mounting bracket and the dash cam lenses.
5 Position the suction cup on the center of the windshield, below the rear view mirror, then move the mounting bracket
switch clockwise until you hear a click.
8 OK button
• In live camera mode, press to start or stop recording.
• In playback mode, press to start or stop playback.
• In playback mode, press q to open a list of files on your
memory card. Select a file for playback, then press OK to start
playback.
• On the Formatting screen, press to start formatting the
microSD card.
• In menu mode, press to confirm a selection.
• In emergency video mode, press to exit.
•On the Restore Default Settings screen, press to restore all
settings to the factory settings.
9 MicroSD card slot Insert a MicroSD card (8 GB to 256 GB) (not included) in this slot to
store video files and photos. You must have a formatted card
inserted to record or playback. See Formatting a MicroSD memory
card on page 5.
10 Micro USB jack Connect a micro USB cable to this jack to power the dash cam or to
download files to a computer.
11 Suction cup mount Attach the dash cam to this mount.
12 Ventilation openings Let air into your dash cam to keep it cool. Do not block.
13 Front lens HD camera
14 Speaker Plays sound from your dash cam.
Note: Use a card with 8 GB to 256 GB of memory. We recommend using a card with the highest memory capacity available.
Higher memory capacity lets you record more.
#ITEM DESCRIPTION