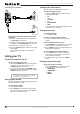
9" Combo DVD/LCD TV Ensemble DVD/ TV ACL de 19 po | Combo DVD/TV con Pantalla LCD de 19" NS-CL19C
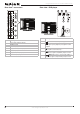
Insignia NS-CL19C 19" Combo DVD/LCD TV Contents Welcome. . . . . . . . . . . . . . . . . . . . . . . . . . . . . . . . . .3 Safety information. . . . . . . . . . . . . . . . . . . . . . . . . . .3 Features . . . . . . . . . . . . . . . . . . . . . . . . . . . . . . . . . .5 Accessories . . . . . . . . . . . . . . . . . . . . . . . . . . . . . . . . . 5 Front view . . . . . . . . . . . . . . . . . . . . . . . . . . . . . . . . . . 5 Rear view - connectors . . . . . . . . . . . . . . . . . . . . . . . .
Insignia NS-CL19C 19" Combo DVD/LCD TV The lightning flash with arrowhead symbol, within an equilateral triangle is intended to alert the user to the presence of uninsulated dangerous voltage within the product’s enclosure that may be of sufficient magnitude to constitute a risk of electric shock. The exclamation point within an equilateral triangle is intended to alert the user to the presence of important operating and maintenance (servicing) instructions in the literature accompanying the appliance.
Insignia NS-CL19C 19" Combo DVD/LCD TV • • • • • • • • • controls not described in these instructions can cause damage, which often requires extensive adjustment work by a qualified technician. • When the product has been dropped or damaged. • When the product displays an abnormal condition. Any noticeable abnormality in the product indicates that the product needs servicing.
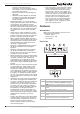
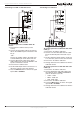
Insignia NS-CL19C 19" Combo DVD/LCD TV Rear view - connectors Rear view - DVD player 1 2 3 1 2 3 4 4 5 5 6 7 Item Description Item Description 1 1 RF (75 ohm) antenna connector 2 2 Headphone jack 3 PC audio input jack PLAY/PAUSE button. Press to begin playback, press again to pause playback. press again to resume playback. 4 Composite video/audio input jacks 3 5 S-Video input jack OPEN/CLOSE button. Press to open the disc tray. Press again to close the disc tray.
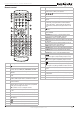
Insignia NS-CL19C 19" Combo DVD/LCD TV Remote control 20 21 22 23 24 1 2 3 4 5 Item Description 15 PLAY/ENTER button. Press to begin disc playback, or in menu mode to confirm your selections. 16 26 7 8 9 10 11 12 13 14 15 27 28 29 30 31 32 33 34 35 36 37 38 16 17 18 19 1 Description POWER button. Press to turn the TV on and off. 2 INPUT button. Press to select the AV signal input between TV, AV, S-VIDEO, PC, COMPONENT, and DVD. 3 SCAN button. Press to scan through memorized TV channels.
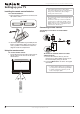
Insignia NS-CL19C 19" Combo DVD/LCD TV Setting up your TV Installing the remote control batteries To install the batteries: 1 Open the battery compartment on the back of the remote control. Note Objects between the remote control and the sensor may weaken the remote control’s IR signal. Range can be diminished by direct sunlight shining on the TV’s IR sensor. Cautions Do not expose the remote control to liquids, direct sunlight, or shock.
Insignia NS-CL19C 19" Combo DVD/LCD TV Connecting to a VCR or other AV source Connecting to a cable box 2 2 1 1 To connect your TV to a VCR or other AV source: 1 Turn off the TV and the VCR (or other source). 2 Connect an RCA video cable to the VCR (1), then to the VIDEO IN jack on the back of the TV (2). - OR Connect an S-Video cable to the VCR, then to the S-VIDEO jack on the back of the TV.
Insignia NS-CL19C 19" Combo DVD/LCD TV Changing the video source Connecting to a computer Your TV supports multiple video sources. 1 2 3 To select the video source: • Press the INPUT button to select from the following input modes: • TV • AV • S-VIDEO • PC • COMPONENT • DVD The name of the input source appears on the screen when it is selected. Changing channels To connect a computer video source to the VGA jacks: 1 Connect a VGA cable from the computer to the VGA IN port on the TV.
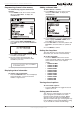
Insignia NS-CL19C 19" Combo DVD/LCD TV Programming channels into memory To automatically program channels into memory: 1 Press MENU on the TV or remote control, then press VOL+/VOL- to display the TUNING menu. Adding a channel label To add a label to a channel: 1 Press MENU on the TV or remote control, then press VOL+/VOL- to display the TUNING menu. 73. 12MHZ 73. 12MHZ 2 Press CH+/CH- to enter the TUNING menu and to highlight AUTO PROGRAM, then press VOL+ to enter the AUTO PROGRAM submenu.
Insignia NS-CL19C 19" Combo DVD/LCD TV Before you can select ratings, you need to set up a parental controls password. To set up a password: 1 Press MENU on the TV or remote control, then press VOL+/VOL- to display the FUNCTION menu. 2 Press CH+/CH- to enter the FUNCTION menu and to highlight PARENTAL, then press VOL+ to enter the PARENTAL submenu. The PASSWORD box opens. 3 Press the number buttons to enter 0000. The PARENTAL menu opens.
Insignia NS-CL19C 19" Combo DVD/LCD TV Rating Description OFF No controls 5 Press the and buttons to highlight menu items, and press PLAY/PAUSE on the player, or PLAY/ENTER on the remote, to select. 6 During playback: Canadian MPAA Ratings • Rating Description E Exempt - includes news, sports, documentaries, talk shows.
Insignia NS-CL19C 19" Combo DVD/LCD TV 2 To remove subtitles, press SUBTITLE until “Off” appears on the screen. Note Changing the subtitle language using this method only affects the DVD currently being played. When the DVD is removed or the player is turned off, the subtitle language reverts to the language setting specified through the DVD player’s main menu. Tip The subtitle language can also be changed through the DVD player’s main menu or the DVD’s own subtitle settings.
Insignia NS-CL19C 19" Combo DVD/LCD TV Using repeat play You can repeat tracks or the entire CD using repeat play. To use repeat play: 1 While the CD is playing, press REPEAT to scroll through the options: • Single - (play current track) • Repeat One - (repeat current track) • Repeat Folder - (repeat current folder) • Folder - (play current folder) 2 To stop repeat playback, do one of the following: • Press REPEAT until “Folder” disappears from the screen. • Press STOP twice. • Eject the CD.
Insignia NS-CL19C 19" Combo DVD/LCD TV On-screen menu PICTURE (Options may vary in different modes.) SOUND FUNCTION 16 On-screen menu Options CONTRAST–Increases the picture level to adjust the white areas of the picture. Decreases the picture level to adjust the black areas of the picture. (0 ~ 100) BRIGHTNESS–Increases the brightness to add more light to dark areas of the picture. Decreases the brightness to add more dark to light areas of the picture.
Insignia NS-CL19C 19" Combo DVD/LCD TV Troubleshooting Changing DVD settings On-screen menu GENERAL SETUP Please check the following items before asking for repair service: Options TV DISPLAY–Sets the aspect ratio of the TV display. • 4:3/PS (Pan and Scan - may be used with external TVs) Widescreen images are shown on the screen, but with some parts automatically cut off the ends.
Insignia NS-CL19C 19" Combo DVD/LCD TV Maintaining Cleaning discs Fingerprints and dust on the disc can cause poor picture quality and sound distortion. Before playing, clean the disc with a clean cloth. Wipe the disc from the center out. Handling and cleaning the TV/DVD Shipping the DVD/VCR Please save the original shipping carton and packing materials. If you need to ship the TV/ DVD, for maximum protection, re-pack the it as it was originally packed at the factory.
Insignia NS-CL19C 19" Combo DVD/LCD TV Discs Label Contents Dimension CD-R Audio or Video (moving picture) 12 cm CD-RW Audio or Video (moving picture) 12 cm CD+G Audio (picture) 12 cm Legal Notices Macrovision statement This product incorporates copyright protection technology that is protected by method claims of certain U.S. patents and other intellectual property rights owned by Macrovision Corporation and other rights owners.
Insignia NS-CL19C 19" Combo DVD/LCD TV • Products where the factory applied serial number 1 Year Limited Warranty has been altered or removed Insignia Products (“Insignia”) warrants to you, the original purchaser of this new 19” Combo DVD/LCD TV (“Product”), that the Product shall be free of defects in the original manufacture of the material or workmanship for a period of one (1) year from the date of your purchase of the Product (“Warranty Period”).
07 2007 2007