
Installation and Operation Manual


3.30.22 357-00060-01 Rev A © Inovonics, 2022 - www.inovonics.com 3
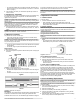
6. Use the ACC680 alarm clearance card or a quarter to turn the battery
door to line up the arrow on the battery door with the arrow under the
locked padlock icon.
7. Press the activation button to initalize the transmitter.
8. Clear the resulting alarm per section 3.2, “Clear an Alarm”.
Note: If the pendant is not activated after replacing the battery, the low
battery indication will not clear until the next check-in interval.
5 Storage Mode
Storage mode is an ultra low battery state designed to protect the life of the
internal battery for up to 24 months. The pendant is shipped from Inovonics
in storage mode. The device will also automatically go into storage mode at
the next check-in transmission time if the coin cell battery has been
removed.
Note: When the pendant is in storage mode, it will not transmit alarms or
check-in messages.
5.1 Extended Storage
If a pendant will not be deployed to an end user for more than 24 months
after the date of manufacture that appears on the device or device
packaging, you can extend the storage life for up to 24 additional months
by temporarily removing the device from storage mode and recharging the
internal battery for 72 hours before placing it back into storage mode.
To remove the device from storage mode, follow the steps in section 5.3.
After 72 hours, place the device back into storage mode by following the
steps in section 5.2.
5.2 Put the Device in Storage Mode
Note: The device should not be left in storage mode for more than 24
months. To achieve the labeled shelf life, devices should be stored in
ambient conditions of 69 to 73 degrees Fahrenheit.
To put the device in storage mode:
1. Use the ACC680 alarm clearance card or a quarter to turn the battery
door to the unlocked position.
2. Remove the battery from the battery compartment.
3. Press the activation button for at least one second.
• The red LED will flash and the pendant will vibrate briefly to indicate
that an alarm has been sent. This serves as confirmation that the
pendant is now in storage mode.
4. Seat the battery door over the empty battery chamber, and use the
ACC680 alarm clearance card or a quarter to turn the battery door to
line up the arrow on the battery door with the arrow under the locked
padlock icon.
5.3 Take the Device out of Storage Mode
To remove the device from storage mode:
1. Use the ACC680 alarm clearance card or a quarter to turn the battery
door to the unlocked padlock icon.
2. Remove the battery door.
3. Place a battery in the battery compartment, ensuring that the positive
terminal (+) faces up.
4. Seat the battery door over the battery so that the arrow on the battery
door is lined up with the unlocked padlock icon.
5. Use the ACC680 alarm clearance card or a quarter to turn the battery
door to line up the arrow on the battery door with the arrow under the
locked padlock icon.
6. Press the activation button for at least one second.
• The red LED will flash and the pendant will vibrate briefly to indicate
that an alarm has been sent. This serves as confirmation that the
pendant is no longer in storage mode.
• When the button is pressed, an alarm message and reset message
are sent to the head end application.
7. To cause the red LED to cease flashing, clear the alarm sent when you
activated the pendant per section 3.2, “Clear an Alarm”.
Note: If the alarm activation button is pressed when the device is not in
storage mode and the battery is not installed, the red LED will blink rapidly
for five seconds, the pendant will vibrate, and an alarm will be sent with a
missing battery message. The alarm clearance function is not enabled in
this situation.
6 Test the Transmitter
The transmitter should be tested after registration and then weekly to
ensure operation.
To test the transmitter:
1. Press the activation button for at least one second and ensure the red
transmit LED lights, the vibration activates, and the alarm is received by
the receiver or gateway.
2. Clear the alarm and ensure the red alarm transmission LED stops
flashing, and the blue alarm clear LED flashes.
7 Cleaning and Care
7.1 Cleaning
Caution: Cleaning should only be performed with the battery door in place
and in the locked position.
Cleaning should be performed by hand using a damp cloth and mild soap,
or disinfectant wipes designed for household use.
Do Not Use
The following products should never be used to clean the EN2221S-60
series pendants:
• Strong cleaning agents such as ammonia, bleach, alcohol or
quaternary disinfectant.
• Abrasive or powder cleansers.
• Alcohol-based hand sanitizers.
The following equipment and processes must never be used:
• Steam autoclave or commercial sterilization procedures using heat,
chemical, gas or radiation techniques.
• Dishwasher or washing machine.
• Soaking or suspending the pendant in water or other liquids.
Using any of these products or processes will damage the pendant.
7.2 Care
The plastic used for the pendant is durable and designed to withstand
exposure to most common substances including soaps and skin lotions.
However, there are some types of creams, lotions or sprays which contain
chemicals that may dull the finish or cause discoloration of the housing.
These include insect repellents containing DEET, sunscreen and topical
analgesics. If an end user is using these types of products, they should
avoid having the pendant come into direct contact with them.
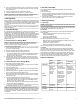
8 Device Indicators
Alarm
Activation
Alarm
Clearance
Low Battery
LED Color
Red Blue Yellow
LED
Pattern
Rapid blink
for five
seconds, and
then slow
blink until
alarm is
cleared
Using alarm
clearance card:
six quick flashes
Using button
pattern: two
quick flashes
after first three
button presses,
and then six
quick flashes
after the next
three button
presses
Blinks every
five seconds
until battery is
replaced or until
seven-day
countdown
expires
Vibration
Patterns
Vibrates for
one second
N/A N/A
See More
Sections 3.1
and 3.2
Section 3.2 Section 3.3