
User Manual


8/28/14 06536A_v9 © Inovonics, 2014 - www.inovonics.com 2
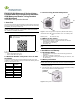
3. Use the ACC680 alarm clearance card or a quarter to turn the battery
door to line up the arrow on the battery door with the arrow under the
locked padlock icon.
Figure 3 Battery door in the locked position
4. Press the activation button.
• The green LED will light briefly, and then the red LED will flash and the
pendant will vibrate, indicating that an alarm has been sent.
5. Clear the alarm sent when you activated the pendant per section 3.2,
“Clear an Alarm”.
2.3 Register the Transmitter
The transmitter sends a check-in message to the receiver or gateway every
60 minutes for the purposes of supervision. The transmitter must be
registered and supervised.
Each transmitter has a unique factory-programmed identification number.
Refer to the receiver or gateway's installation instructions for details on
registering and setting up supervision.
6. When prompted by the receiver or gateway to reset transmitter, press
the activation button, and then clear the alarm per section 3.2, “Clear an
Alarm”.
Caution: The transmitter should be tested after registration to ensure
operation. See section 6, “Test the Transmitter”.
2.4 Wear the Transmitter
The pendant transmitter can be worn in three ways:
• Around the neck with the ACC681 neck lanyard, which is included
with the EN1221S-60N waterproof senior living pendant with neck
lanyard.
Caution: The neck lanyard included with the senior living pendant is
designed with a breakaway feature for user safety. Substitution of a
stronger cord or chain may result in injury to the wearer.
• On the arm with the ACC682 wristband, which comes attached on the
EN1221S-60W waterproof senior living pendant with wristband.
• On the belt, using the optional ACC683 belt loop attachment kit.
ACC681 Neck Lanyard
To attach the ACC681 neck lanyard:
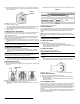
7. Secure the lanyard to the pendant’s attachment loop with a simple girth
hitch knot.
Figure 4 A simple girth hitch knot
8. Adjust the neck lanyard to the wearer’s neck size.
• Pull both slide adustment tabs on the lanyard to reduce the length of
the cord.
• Pull both sides of the lanyard cord to increase the length of the cord.
Figure 5 Adjust the neck lanyard
ACC682 Wristband
The ACC682 wristband comes attached to the EN1221S-60W waterproof
senior living pendant with wristband. The wristband is a standard 16mm
width, allowing for easy replacement with the wristband of the user’s
choice.
Note: Replacement wristbands must be of a similar thickness to the
provided 16mm wristband. Metal expansion bands will not attach reliably to
the device.
3 Operate the Transmitter
3.1 Send an Alarm
To send an alarm:
1. Press the activation button for at least one second.
• When activated, the pendant will vibrate briefly and the red
transmission LED will blink rapidly for the first five seconds, and then
slowly until the alarm is cleared.
3.2 Clear an Alarm
There are two ways to clear an alarm:
Using the Alarm Clearance Card
Note: The ACC680 alarm clearance card is an optional accessory sold
separately.
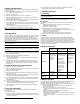
1. Place the dot on the ACC680 alarm clearance card over the activation
button.
• The red transmission LED will cease flashing and the blue alarm clear
LED will flash quickly six times to indicate the alarm has cleared.
Figure 6 Place the alarm clearance card over the activation button
Using a Button Pattern
1. Press the activation button three times, quickly.
2. When the blue LED flashes twice, press the activation button three
more times, quickly.
• The blue alarm clear LED will flash quickly six times to indicate the
alarm has cleared.
3.3 Low Battery Alert
When a low battery is detected, the transmitter will send a low battery alert,
and start a seven day countdown. If the battery has not been replaced
within two days from when the low battery alert message was sent, the
yellow low battery LED on the bottom of the pendant will begin to blink, and
will not stop until the battery is replaced, or the seven day countdown
expires.
If the seven day countdown expires without the battery being changed, the
pendant will go into storage mode. For more about storage mode, see
section 5, “Storage Mode”.
Locked
position
Cord
Attachment
loop
Tighten
Loosen