
Owner Manual


8
The Urbania is manufactured with “Ozone Ready” plumbing. If you want to install an ozone generatorr, follow the instructions below.
Installation should be done when the spa is empty.
OZONE GENERATOR INSTALLATION
OZONE GENERATOR INSTALLATION - VS300 Spa Pack
Overview
After installation and with the spa running on low speed, there will be a slight bluish glow coming
from the small hole on the bottom of the ozonator. This should be checked every 3-6 months to
ensure that the bulb is still working and you are producing ozone. There will also be a bubble mist
entering the spa water through the ozone return fitting located in the foot well of the spa. Ensure that
there is a bubble mist.
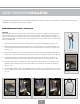
1. Remove the access door from the end of the spa with the external LED lights. (see fig. 1.0)
2. Remove the plumbing manifold that connects the pump discharge to the heater manifold. The
unions will be tight together and it is best to use an oil filter wrench to loosen and tighten them.
(see fig. 1.1)
3. Remove the insulation from the left side of the spa cavity to expose the plumbing manifold. The
insulation is not itchy and you will be putting it back in after you install the injector. (see fig. 1.2)
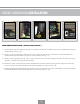
4. Cut the water line at the end and on the right side of the manifold. Cut it about 2” above the
white barb. Install the two hose clamps from the hardware kit onto the tubing. (see fig. 1.3)
5. Lubricate each end of the injector with olive oil. Ensure the FLOW arrow on the injector points
upwards. Insert the top first then secure the clamp over the barb. Do the same at the bottom.
(see fig. 1.4)
6. Form a double Hartford loop in the tubing about 4” in diameter. Secure it with wire ties. Cut 6” off
one end. Blow into the check valve and install it with the air flow travel towards the 6” end. (see
fig. 1.5)
Oil filter wr en ch
figure 1.0
figure 1.1 figure 1.2 figure 1.3 figure 1.4 figure 1.5