
Brochure


Installation tips
Refer to the following prohibited locations before installing the detector:
A. Avoid installing in places where there is a lot of oil smoke, corners, cabinets and other places where the air is not easy to circulate;
B. Can not be too close to the gas stove, avoid high temperature and high humidity environment, such as places with a lot of water vapor;
C. Avoid large airflow in the detection area, such as near the exhaust fan;
D. Avoid installing in direct sunlight or locations with strong electromagnetic interference.
Refer to the following prohibited installation times before installing the detector:
A. Installation is prohibited when the house has not been painted and renovated, or the house has been renovated and the overall ventilation is less than 5
days. Please follow the schematic diagram recommended in the manual for installation. Try to find the best installation location and ensure that the
product is in the effective monitoring range; during decoration, do not remove the product blister cover; open doors and windows to maintain indoor ventilation.
If possible, the detector can be temporarily removed, otherwise the effect of the gas released in the room decoration on the detector is destructive and
cannot be recovered, which may lead to false alarms or failure of the product.
B. It is forbidden to install wood furniture in the house, or purchase new wood furniture, when its comprehensive ventilation is less than 3 days;
C. Use or spray: insecticides (mosquitoes, cockroaches, etc.), air cleaners, glue, hairspray, etc., and installation is prohibited if the overall ventilation is less
than 4 hours. Avoid contacting the detector with silicone vapor, formaldehyde, toluene, acetic acid, and hydrogen sulfide. They are mainly produced in
home decoration and horizontal materials, such as: adhesives, wall coatings, hairspray, silicone rubber, etc. These can cause sensor poisoning, irrecover
able damage, and cause detector false alarms or failures. High concentrations of alcohol vapor will cause false alarms; and long-term exposure to these
gases will cause the detector sensitivity to drift and cannot be recovered.
D. Before use, the detector can be turned on only after sufficient ventilation time. Otherwise, it may cause false alarms, or cause product false alarms,
failures and other problems.
Operation and adjustment
1. Self-check status:
Turn on the power of the detector, the green indicator light flashes, and the detector enters the preheating state, which lasts for 30 seconds in the shortest time
and 10 minutes in the longest time; The indicator light is always on, the preheating is over, and the detector enters the normal monitoring working state. If the
status does not match the above, it needs to be returned to the factory for processing.
Note: The gas sensor of the detector is not stable at the beginning of power-on. In order to ensure the accurate detection of the detector, it is very important
to preheat the gas sensor. During the warm-up period, it is forbidden to perform a gas test on the detector. The detector does not respond to key processing
and alarm events.
2. Sensitivity optional:
Open the product shell and adjust the sensitivity through the jump cap, which is divided into three levels of L/M/H (low, normal, and high), the jump cap is inserted
with "L" jump cap, it is low sensitivity; plug in "M" Jumping cap, for normal sensitivity (factory default); plug in "H" jumping cap, for high sensitivity.
3. Normal work:
The detector continuously collects, analyzes and judges the air in the use environment. If the gas leakage reaches the alarm concentration of the detector,
the buzzer of the detector will emit an alarm sound of "di~di~di~", and the red indicator light will flash quickly and an alarm message will be issued.When an
alarm occurs, press the "self-check/silence" button , the detector will enter the silencing state, the buzzer will stop beeping, but the red indicator light still
keeps flashing, indicating that there is still an alarm. If the alarm is lifted at this time, the red indicator light will go out and enter the normal monitoring state.
4. Test operation:
When the detector is monitoring normally, short press the "self-test/silence" button, the detector will emit a loud "di~di~di~" alarm tone, and the red and yellow
indicator lights will flash rapidly at the same time.
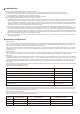
5. Indicator light and buzzer indication information :
6. Record reading:
Use the special reading device specified by the national standard, and insert the connecting line on the main board (the cover needs to be opened) to the
4P pin terminal with G\U\T\R silk screen printed on it to read all the history currently stored by the detector. Record. The reading device can provide the
detector's alarm, self-test status, and information review functions.
7. Solving the internal fault of the detector:
When encountering an internal failure of the detector, please turn off the power first, then reconnect the power, and the detector will enter the self-checking
state. If the fault is still not resolved, please contact the dealer in time.
status description Instructions
The red and yellow indicator lights are flashing, accompanied by the rapid alarm sound of the
buzzer "Di~Di~Di~"
The green indicator is always on, the red and yellow indicators are off, and the buzzer is silent.
The green light flashes, the buzzer does not sound.
The yellow indicator light is always on, and the buzzer beeps for a long time.
Yellow indicator light flashes, buzzer does not sound.
The red indicator light flashes, accompanied by the rapid alarm sound of the buzzer "Di~Di~Di~".
Short press the "self-test/-
silence" button
normal work
Detector is warming up
Detector failure
Sensor life expired
gas leak
fault phenomenon
Light does not shine No power or not plugged in Check the power supply
flashing yellow light sensor element failure Replacing the sensor element
Detector false positives
Item No
1
2
3 Poor ventilation or gas sensor failure Ventilation/replacement of gas sensors
Cause Analysis Method of exclusion