Form MHD56391 PARTS, OPERATION AND MAINTENANCE MANUAL for MANUAL CHAIN HOIST MODELS SMB005 SMB010 1/2 ton 1 ton SMB030 3 ton SMB015 1-1/2 ton SMB020 2 ton SMB050 5 ton (Dwg. MHP0831) Unless otherwise noted, tons in this manual are metric tons. 1 metric ton = 2,200 lb. READ THIS MANUAL BEFORE USING THESE PRODUCTS. This manual contains important safety, installation, operation and maintenance information.
1 SAFETY INFORMATION This manual provides important information for all personnel involved with the safe installation, operation and proper maintenance of this product. Even if you feel you are familiar with this or similar equipment, you should read this manual before operating the product. Signal-person - person who observes load and relays directions to winch operator.
12. When using two hoists to suspend one load, select two hoists each having a rated capacity equal to or more than the load. This provides adequate safety in the event of a sudden load shift. 13. Never place your hand inside the throat area of a hook. 14. Never use the hoist load chain as a sling. 15. Never operate a hoist when the load is not centered under the hook. Do not “side pull” or “yard.” 16. Never operate a hoist with twisted, kinked, “capsized” or damaged load chain. 17.
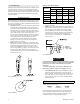
Lift (Hoist load chain/ hook travel) Hoist Capacity Series SMB= Silver Series Manual Chain Hoist 005 = 1/2 metric ton / 500 kg 010 = 1 metric ton / 1,000 kg 015 = 1-1/2 metric ton / 1,500 kg 020 = 2 metric ton / 2,000 kg 030 = 3 metric ton / 3,000 kg 050 = 5 metric ton / 5,000 kg 10 = 10 ft (3 m) (standard) 15 = 15 ft (5 m) 20 = 20 ft (6 m) XX = Specify length F = Hoist without load chain Hand Chain (Hand chain is 2 ft less than lift) Slip Clutch 8 = 8 feet (standard) V = Slip Clutch (10 foot lift
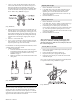
Initial Operating Checks NOTICE CAUTION • Ensure the hoist top hook is properly installed on the support member and the hook latch is engaged. Operate the hoist with a test load (10% of rated capacity) by raising and lowering this load several times. Verify the brake operation by lowering the same load to check load does not slip when lowering stops.
Load Chain Reports Records should be maintained documenting the condition of load chain removed from service as part of a long-range load chain inspection program. Accurate records will establish a relationship between visual observations noted during frequent inspections and the actual condition of the load chain as determined by periodic inspection methods. Frequent Inspection Manual Chain Hoists should be inspected at the beginning of each shift.
1. 2. 3. 4. 5. 6. 7. 8. 9. Fasteners. Check rivets, capscrews, nuts, cotter pins and other fasteners on hooks and hoist body. Replace if missing and tighten or secure if loose. All Components. Inspect for wear, damage, distortion, deformation and cleanliness. If external evidence indicates the need, disassemble. Check gears, shafts, bearings, sheaves, chain guides, springs and covers. Replace worn or damaged parts. Clean, lubricate and reassemble. Hooks. Inspect hooks for cracks.
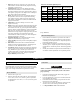
TROUBLESHOOTING This section provides basic troubleshooting information. Specific causes to problems are best identified by thorough inspections performed by personnel instructed in safety, operation and maintenance of this equipment. The chart below provides a brief guide to common hoist symptoms, probable causes and remedies. SYMPTOM Hoist will not operate. CAUSE Hoist is overloaded. Slip clutch not adjusted. Load continues to move when hoist is stopped. Brake is slipping. Hoist is overloaded.
3. Using a “C” link, join the old load chain to the new load chain. (If the old load chain was installed correctly, the “C” link assures end link of new load chain will be correctly reeved through the hoist.) Be sure welds of “standing” links on the new load chain are facing away from the hoist load sheave. Refer to Dwg. MHP0042 on page 9. Adjusting with a Weight 1. 2. 3. 4. Remove handwheel cover from hoist. Using hand chain ‘hoist up’ the load. If load does not rise tighten nut 1/4 turn.
Slip Clutch Disassembly General Disassembly The following instructions provide the necessary information to disassemble, inspect, repair, and assemble the hoist. Parts drawings of the hoist assembly are provided in the parts section. If a hoist is being completely disassembled for any reason, follow the order of the topics as they are presented. It is recommended that all maintenance work on the hoist be performed on a bench. In the process of disassembling the hoist, observe the following: 1.
Repair Brake End Assembly Actual repairs are limited to the removal of small burrs and other minor surface imperfections from gears and shafts. Use a fine stone or emery cloth for this work. 1. Worn or damaged parts must be replaced. Refer to the applicable parts listing for specific replacement parts information. 2. Inspect all remaining parts for evidence of damage. Replace or repair any part which is in questionable condition.
Hand Chain Adjustment or Replacement 2. 3. CAUTION • When cutting the weld side of a hand chain link, do not cut or nick the opposite side. A damaged link must be replaced to prevent premature failure. A falling hand chain can cause injury. 4. 5. 6. If the hand chain is being replaced, disconnect it at the “C” link and carefully remove the hand chain. When replacing a hand chain, cut a length 2 times the required hand chain drop plus about one foot (305 mm).
SERVICE NOTES MHD56391 - Edition 2 13
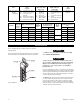
10 76 1 35 77 70 27 4 82 24 3 67 30 87 5 31 82 17 28 68 23 6 5 ton 18 17 7 5 67 8 18 63 9 64 31 65 68 15 34 33 20 66 21 91 26 25 17 32 19 22 92 67 30 31 18 12 4 62 68 45 38 67 70 41 70 39 18 31 37 68 36 93 40 43 37 46 47 34 11 5 ton 11 10 5 ton 2 44 HOIST ASSEMBLY PARTS DRAWING (Dwg.
HOIST ASSEMBLY PARTS LIST ITEM DESCRIPTION NO. OF PART PART NO. QTY.
HOIST ASSEMBLY PARTS LIST CONTINUED ITEM DESCRIPTION NO. OF PART QTY. TOTAL PART NO.
ACCESSORIES AND KITS PARTS LIST DESCRIPTION OF PART PART NO. Chain Lubricant LUBRI-LINK-GREEN® PARTS ORDERING INFORMATION The use of other than genuine Ingersoll Rand replacement parts may adversely affect the safe operation of this product. When ordering replacement parts, please specify the following: 1. Complete model number and lot number as it appears on the capacity label. 2. Part number(s) and part description(s) as shown in this manual. 3. Quantity required.
DECLARATION OF CONFORMITY DECLARATION OF CONFORMITY (CS) PROHLÁŠENÍ O SHODċ (DA) FABRIKATIONSERKLÆRING (DE) KONFORMITÄTSERKLÄRUNG (EL) ƩƬƯƻƶƬ ƧƱƧīƱƻƵƭƶƬƶ (ES) DECLARACIÓN DE CONFORMIDAD (FI) VAKUUTUS NORMIEN TÄYTTÄMISESTÄ (FR) CERTIFICAT DE CONFORMITÉ (HU) MEGFELELėSÉGI NYILATKOZAT (IT) DICHIARAZIONE DI CONFORMITÀ (NL) SCHRIFTELIJKE VERKLARING VAN CONFORMITEIT (NO) KONFORMITETSERKLÆRING (PT) DECLARAÇÃO DE CONFORMIDADE (PL) DEKLARACJA ZGODNOĝCI (SK) PREHLÁSENIE O ZHODE (SL) IZJAVA O SKLADNOSTI (SV) FÖRSÄ
WARRANTY LIMITED WARRANTY Ingersoll Rand Company warrants to the original user its Hoists and Winches (Products) to be free of defects in material and workmanship for a period of one year from the date of purchase. Ingersoll Rand will repair, without cost, any Product found to be defective, including parts and labor charges, or at its option, will replace such Products or refund the purchase price less a reasonable allowance for depreciation, in exchange for the Product.
www.irtools.