
User's Manual


Page 6
4. Installing the Terminal
Installing the Terminal via PSTN
Before switching the power on at the mains socket, plug the pre-connected telephone cable into your
telephone wall socket.
Position the terminal in a clear area where the display can be read and the keypad and card swipe are
easily accessible. Position the PINpad where it will be easily accessible to the cardholder.
Ensure you have your Merchant ID to hand. This can be found on your Welcome Letter.
Now switch the power on at the mains supply and Installation will begin.
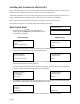
Terminal Installation
Plug in Phone Line
and then press ENTER
Key in the Number used
to get an Outside Line
and then press ENTER
Does the Tel. Line have
Call Waiting or 1571 ?
Enter=YES Clear=NO
<Software Version>
<Serial Number>
Ready
<Software Version>
<Serial Number>
Ready
<Software Version>
<Serial Number>
Ready
<Software Version>
<Serial Number>
Ready
Dial Prex Required ?
Enter=YES Clear=NO
Terminal Displays
PINpad Displays
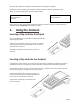
Ensure the telephone line is connected to the telephone IN port on the terminal’s connector box
and to the wall socket and then press the GREEN button.
If your terminal it is connected to a Switchboard/PABX select YES by pressing the GREEN button. Key in
the number used to get an outside line (often 9)and then press the GREEN button.
Dual Comms Mode
Connection Method
Telephone (PPP)
LOCAL NETWORK
If however your terminal is connected via a direct line and you selected NO by pressing the YELLOW
button.
If your telephone line has Call Waiting or 1571 press the GREEN button.
You should use the arrows to highlight the
required option and then press ENTER to select Tel-
ephone (PPP) for PSTN.
1.
2.