
User's Manual


Page 33
At the READY prompt press the MENU button twice.
Using the key highlight the Select Function
option and then press the GREEN button.
Enter the number 40 and then press the GREEN button.
Swipe your Supervisor Card or enter your Supervisor
code. If you want to proceed to the Waiter Setup menu,
press the GREEN button. If not, press the YELLOW button
to return to READY prompt.
27. Waiter ID’s (Restaurants)
Default Waiter 0
A default waiter, Waiter 0: SHARED will be created automatically by the terminal. This can be used if
you do not want to create individual Waiter ID’s.
All Sale transactions with gratuity will add tips/gratuities to this waiter without the need for a waiter ID
to be entered during transaction processing.
The total of all ‘Waiter 0’ tips/gratuities will be printed as part of the Waiter Totals Report showing the
total value of tips/gratuities performed.
Adding an Individual Waiter ID
Your terminal can be configured to recognise individual Waiter ID’s. These make it possible to
identify which staff member has dealt with the transaction. The Waiter ID will be printed on the receipt.
1.
2.
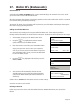
SYSTEM MENU
Totals
Print Function Codes
Select Function
EFT
Waiter Setup
Enter = YES Clear = NO
3.
ADD Waiter Code nn
Key in Waiter’s Name
aaaaaaaaaaaa
and then press ENTER
WAITER SETUP
Delete
Print
Add
4.
5.
Change Name
Delete All
Create Defaults
Using the key, highlight Add and then press the
GREEN button.
Your terminal will automatically allocate the next
available Waiter ID. Key in the text/name description
and press the GREEN button (this field is limited to 10
characters).
(Please refer to Section 5 for instructions on how to Enter Letters).
A total of 99 waiters can be added.
Deleting a Waiter ID
Follow steps one to five above and select Delete from the WAITER SETUP menu, now proceed as
follows: