
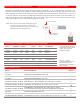
Installation Manual

PROBLEM WHAT TO DO
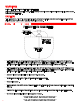
TROUBLESHOOTING
• Disconnect power and check element with ohm meter for continuity. If there
is any continuity across the bulb, the problem is in the wiring/controls.
• Check that there is proper voltage to the heater.
• Check that the control/switch is working.
• Check main power circuit breaker.
• Check wiring for a loose connection or burned wire.
Heater does not work
• A 240V element connected to 110V or 208V will warm, but not glow orange
or generate sufficient heat for typical applications (Matching your voltage is
extremely important). If element is visibly orange, but there is insufficient
heat, refer to the areas covered with respect to conditions and mounting
heights.
• Replace or clean dirty or non-reflective reflectors.
Low heat output Heater
Heater does not glow
• Check supply voltage to confirm it matches voltage of heating element.
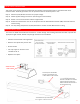
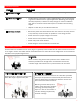
Unless heaters are installed over 12’ (3.7m) high, it is generally recommended that all radiant heaters be mounted
on an angle to assure that radiant warmth is distributed from the sides rather than straight down on the heads and
shoulders
of
the people being warmed.
When outdoors, hang heater under protective roof or weather cover
whenever possible. Even though heater is all-weather
construction,
it will last longer and look better if it is protected from rain and snow.
Angle fixture 30º to 60º from horizontal face
down. Best angle is approximately 45º.
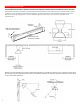
Install fixture to heat the area from the “cold side” if possible.
This helps compensate for increased body heat losses due to
exposure. Warm floors reradiate heat. Warmer air rises from
floor. Some heat reflects from floor.
Mounting a heater directly over a
table or other obstruction will block
the energy, primarily heating the
object. It is best to move heater to
the side, allowing complete body
and floor coverage.
LOCATION SUGGESTIONS
OUTDOORS
INSTALLATION DIRECTION
RECOMMENDED POSITIONING
7