
Reference Manual


6
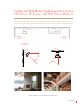
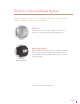
Mounting Options
Applicable for Infratech’s W-Series and WD-Series 39" Heaters
Installation Types
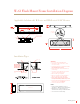
W-39 Flush Mount Frame Installation Diagram
ACCESSIBLE JUNCTION
BOX MOUNTED OUTSIDE
OF SEALED POCKET
FIXTURE WHIP w/ CONNECTORS:
CONNECTION MADE AT HEATER
JUNCTION BOX
5/8" TYPE X DRYWALL SUBFLOOR
MIN. 2 X 8
NOTE:HEATER BODY
MUST BE FLUSH WITH
OR LOWER THAN THE
FINISHED CEILING.
SUB-FLOOR
1/2" CLEARANCE
FROM VENTILATION
HOLES
HEATER BODY FLUSH
w/ FINISHED CEILING
HEATER BODY FLUSH
w/FLANGE
BACKSIDE VIEW
5/8" TYPE X
DRYWALL CAP
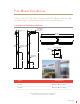
WARNINGS:
• Do not use Surface Mount Brackets.
• This Frame is ONLY to be used on a flat
non-sloped celling.
• Heater Body must face straight down and be
flush with the finished ceiling.
• Frame and Heater cannot be Installed on a
pitched angle.
• Accessible Junction Box must be installed
outside of sealed drywall pocket.
• Must use 5/8" type "X" drywall.
• Must use supplied 4 foot Hi-Temp Fixture
Whip and Hi-Temp Ceramic Wire Nuts.
• Please contact factory for longer length
Hi-Temp Fixture Whips available for purchase.
• Discard Surface Mounting Brackets provided
with Heater and use “L” Brackets.
• Use Licensed Electrician ONLY.
NOTES:
• Heater suspends (Gravity) by resting on
adjustable “L” Brackets in flush mount fixture.
• Mounting holes on Surface Flange to be
determined and drilled by Contractor/Installer.
• Coil excess flex into heater cavity.
47.00
ADJUSTABLE
“L” BRACKETS
43.00
11.75
5/8" TYPE X DRYWALL
LINE AND SEAL ENTIRE CAVITY
(5 SIDES)