
Reference Manual


Flush Mount Installation
n
Frames are compatible with the W-Series and
WD-Series fitting 33", 39", or 61-1/4" heaters.
n
Select an area with a flat ceiling and minimum
2" x 8" studs, where the heater can face straight
down when recessed (see warning below).
n
The Flush Mount Application requires a 5-sided
5/8" drywall lined pocket with a (1) hour fire rating.
n
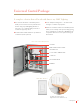
Infratech’s Flush Mount Frames are furnished
with a 4' Whip and Hi-Temp Wire Nuts for proper
installation.
n
The 4' Whip connects to the Heater (inside of the
pocket) to a junction box outside of the pocket.
n
The provided Hi-Temp Wire Nuts are used to
connect the Whip (elbow side) to the J-Box on the
back of the heater.
n
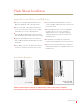
The Flush Mount Frames can be installed with
the edges exposed, or can be covered by a
drywall, plaster, stucco or tongue-and-groove
ceiling treatment. (½" clearance required from
ventilation holes).
n
Heater/Frame must always be permanently
installed and hard wired by a licensed electrician.
n
All electrical connections must be in compliance
with the National Electric Code (NEC) and or local
building codes.
2
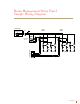
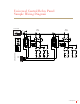
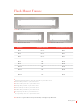
Mounting Options
Applicable for the W-Series and WD-Series
Installation Examples
WARNING: FRAME AND HEATERS CANNOT BE FLUSH MOUNTED ON A SLOPED/PITCHED CEILING. FLUSH MOUNT
APPLICATIONS MUST ALWAYS BE INSTALLED WITH HEATERS HORIZONTAL TO THE FLOOR ON A FLAT, NON-SLOPED CEILING.
STUCCO OVER FRAME
MATCHING COLORED FRAME
OVER FINISHED CEILING
TONGUE-AND-GROOVE
OVER COLORED FRAME