
Operation Manual


Preface
– 7 –
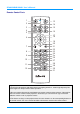
ITEM LABEL DESCRIPTION SEE PAGE:
1.
Power ON Turn the projector on.
9
2.
LED indicator Only lights when the remote keys are pressed.
3.
Display Mode Choose a suitable preset mode for usage environment.
4.
Contrast Display the Contrast setting bar and use the right and left keys to adjust.
5.
Brightness
Display the Brightness setting bar and use the right and left keys to ad-
just.
6.
Left cursor
When the OSD is displayed, this button navigates to the
left.
13
7.
Menu Display the OSD menu.
8.
Auto image Re-synchronize the PC image.
9.
Overscan Adjust overscan.
10.
SHARP
Display the Sharpness setting bar and use the right and left keys to ad-
just the image sharpness levels (video sources only).
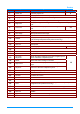
11.
Source-1 HDMI1
12.
Source-4 Component
13.
Power OFF Turn the projector off.
9
14.
Source Navigate and select sources..
15.
Info Display projector information.
16.
Mute Mute the audio.
17.
Up cursor /
Keystone+
When the OSD is displayed, this button navigates up the
menu. Otherwise it adjusts keystone.
18.
Select Enter and confirm settings in the OSD.
19.
Right cursor
When the OSD is displayed, this button navigates to the
right.
20.
Down cursor /
Keystone -
When the OSD is displayed, this button navigates down
the menu. Otherwise it adjusts keystone.
13
21.
Resize Change the image aspect ratio.
22.
Blank Blank the screen.
23.
Volume+ Increase the volume.
24.
Freeze Freeze video.
25.
Volume- Decrease the volume.
26.
TINT
Display the Tint setting bar and use the right and left keys to adjust the
image tint levels (video sources only).
27.
2Dto3D Turn On/Off 2D to 3D function (HDMI1 and HDMI2 only).
28.
Source-3 VGA
29.
Source-2 HDMI2
30.
Light Turn the remote control backlight on or off.
31.
Source-5 Video