
User's Guide

18
5.9.2 Automatic/Manual correction
After entering the advanced settings, short press menu button to enter the A/M
correction options, short press power button/photo button to select A or M, where A
means automatic shutter correction, and M means manual shutter correction.
5.9.3 Unit selection
After entering the advanced settings, short press menu button to enter the unit
selection option, short press power button/photo button to select m or yd.
5.9.4 Calibration type
After entering the advanced settings, short press menu button to enter the calibration
type option, short press power button/photo button to select A, B, C, respectively
corresponding to 100m, 200m, 300m in the calibration distance selection, the current
calibration type can be displayed at the reticle position adjustment interface.
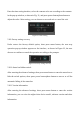
5.9.5 Compass calibration
This operation is to calibrate the electronic compass. When the location of use is
changed or the surrounding magnetic field environment changes greatly, this
operation is needed to ensure the accuracy of the electronic compass.
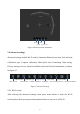
Enter the compass calibration interface, and rotate the night-vision more than 360°
along the arrows in X, Y and Z directions according to the icon on the screen to
calibrate the compass, as shown in Figure 18.
Automatically exit the compass calibration interface after 30 seconds (the button
cannot be operated to exit).
Note: a) The rotation direction is not limited b) The rotation sequence of X, Y and Z is not