PFN640+ Multi-functional night-vision monocular user guide
Publisher’s note The user manual details the multi-purpose use method and matters needing attention of multi-purpose night-vision monocular, to ensure the personal safety of operators, as well as to the utility of monocular goggles reasonable and effective maintenance and use, at the same time in order to ensure the normal use of multi-purpose night-vision monocular lifetime, the company requires the user to before using multi-purpose night-vision monocular,The following code of practice must be carefully r
Contents 目录 Ⅰ Overview ...................................................................................................................................... 1 Ⅱ Performance¶meter .............................................................................................................. 2 2.1 Performance ........................................................................................................................ 2 2.2 Parameter ..............................................................
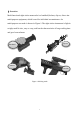
Ⅰ Overview Multi-functional night-vision monocular is a handheld, helmet, clip-on, direct aim multi-purpose equipment, which is used for individual reconnaissance. Its multi-purpose use mode is shown in Figure 1.The night-vision instrument is light in weight, small in size, easy to carry, and has the characteristics of long working time and good concealment.
Ⅱ Performance¶meter 2.1 Performance 1) Support 4 modes of use: handheld, helmet, clip-on and direct aim; 2) High performance 12μm VOx detectors provide clear images at night and in harsh weather conditions; 3)0.
2.2 Parameter Table 1 Technical parameters Detector 640×512/12μm Lens f25mm/F1.0 Human recognition 600m Vehicle recognition 1070m NETD ≤40mK Frame rate 50Hz FOV 17.2°×13.7° Focusing range 1m-∞ Eyepiece 14x Diopter -4~4 Exit pupil distance 15mm-35mm Polarity White、Black、Red、Color Battery life ≥4h Battery type 1×18650/1×18700 Display 1024×768,0.
Ⅲ Configuration sn 1 2 3 4 5 6 7 8 9 10 11 12 13 14 Table 2 Configuration Name Multi-functional night-vision monocuclar Charger Data cable Eyepiece cup(Clip-on ) Scope mounts Soldier bag Cleanning cloth Helmet mount Helmet adapter Battery cover Allen Wrench 2.5 Allen Wrench 3.
Ⅳ Operation 4.1 Warning Do not direct the multi-functional night-vision monocular into the sun, carbon dioxide lasers, welding machines and other high-intensity radiation sources; The time interval between two switching machines should be greater than 20 seconds; Multi-functional night-vision monocular uses precise optical instruments and electronic equipment sensitive to static electricity.
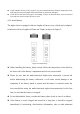
Check whether the lens, body, eyepiece, keys and vibration absorber bracket components of the multi-purpose monocular night-vision instrument are obviously damaged; Check the infrared lens and eyepiece for smudge. If there are obvious stains, wipe the infrared lens with lens cloth to ensure the lens is clean. 4.3.2 Install battery The night-vision is equipped with two lengths of battery cover, which can be adapted to batteries with two lengths of 65mm and 70mm, as shown in Figure 2.
phenomena are found. Note: The night-vision cannot be shut down when using USB external power supply.USB external power supply 5V DC. 4.3.3 Install accessories Install eyepiece cup:It is recommended to use a longer eyepiece cup for handheld mode and direct aim mode, and a shorter eyepiece cup for helmet mode and Clip-on mode.
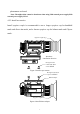
Install scope mounts:The direct aim mode and Clip-on mode need to install the scope mounts, the installation direction is shown in Figure 3. Install helmet adapter:The helmet adapter needs to be installed in helmet mode, as shown in Figure 4. 4.4 Keys function The key diagram and function description of the multi-functional night-vision monocular are shown in Table 3.
button in the power-on state to select shutdown according to the pop-up prompt, as shown in Figure 6. Figure 5 Boot screen Figure 6 Shutdown prompt 4.6 Diopter adjustment The night-vision has a diopter adjustment of -4~+4. When the interface icon or text on the screen is blurred, it means that the eyepiece view does not match the user's view. Please adjust diopter. After startup, slowly turn the eyepiece adjustment ring until the icon in the picture is clearly visible.
4.8 Shortcut keys Shortcut key operations are carried out in the main interface, as shown in Figure 7. If the status bar is automatically hidden, press any key to activate the status bar. After activation, you can perform shortcut operations.
recording, a recording icon will appear on the left side of the screen and the recording will be timed; All files will be saved to the built-in memory card. Note: a) Photographic operation can still be carried out during the video recording. b) The maximum length of a single video file is 5 minutes. When the recording time exceeds 5 minutes, it will be automatically recorded into the next new file. 4.
Image brightness, Contrast, Screen brightness, File management, Reticle setting and Advanced settings, as shown in Figure 10. Working mode Image polarity E-zoom Contrast Image brightness File management Advanced settings Screen brightness Reticle setting Figure 10 Menu 5.1 Working mode Select the option of working mode, short press power button / photo button to switch Handheld / Direct aim and Clip-On, when the button is facing down, it will automatically enter the helmet mode.
advanced settings provide Wi-Fi switch, manual/automatic correction, and factory reset functions, such as Shown in Figure 12. The recommended riflescope for Clip-on mode is 1x-4x. Figure 12 Clip-on mode 5.2 E-zoom The night-vision supports 1-4X image amplification to increase visual magnification. Select the E-zoom option, short press menu button to confirm this option, short press power button / photo button to realize 1×, 2×, 4× switch.(where 1 times is the default multiple of boot). 5.
5.4 Image brightness Select the image brightness option, short press menu button to confirm this option, short press power button / photo button to adjust the image brightness, the image brightness is 0-9 level switch.(Level 5 is the factory default brightness, and the image brightness set in the last shutdown should be maintained after the machine is turned on.) 5.
The file management interface consists of four areas: file list, file thumbnail, memory situation and operation menu. List Preview Current operate Delete Next Previous Play Memory Exit Image Video Figure 13 File management 5.8 Reticle settings Under the Differentiation Settings menu, there are four function Settings to switch: Reticle style, Reticle brightness, Reticle color , Calibration distance and Reticle position, as shown in Fig. 14.
Figure 15 7 Reticle styles 5.8.2 Reticle brightness The reticle brightness is 0-6 switch, a total of 7 kinds of partition brightness adjustable. 5.8.3 Reticle color The reticle color has color of white, black, red, and green, a total of 4 kinds of reticle colors can be selected. 5.8.4 Calibration distance The night-vision defaults with 100m, 200m and 300m calibration distances, corresponding to three types of calibration: A, B, and C.
X axis Exit Y axis Cancel exit Figure 16 Reticle position adjustment 5.9 Advanced settings Advanced settings include Wi-Fi switch, Automatic/Manual correction, Unit selection, Calibration type, Compass calibration, Blind pixel clear, Formatting, Time setting, Factory setting recovery, Status bar hidden switch and Version information, as shown in Figure 17.
5.9.2 Automatic/Manual correction After entering the advanced settings, short press menu button to enter the A/M correction options, short press power button/photo button to select A or M, where A means automatic shutter correction, and M means manual shutter correction. 5.9.3 Unit selection After entering the advanced settings, short press menu button to enter the unit selection option, short press power button/photo button to select m or yd. 5.9.
limited, but the operation must be completed in all three directions c) The rotation axis is centered on the night-vision itself d) The rotation range must be greater than 360° Figure 18 Compass calibration 5.9.6 Blind pixel clear If the night-vision does not conform to the scene of the bright spots or dark spots (collectively referred to as blind elements), it can be operated to clear the blind pixel. Under the option of blind pixel clear, press menu button to enter blind pixel clear.
X axis move Y axis move Cancel Clear Exit without saving Save and exit Figure 19 Blind pixel clear 5.9.7 Formatting This function only formats the memory card. After entering the formatting menu, a prompt box of whether to format will pop up, as shown in Fig. 20. Short press power button/photo button to select whether to format the memory card. Note: Formatting operation is not reversible, please be careful.Do not perform other operations during formatting. Figure 20 Formatting 5.9.
Enter the time setting interface, select the contents to be set according to the contents in the pop-up window, as shown in Fig. 21, and press power button/photo button to adjust the value. After setting, you can choose to save and exit or cancel the exit. Figure 21 Time setting 5.9.
Ⅵ Wi-Fi function The night-vision has a Wi-Fi module, and it can be connected to external devices (computers, phones) via Wi-Fi. When Wi-Fi is turned on, search for the Wi-Fi named "INFRARE_XXXX" on the mobile device, where XXXX is a 4-digit serial code consisting of numbers and letters. Select the Wi-Fi, enter the password and connect, the initial password is 123456789. After the Wi-Fi connection is successful, the night-vision can be controlled through the APP on the mobile device.
Ⅶ APP introduction You can go to the website (www.xinfared. com) or search the infiray outdoor in the app store to download and install the app, or scan the QR code below for free download, as shown in Figure 23. Figure 23 APP download After the installation is complete, open the Infiray Outdoor app; If your device is connected to a mobile device, please turn on the mobile data network on the mobile device.
Ⅷ Maintenance After the observation is completed or the target is not observed for a long time after starting the machine, the machine should be shut down in time to extend the effective use time of the night-vision. lens is an important optical component. During installation and use, avoid oil stains and various chemical substances to contaminate and damage the lens surface. After use, please cover the lens cap.
Ⅸ Trouble removal If there is a problem with the equipment, check and fix it according to the suggestions in the list.If the problem is not mentioned in the list, or cannot be repaired by yourself, please contact the supplier for repair. Fault Reason Solution Monocular can’t open. Low power Charge USB line damage Change another use line External power no available. The image is not clear, vertical lines appear, or the background is uneven.
7. FCC Warning § 15.19 Labeling requirements. This device complies with part 15 of the FCC Rules. Operation is subject to the following two conditions: (1) This device may not cause harmful interference, and (2) this device must accept any interference received, including interference that may cause undesired operation. § 15.21 Information to user. Any Changes or modifications not expressly approved by the party responsible for compliance could void the user's authority to operate the equipment. § 15.