Cabin Series Operating Manual V1.0 InfiRay Technologies Co., Ltd.
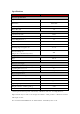
Specifications Model CAD25 Detector Specifications Type Resolution CMOS 1440×1080 Pixel size, μm 4 Frame Rate, Hz 50 Optical Specifications Objective Lens, mm FOV 22/25 13.1º×9.9º Visual Magnification, × 2-8 Digital Zoom, × 1-4 Eye Relief, mm 30 Focusing range of eyepiece, D Detection Range, m (Target size: 1.7m×0.
I. Package Contents Cabin series digital night vision device IBP-2 battery pack Wrist strap Type-C USB cable Strap Power adapter Portable bag Lens cleaning cloth IBC-2 power adapter Adapter clamp II. Description: The Cabin series digital night vision device is a multi-function night vision device for outdoor use. It is both a handhold device for independent usage and a night vision rear attachment.
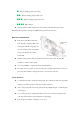
PIP (picture-in-picture) function; Convenient operation interface IV. Device Composition 1. Lens cap 2. Laser pointer 3. Fill-in Light 4. Type-C interface 5. Power button 6. Up button (zoom button) 7. M button (menu button) 8. Down button (camera button) 9. Eye cup 10. Eyepiece focusing ring 11. Power indicator 12. Objective lens focus knob 13. Battery pack V.
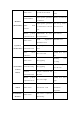
Open/Exit the main Home screen Open the shortcut menu menu Adjust specific parameters Exit the shortcut menu Shortcut Menu of a function M button (Menu button) Main Adjust specific parameters Save and go back to of a function/Go to the next the home screen menu interface level Reticle position adjustment screen Enable/disable the cursor Save and exit movement function Visual amplification Turn PIP on/off Home screen adjustment: 2×-8× Up button (Zoom button) Shortcut Navigate upwards with
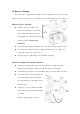
VI. Battery Charging The Cabin series is supplied with a quickly removable 18650 Li-ion battery pack, which enables the device to be used for up to 8 hours. The battery should be fully charged before first use. Method 1: Type C Charging Align the orange vertical line on the battery pack with that next to the battery holder of the Cabin night vision device, and install the battery pack into the battery holder.
- ●◐ - ●●◐ - ●●●◐ - ●●●● Battery charging capacity 25%-50% Battery charging capacity 50%-75% Battery charging capacity 75%-99% Fully charged After the battery is fully charged, remove the battery pack from the battery holder. Note: This battery holder can charge two IBP-2 battery packs at the same time.
The device should be charged at a temperature of 0°C to +45°C. Otherwise, the battery life will be significantly reduced.
battery icon will be changed to the USB icon , and the power indicator is green; When the external power supply is disconnected, the Cabin series device will automatically switch to the battery pack and will not shut down. VIII. Installation and Usage Operation WARNING! The lens must not be pointed at any sources of intense radiation energy, such as laser-emitting devices or the sun. This may damage the electronic components in the device.
disconnect it from the power source. Otherwise, the data cannot be saved. Before the countdown ends, you can release the button to return to the home screen. IX. Digital Zoom The Cabin series supports 1-4 times magnification of images to increase visual magnification.
right corner of the display, with the time format as 00:00:00 (hours: minutes: seconds); During recording, you can also take a photo by pressing the Down button (8); Stop the recording and save the video by pressing and holding the Down button (8); The videos and images taken are saved in the built-in memory space. Note: - The menu can still be operated during video recording; - The images taken and the videos recorded are stored in the built-in memory card in the format of IMG_HHMMSS_XXX.
"Infiray" , and then double-click to open the device name "Internal Storage" to access the memory; Open the memory file, and there are different folders named after time in the format of xxxx (year) xx (month) xx (day) in it; The folders store the videos/images captured on the corresponding days. To copy or delete files or folders, select accordingly. XII.
- Image mode: After selecting this option, press the Menu button (7) to circularly switch among image modes in a sequence of day mode and night mode; - Screen brightness: After selecting this option, press the Menu button (7) to adjust the screen brightness among 1-5 levels; - Image sharpness: After selecting this option, press the Menu button (7) to adjust the image sharpness among 1-5 levels; - Image contrast: After selecting this option, press the Menu button (7) to adjust the image contrast among
During the continuous operation of the thermal imager, when exiting from the main menu, the cursor remains at the position before exiting. When you restart the thermal imager and go to the main menu for the first time, the cursor stays at the first menu option.
Compensation Press the Up button (6) or Down button (8) to select the "Exposure Compensation" function option; Press M button (7) to go to the "Exposure Compensation" function option screen; Press the Up button (6) or Down button (8) to adjust the exposure compensation value as required; After finishing moving the cursor, press the M button (7) to save the setting and exit. The icon stops blinking.
rightward or downward. One press moves a pixel and pressing and holding for one time moves the red cursor by 10 pixels each time; After finishing moving the cursor, press the M button (7) to save the setting and exit.
Press and hold the M button (7) to open the main menu; Press the Up button (6) or Down button (8) to select "Settings".
accordingly. Selecting the language Press the M button (7) to open the secondary menu of "Settings"; Press the Up button (6) or Down button (8) to select "Language"; Language Press the M button (7) to open the secondary menu for language selection; Press the Up button (6) or Down button (8) to switch between English and simplified Chinese; Press the M button (7) to confirm and save the selection, and return to the menu screen.
factory reset; Press the Up button (6) or Down button (8) to select "Yes" for restoring factory settings or "No" for canceling the operation; Press the M button (7) to confirm the selection; If "Yes" is selected, the device will shut down automatically; If "No" is selected, the operation is canceled and returns to the upper menu. After the Factory Reset is selected, the following functions will be restored to default settings: - Image Mode: Day - Optical Magnification: 2.
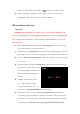
"Info"; Press the M button (7) to query the relevant information about the current device; Press the M button (7) or the Power button (5) to exit and return to the upper menu. XV. PIP Function Picture-in-Picture (PIP) provides a floating window independent of the full screen. This window shows part of the image which is enlarged to 2× in a certain area centered on the reticle of the main image. On the home screen, press and hold the Up button (6) to enable or disable PIP.
- Deer: 1.7m high - Wild boar: 0.9m high - Hare: 0.2m high Adjust the device to move the target in the center of the display area. Press or press and hold the Up button (6) to enlarge or Down button (8) to reduce the width between the measurement lines, so that the target is completely between the measurement lines.
After the Wi-Fi of the device is enabled, search for the Wi-Fi signal with the name "CAD22(CAD25)_XXXXXX" on the mobile device, among which XXXXXX is a 6-bit serial number composed of digits and letters. Select the Wi-Fi, enter the password and connect. The initial password is 12345678; After Wi-Fi access, you can control the device via the mobile app. Setting Wi-Fi name and password The Cabin series allows you to change the name and password of the device Wi-Fi in the app.
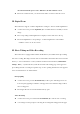
About InfiRay Outdoor You can download and install the InfiRay Outdoor app on the official website (www. infirayoutdoor.com) or an app store. Alternatively, you can scan the QR code below to download it for free. After installing the app, open it. If your device has been connected to a mobile device, enable mobile data on it. After the device accesses the Internet, an update prompt will be displayed automatically. Click Now to download the latest version immediately or click Later.
Status of the rechargeable battery (fully charged in advance) and electrical contact (no salinization or oxidation). XXIV. Product Maintenance The device must be maintained in the following ways at least twice each year: Wipe the surface of metal and plastic parts to clear off dust and dirt by using a cotton cloth. Apply silicone grease if required. Use non-greasy organic solvent to wash the electric contact and slot of the battery. Check the glass surface of the eyepiece and lens.
The display is not bright Images are too dark Adjust the display brightness enough Rotate the lens focus knob to adjust the The lens is not focused focus.
FCC Caution. § 15.19 Labeling requirements. This device complies with part 15 of the FCC Rules. Operation is subject to the following two conditions: (1) This device may not cause harmful interference, and (2) this device must accept any interference received, including interference that may cause undesired operation. § 15.21 Information to user. Any Changes or modifications not expressly approved by the party responsible for compliance could void the user's authority to operate the equipment. § 15.
Body-Support Operation This device was tested for typical body-support operations. To comply with RF exposure requirements, a minimum separation distance of 0cm must be maintained between the user’s body and the handset, including the antenna. Third-party belt-clips, holsters, and similar accessories used by this device should not contain any metallic components. Body-worn accessories that do not meet these requirements may not comply with RF exposure requirements and should be avoided.