KEILER PRO 2020 BEDIENUNGSANLEITUNG OPERATING MANUAL MANUAL DE INSTRUCCIONES MODE D‘EMPLOI INSTRUKCJA OBSŁUGI
FASZINATION WÄRMEBILDTECHNIK Liebe Kunden, aus unserem Anspruch heraus, Ihnen stets technisch und qualitativ führende Wärmebildoptiken anzubieten, finden Sie in unserem neuen Programm Produkte mit modernster Technologie und herausragenden Leistungsparametern.
INHALT D E 01. TECHNISCHE DATEN ������������������������� 4 02. LIEFERUMFANG �����������������������������4 03. EINZELTEILE UND BEDIENELEMENTE �����������4 04. SICHERHEITSHINWEISE �����������������������5 05. BETRIEB �����������������������������������5 06. EINSCHALTEN �����������������������������6 07. AUSSCHALTEN �����������������������������6 08. STANDBY-MODUS ��������������������������6 09. DIOPTRIENEINSTELLUNG ��������������������6 10. UMSCHALTEN DES BILDMODUS ��������������6 11.
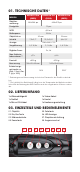
01. TECHNISCHE DATEN* KEILER-35 Pro (2020) MODELL Detektor auflösung KEILER-36 Pro (2020) 384×288 px KEILER-50 Pro (2020) 640×512 px Pixelgröße 12 µm NETD ≤50 mk Bildfrequenz 50 Hz Objektivlinse 35 mm Sehfeld 7,5×5,7° 50 mm 12,5×10,0° Anzeige 8,8×7,0° 1280×960 LCOS Vergrößerung 3,5-14,0x 2,1-8,4x Digitaler Zoom 3,0-12,0x 2x, 4x Max.
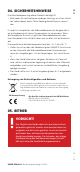
04. SICHERHEITSHINWEISE Die Nennladespannung dieses Produkts beträgt 5V. > Bitte laden Sie rechtzeitig bei niedriger Leistung, um einen Verlust der Lebensdauer durch Tiefentladung der Batterie zu vermeiden. D E Es wird nicht empfohlen, die Wärmebildkamera für längere Zeit in einer Umgebung mit hohen Temperaturen zu verwenden. Wenn die Temperatur zu hoch ist, geht die Wärmebildkamera in den Hochtemperatur-Schutzstatus über und schaltet sich automatisch ab.
06. EINSCHALTEN > Schalten Sie das Gerät ein, indem Sie die Ein/Aus-Taste lang drücken. Der Startbildschirm erscheint und nach einigen Sekunden wird das Infrarotbild angezeigt. Die LED-Anzeige leuchtet kontinuierlich grün. 07. AUSSCHALTEN > Schalten Sie das Gerät durch langes Drücken der Ein/Aus-Taste aus. Auf dem Bildschirm erscheint ein Countdown, der von 3 bis 1 zählt, danach schaltet sich das Gerät aus. > Wenn Sie die Ein/Aus-Taste während des Countdowns loslassen, bleibt das Gerät eingeschaltet. 08.
11. DIGITALER ZOOM > Drücken Sie kurz die Zoomtaste, um das Bild von 1× auf 2x, 4× und zurück auf 1x zu zoomen. D E 12. AUFNEHMEN VON BILDERN UND VIDEOS > Drücken Sie im normalen Anzeigemodus kurz auf die Fototaste, um ein Foto aufzunehmen, und drücken Sie die Fototaste lange, um eine Videoaufnahme zu starten. Die Fotoaufnahme wird durch ein Kamerasymbol in der Anzeige bestätigt. Während der Videoaufnahme wird die Aufnahmezeit in der oberen rechten Ecke des Bildschirms angezeigt.
SYMBOL Bedeutung Bildoptimierung WLAN Bildhelligkeit Warm-/Kaltweiß-Darstellung Kalibrierungsmodus Video-Ausgang Bild-in-Bild (PIP) Weiter Digitaler Kompass Bewegungssensor Auto-Standby Kompasskalibrierung Systeminformation Wiederherstellung der Werkseinstellungen Zum Haupmenü zurückkehren 16. UC-BILDOPTIMIERUNG Modelle Keiler 36 Pro und Keiler 50 Pro: Je nach Grad der Luftfeuchtigkeit können Sie mit dem UC-Modus (Ultra Clear) das Bild optimieren.
Nachdem die WiFi-Verbindung erfolgreich hergestellt wurde, kann die auf dem Telefon installierte App für Steuerungsfunktionen wie Foto- und Videoaufnahmen verwendet werden. > Näheres zur App finden Sie unter: https://liemke.shop/medien D E 18. HELLIGKEITSEINSTELLUNG > Drücken Sie im Menüpunkt „Bildhelligkeit“ die Zoomtaste, um die vier Helligkeitsstufen von 1 bis 4 und wieder zurück zu 1 zu ändern. 19.
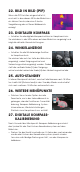
22. BILD IN BILD (PIP) Wenn die PIP-Funktion eingeschaltet ist, erscheint in der oberen Mitte des Bildschirms ein kleines Fenster, das eine 2-fache Vergrößerung des mittleren Bildbereichs anzeigt. 23. DIGITALER KOMPASS > Schalten Sie die digitale Kompassfunktion im Hauptmenü ein. Sie wird dann in der Mitte oben auf dem Bildschirm angezeigt und zeigt die aktuelle Himmelsrichtung an. 24. WINKELANZEIGE > Schalten Sie die Winkelanzeige-Funktion im Hauptmenü ein.
28. SYSTEMINFORMATIONEN > Drücken Sie kurz die Zoomtaste, um die Systeminformationen (Versions informationen und Produktcode) anzuzeigen. D E 29. ZURÜCKSETZEN AUF WERKSEINSTELLUNGEN Achtung! Die im Gerät gespeicherten Bild- und Videodateien werden beim Zurücksetzen gelöscht! > Drücken Sie kurz auf die Zoomtaste für die Werkseinstellung. > Drücken Sie kurz die Bildmodustaste oder die Fototaste, um eine Ja- oder Nein-Auswahl zu treffen, und drücken Sie dann kurz die Zoomtaste zur Bestätigung.
31. BILD- UND VIDEOÜBERTRAGUNG Nachdem Sie das Gerät über ein USB-Kabel an Ihren Computer angeschlossen und das Gerät eingeschaltet haben, fungiert es als Massenspeichergerät, sodass Sie Ihre Bilder und Videos auf dem Computer ansehen, kopieren oder löschen können. 32. TECHNISCHE PRÜFUNG Vor der Inbetriebnahme des Geräts empfehlen wir eine technische Prüfung. > Prüfen Sie dabei den äußeren Zustand des Geräts: Das Gehäuse darf keine Risse aufweisen.
Fehlfunktion Möglicher Grund Die Wärmebildkamera Der Akku ist komplett lässt sich nicht einschal entladen. ten. Kann nicht über eine externe Stromquelle betrieben werden. Korrektur Laden Sie den Akku. D E USB-Kabel ist beschädigt USB-Kabel ersetzen. Die externe Stromquelle ist entladen Das Bild ist unscharf, mit Kalibrierung erforderlich senkrechten Linien und unebenem Hintergrund. Laden Sie die externe Stromquelle (falls erforderlich).
FASCINATION THERMAL IMAGING Dear Customer, Based on our commitment to always offer you thermal imaging optics with leading performance and quality, you will find state-ofthe-art products with outstanding performance parameters in our new range of products.
CONTENT E N 01. SPECIFICATIONS ��������������������������� 16 02. PACKAGE CONTENTS ���������������������� 16 03. COMPONENTS AND CONTROLS ������������� 16 04. SAFETY ���������������������������������� 17 05. OPERATION ������������������������������� 17 06. SWITCH ON ������������������������������� 17 07. SWITCH OFF ������������������������������� 18 08. STANDBY MODE �������������������������� 18 09. DIOPTER ADJUSTMENT ���������������������� 18 10. SWITCHING THE IMAGE MODE ������������� 18 11.
01. SPECIFICATIONS* KEILER-35 Pro (2020) MODELL Detector Resolution KEILER-36 Pro (2020) 384×288 px KEILER-50 Pro (2020) 640×512 px Pixel Size 12 µm NETD ≤50 mk Frame Rate 50 Hz Objective Lens 35 mm Field of View 7.5×5.7° 50 mm 12.5×10.0° Display 8.8×7.0° 1280×960 LCOS Magnification 3.5-14,0x 2.1-8.4x Digital Zoom 3.0-12.0x 2x, 4x Max. Battery Life** ≤7 h Weight Dimensions ≤6 h <450 g <520 g 186×65×64 mm 202×65×64 mm Detection Ran ge, m (Target: 1.7m×0.
04. SAFETY E The rated charging voltage of this product is 5V. > Please charge in time when power is low, so as to avoid service life loss caused by battery over-discharge. N The thermal imager is not recommended to be used in high temperature environment for a long time, if the temperature is too high, the imager will enter the high-temperature protection state, and automatically shut down. The recommended temperature for use −10°C to +50°C.
07. SWITCH OFF > Switch off the device by long pressing the Power button. A count-down timer appears in the display, counting from 3 to 1 and then the device switches off. If you release the Power button during the countdown, the device will remain switched on. 08. STANDBY MODE To increase the battery life, the device can be put into standby mode. > When the device is on, short press the Power button to enter the standby mode. The green indicator light will flash every 2 seconds.
12. CAPTURING IMAGES AND VIDEOS E N > In the normal display mode, short press the Photo button to take a photo and long-press to start video recording. Photo capture is confirmed by a camera symbol in the display. During video recording, the recording time is displayed in the upper-right corner of the screen. > Long press the Photo button again to quit recording and save the video. Photo capture by short-pressing the Photo button is also possible during video capture. 13.
ICON Function Image optimization WIFI Display brightness Warm / cold white display Calibration mode Video-Out Picture-in-Picture (PIP) More Digital compass Motion sensor Auto standby Compass calibration System information Factory reset Return to the Main Menu 16. UC IMAGE OPTIMIZATION Models Keiler 36 Pro and Keiler 50 Pro: Depending on the level of humidity, you can use the UC (Ultra Clear) mode to optimize the image. If the humidity is high, it is recommended to activate the UC mode.
18. BRIGHTNESS ADJUSTMENT > In the menu item “brightness setting”, press the Zoom button to change the four brightness levels from 1 to 4 and back to 1. E N 19. WARM / COLD WHITE DISPLAY Here you can choose between two options for displaying images. This option is not available in the false color mode. 20. VIDEO OUT > Turn on the analog video recording function in the main menu. The video output icon will appear in the lower-right corner of the image.
24. ANGLE INDICATOR > Turn on the angle indicator function in the main menu. It will be displayed on the right side of the screen, showing inclination angle and cant angle. Among them, the vertical scale (V) represents the inclination angle, while the horizontal scale (H) represents the cant angle. 25. AUTO STANDBY If this menu item is activated, the camera switches to standby mode after 15 minutes of inactivity (idle mode) and switches off automatically after a further 15 minutes. 26.
29. FACTORY RESET Attention! The image and video files stored in the device are deleted when the device is reset! E N > Short press the Zoom button for factory reset. > Short press the Image Mode button or Photo button to make a yes or no choice, then short press the Zoom button for a confirmation. After reset to factory settings, the image of the device will revert to white hot mode, brightness will be level 2, calibration mode will be S. 30.
32. TECHNICAL INSPECTION A technical inspection of the device is recommended before use. > Check the external appearance of the device. There should be no cracks in the casing. > Check the condition of the lens and eyepiece: There should be no cracks, greasy spots, dirt or other deposits. > Check the condition of the rechargeable battery: This should be charged. > Check the electrical contracts: There should be no presence of salts or oxidation. 33.
Malfunction Possible reason Correction Thermal imager does not power up. Battery completely discharged Charge the battery Does not operate from external power source. USB cable damaged Replace USB cable External power source discharged Charge external power source (if necessary). Image is unclear, with vertical lines and uneven background Calibration required Perform image calibration according to Section 21 „Sensor Calibration Mode“ of the Manual. The image is too dark.
FASCINACIÓN TERMOGRAFÍA Estimados clientes, basándonos en nuestra filosofía de ofrecerles constantemente óptica termográfica de calidad y tecnología punteras, en nuestro nuevo programa incluimos productos con la más moderna tecnología y extraordinarias prestaciones. Con la promesa de nuestro servicio técnico de devolverle su óptica en diez días laborables en caso de que nos la remita, así como una garantía de hasta tres años sobre nuestros productos, agradecemos su confianza y le deseamos una buena caza.
ÍNDICE E S 01. DATOS TÉCNICOS ������������������������ 28 02. VOLUMEN DE SUMINISTRO ����������������� 28 03. PIEZAS Y ELEMENTOS DE CONTROL ���������� 28 04. I NSTRUCCIONES DE SEGURIDAD ������������� 29 05. FUNCIONAMIENTO ������������������������� 29 06. ENCENDIDO ������������������������������� 29 07. APAGADO ������������������������������� 30 08. MODO DE ESPERA ������������������������� 30 09. AJUSTE DE DIOPTRÍAS ���������������������� 30 10. CAMBIO DEL MODO DE PANTALLA ���������� 30 11.
01.
04. INSTRUCCIONES DE SEGURIDAD La tensión de carga nominal de este producto es de 5V. > Si baja el rendimiento, cargue a tiempo para evitar que se reduzca la vida útil debido a una descarga profunda de la batería. E S No se recomienda emplear la cámara termográfica durante mucho tiempo en un entorno con temperaturas elevadas. Si la temperatura es demasiado alta, la cámara termográfica pasa al estado de protección contra la sobretemperatura y se apaga automáticamente.
07. APAGADO > Apague el aparato pulsando prolongadamente el botón de encendido/apagado. En la pantalla aparece una cuenta atrás de 3 a 1, tras la cual se apaga el aparato. > Si suelta el botón de encendido/apagado durante la cuenta atrás, el aparato sigue encendido. 08. MODO DE ESPERA Para aumentar el tiempo de funcionamiento de la batería, el aparato puede pasar al modo en espera. > Con el aparato encendido, pulse brevemente el botón de encendido/apagado para acceder al modo en espera.
12. GRABACIÓN DE IMÁGENES Y VÍDEOS E S > En el modo de visualización normal, pulse brevemente el botón de fotografía para hacer una foto y púlselo prolongadamente para iniciar una grabación de vídeo. El símbolo de una cámara en el indicador confirma la foto. Durante la grabación de vídeo, el tiempo de grabación aparece en la esquina superior derecha de la pantalla. > Vuelva a pulsar prolongadamente el botón de fotografía para finalizar la grabación y guardar el vídeo.
SÍMBOLO Significado Optimización de imagen WLAN (Wi-Fi) Brillo de la pantalla Presentación blanco cálido / frío Modo de calibración Salida de vídeo Imagen en la imagen (PIP) Continuar Brújula digital Sensor de movimiento Espera automática Calibración de la brújula Información del sistema Restablecimiento de los ajustes de fábrica Volver al menú principal 16.
17. FUNCIÓN WI-FI > Active la función Wi-Fi en el menú principal y conecte el teléfono con la señal de Wi-Fi. El nombre de la red Wi-Fi es «Keiler_xxxxxx», la contraseña es 12345678. Tras establecer la conexión por Wi-Fi con éxito, se puede usar la APP instalada en el teléfono para las funciones de control como fotografías y grabaciones de vídeo. > Encontrará más información sobre la APP en: https://liemke. shop/medien E S 18.
22. IMAGEN EN LA IMAGEN (PIP) Cuando la función PIP está activada, en la parte superior central de la pantalla aparece una ventanita que indica que el área central de la imagen se ha aumentado al doble. 23. BRÚJULA DIGITAL > Active la función de la brújula digital en el menú principal. Aparece centrada en la parte superior de la pantalla y muestra la orientación actual de la brújula. 24. INDICACIÓN DEL ÁNGULO > Active la función de indicación del ángulo en el menú principal.
28. INFORMACIÓN DEL SISTEMA > Pulse brevemente el botón de zoom para visualizar información del sistema (información de la versión y código de producto). E S 29. RESTABLECIMIENTO DE LOS AJUSTES DE FÁBRICA ¡Atención! Los archivos de imagen y video almacenados en el dispositivo se eliminan cuando se reinicia el dispositivo. > Pulse brevemente el botón de zoom para el ajuste de fábrica.
32. INSPECCIÓN TÉCNICA Antes de poner el aparato en funcionamiento, recomendamos una inspección técnica. > Compruebe el estado exterior del aparato: La carcasa no debe presentar grietas. > Compruebe el estado del objetivo y del ocular: No debe presentar grietas, manchas de grasa, suciedad ni otros depósitos. > Compruebe el estado de la batería: Se debe cargar, si es necesario. > Compruebe todos los contactos eléctricos: No debe haber sales ni puntos oxidados. 33.
Mal funcionamiento Posible causa La cámara termográfi ca no se enciende. La batería está comple- Cargue la batería. tamente agotada. Corrección No se puede operar a El cable USB está través de una fuente de dañado corriente externa. La fuente de corriente externa está agotada Cambiar el cable USB. La imagen no es nítida, presenta líneas vertica les y un fondo irregular.
FASCINATION TECHNOLOGIE D’IMAGERIE THERMIQUE Chers clients, Conformément à notre volonté de toujours vous offrir des optiques d'imagerie thermique de pointe sur le plan technique et qualitatif, vous trouverez dans notre nouvelle gamme des produits dotés d'une technologie des plus avancées et de paramètres de performance exceptionnels.
SOMMAIRE F R 01. CARACTÉRISTIQUES TECHNIQUES ������������ 40 02. CONTENU DE LA LIVRAISON ���������������� 40 03. PIÈCES DÉTACHÉES ET ÉLÉMENTS DE COMMANDE ���������������� 40 04. C ONSIGNES DE SÉCURITÉ ������������������� 41 05. UTILISATION ������������������������������� 41 06. MISE EN MARCHE ������������������������� 42 07. MISE À L’ARRÊT ���������������������������� 42 08. MODE VEILLE ���������������������������� 42 09. RÉGLAGE DIOPTRIQUE �������������������� 42 10.
01. CARACTÉRISTIQUES TECHNIQUES* KEILER-35 Pro (2020) MODÈLE Résolution du détecteur KEILER-36 Pro (2020) 384×288 px KEILER-50 Pro (2020) 640×512 px Taille des pixels 12 µm NETD ≤50 mk Fréquence de balayage 50 Hz Lentille d’objectif 35 mm Champ de vision 7,5×5,7° 50 mm 12,5×10,0° Affichage 8,8×7,0° 1280×960 LCOS Grossissement 3,5-14,0x 2,1-8,4x Zoom numérique Durée de vie max.
04. CONSIGNES DE SÉCURITÉ La tension de charge nominale du présent produit est de 5V. > Veuillez recharger à temps lorsque la puissance est faible pour éviter une perte de la durée de vie due à une décharge profonde de la batterie. F R Il n’est pas recommandé d’utiliser la caméra d’imagerie thermique pendant une longue période dans un environnement ayant des températures élevées.
06. MISE EN MARCHE > Mettre l’appareil en marche en appuyant longtemps sur la touche Marche/Arrêt. L’écran d’accueil apparaît et après quelques secondes, l’image infrarouge s’affiche. Le voyant à LED s'allume en vert en permanence. 07. MISE À L’ARRÊT > Mettre l’appareil à l’arrêt en appuyant longtemps sur la touche Marche/Arrêt. Sur l’écran, un compte à rebours apparaît, qui décompte de 3 à 1, après quoi l’appareil se met à l’arrêt.
11. ZOOM NUMÉRIQUE > Appuyer brièvement sur la touche de Zoom pour zoomer l’image de 1× à 2x, 4× et revenir à 1x. F R 12. ENREGISTREMENT D’ IMAGES ET DE VIDÉOS > Appuyer brièvement sur la touche Photo en mode d’affichage normal pour enregistrer une photo et appuyer sur la touche Photo pour lancer un enregistrement vidéo. Une icône d'appareil photo apparaît à l'écran pour confirmer que la photo a été prise.
SYMBOLE Signification Optimisation d‘image WLAN Luminosité Affichage blanc chaud / froid Mode d’étalonnage Sortie vidéo Image dans l’image (PIP) Continuer Boussole numérique Capteur de mouvement Mode veille automatique Etalonnage de la boussole Informations sur le système Restauration des paramètres d’usine Retour au menu principal 16.
Une fois la connexion WiFi installée avec succès, il est possible d’utiliser l’APP installée sur le téléphone pour les fonctions de commande telles que les enregistrements photo et vidéo. > Vous trouverez plus d'informations sur l’APP à l'adresse suivante : https://liemke.shop/medien F R 18. RÉGLAGE DE LA LUMINOSITÉ > Dans l’élément de menu « Luminosité de l’écran », appuyer sur la touche Zoom pour changer les quatre niveaux de luminosité de 1 à 4 et les ramener à 1. 19.
22. IMAGE DANS L'IMAGE (PIP) Si la fonction PIP est activée, une petite fenêtre affichant un double grossissement de la zone centrale de l’image apparaît dans le milieu supérieur de l’écran. 23. BOUSSOLE NUMÉRIQUE > Activer la fonction Boussole numérique dans le menu principal. Elle est ensuite affichée au centre, en haut de l'écran, et indique la direction actuelle du ciel. 24. INDICATEUR D’ANGLE > Activer la fonction Indicateur d’angle dans le menu principal.
28. INFORMATIONS SYSTÈME > Appuyer brièvement sur la touche Zoom pour afficher les informations système (informations sur la version et code produit). F R 29. RÉTABLISSEMENT DES PARAMÈTRES D'USINE Attention! Les fichiers image et vidéo stockés dans l‘appareil sont supprimés lors de la réinitialisation de l‘appareil! > Appuyer brièvement sur la touche Zoom pour les paramètres d’usine.
32. CONTRÔLE TECHNIQUE Avant de mettre l'appareil en service, nous recommandons d’effectuer un contrôle technique. > Vérifiez l'état extérieur de l'appareil : Le boîtier ne doit présenter aucune fissure. > Vérifier l’état de l’objectif et de l’oculaire : Il ne doit présenter aucune fissure, tache de graisse, saleté ou autre dépôt. > Vérifier l’état de la batterie : Celle-ci doit être chargée si nécessaire. > Vérifier tous les contacts électriques : Il ne doit pas y avoir de sels ni de taches d’oxydation.
Dysfonctionnement Cause possible Correction La caméra thermique ne peut pas être mise en marche. La batterie est complètement déchargée. Charger la batterie. Ne peut pas être exploitée à partir d’une source d’énergie externe. Le câble USB est endom- Remplacer le câble USB. magé. La source de courant externe est déchargée L’image est floue, avec Etalonnage nécessaire des lignes verticales et un arrière-plan irrégulier. F R Charger la source de courant externe (si nécessaire).
FASCYNACJA TECHNIKĄ TERMOWIZYJNĄ Drodzy Klienci! Opierając się na tym, aby zawsze oferować Państwu wiodące pod względem technicznym i jakościowym rozwiązania optyki termowizyjnej, w ramach naszego nowego asortymentu proponujemy produkty o najnowocześniejszych rozwiązaniach technologicznych i najlepszych z możliwych parametrach wydajnościowych.
SPIS TREŚCI P L 01. DANE TECHNICZNE ������������������������ 52 02. ZAKRES DOSTAWY ������������������������� 52 03. ELEMENTY SKŁADOWE I OBSŁUGOWE ������� 52 04. INFORMACJE DOTYCZĄCE BEZPIECZEŃSTWA ������������������������� 53 05. EKSPLOATACJA ���������������������������� 53 06. WŁĄCZANIE ������������������������������� 54 07. WYŁĄCZANIE ����������������������������� 54 08. TRYB CZUWANIA �������������������������� 54 09. REGULATOR DIOPTRII ���������������������� 54 10.
01. DANE TECHNICZNE* KEILER-35 Pro (2020) MODEL Rozdzielczość detektora KEILER-36 Pro (2020) 384×288 px KEILER-50 Pro (2020) 640×512 px Rozmiar piksela 12 µm NETD ≤50 mk Częstotliwość wyświetlania 50 Hz Soczewka obiektywu 35 mm Pole widzenia 7,5×5,7° 50 mm 12,5×10,0° Wyświetlacz 8,8×7,0° 1280×960 LCOS Powiększenie 3,5-14,0x 2,1-8,4x Zoom cyfrowy 3,0-12,0x 2x, 4x Maks.
04. INFORMACJE DOTYCZĄCE BEZPIECZEŃSTWA P L Nominalna wartość napięcia ładowania dla tego produktu wynosi 5 V. > Aby zapobiec skróceniu żywotności akumulatora na skutek głębokiego rozładowania, należy w odpowiednim czasie go ładować z zachowaniem niskiej mocy. Nie zaleca się długotrwałego użytkowania kamery termowizyjnej w środowisku o wysokiej temperaturze.
06. WŁĄCZANIE > Włączyć urządzenie poprzez naciśnięcie i przytrzymanie przycisku włączania/wyłączania. Pojawi się ekran początkowy, a po kilku sekundach zostanie wyświetlony obraz w podczerwieni. Wskaźnik LED świeci na zielono. 07. WYŁĄCZANIE > Wyłączyć urządzenie poprzez naciśnięcie i przytrzymanie przycisku włączania/wyłączania. Na wyświetlaczu pojawi się licznik odliczający od 3 do 1, po czym nastąpi wyłączenie urządzenia.
11. ZOOM CYFROWY > Nacisnąć przycisk powiększania/pomniejszania, aby powiększyć obraz z 1× do 2×, 4× i z powrotem pomniejszyć do 1×. P L 12. WYKONYWANIE ZDJĘĆ I NAGRYWANIE FILMÓW > Aby zrobić zdjęcie, w normalnym trybie wyświetlania nacisnąć przycisk wykonywania zdjęcia. Aby rozpocząć nagrywanie filmu, nacisnąć i przytrzymać przycisk wykonywania zdjęcia. Na wyświetlaczu pojawi się symbol aparatu potwierdzający wykonanie zdjęcia.
SYMBOL Znaczenie Optymalizacja obrazu WLAN Jasność wyświetlacza Wyświetlacz ciepły / zimny biały Tryb kalibracji Wyjście wideo Obraz w obrazie (PIP) Cyfrowy kompas Pozostałe Czujnik ruchu Automatyczny tryb czuwania Kalibracja kompasu Informacje systemowe Przywracanie ustawień domyślnych Powrót do menu głównego 16. UC OPTYMALIZACJA OBRAZU Modele Keiler 36 Pro i Keiler 50 Pro: Zależnie od stopnia wilgotności powietrza można zoptymalizować obraz za pomocą trybu UC (Ultra Clear).
17. FUNKCJA WIFI > Włączyć funkcję WiFi w menu głównym i połączyć telefon z sygnałem WiFi. Nazwa sieci WiFi to „Keiler_xxxxxx”, hasło to 12345678. Po pomyślnym nawiązaniu połączenia WiFi aplikacja zainstalowana w telefonie może być używana do sterowania funkcjami, takimi jak wykonywanie zdjęć i nagrywanie filmów. > Więcej informacji na temat aplikacji można znaleźć na stronie internetowej: https://liemke.shop/medien P L 18.
22. OBRAZ W OBRAZIE Gdy funkcja Obraz w obrazie jest włączona, w górnej środkowej części wyświetlacza pojawia się małe okienko, stanowiące 2-krotne powiększenie środkowego obszaru obrazu. 23. CYFROWY KOMPAS > Włączyć funkcję cyfrowego kompasu w menu głównym. Zostanie on wyświetlony w górnej środkowe części wyświetlacza, wskazując aktualny kierunek geograficzny. 24. WSKAŹNIK KĄTA > Włączyć funkcję wskaźnika kąta w menu głównym.
28. INFORMACJE O SYSTEMIE > Nacisnąć przycisk powiększania/pomniejszania, aby wyświetlić informacje o systemie (wersja i kod produktu). P L 29. PRZYWRACANIE USTAWIEŃ DOMYŚLNYCH Uwaga! Obrazy i pliki wideo zapisane w urządzeniu są usuwane po zresetowaniu urządzenia! > Nacisnąć przycisk powiększania/pomniejszania, aby przejść do ustawień domyślnych.
31. PRZESYŁANIE ZDJĘĆ I FILMÓW Po podłączeniu urządzenia do komputera za pomocą przewodu USB i włączeniu urządzenia jest ono wykrywane jako urządzenie pamięci masowej, dzięki czemu można przeglądać, kopiować lub usuwać zdjęcia i filmy na komputerze. 32. KONTROLA TECHNICZNA Przed uruchomieniem urządzenia zaleca się przeprowadzenie kontroli technicznej. > Sprawdzić stan zewnętrzny urządzenia: obudowa nie może mieć żadnych pęknięć.
Usterka Możliwa przyczyna Kamery termowizyjnej nie można włączyć. Akumulator jest całkowi- Naładować akumulator. cie rozładowany. Środek zaradczy Urządzenie nie działa po podłączeniu do zewnętrznego źródła zasilania. Przewód USB jest uszkodzony. Obraz jest niewyraźny, z pionowymi liniami i nierównym tłem. Wymagana kalibracja. Przeprowadzić kalibrację obrazu zgodnie z opisem w rozdziale 21 „Tryb kalibracji czujnika” w instrukcji obsługi. Obraz jest ciemny. Zbyt niskie ustawienie jasności.
LIEMKE · KEILER PRO 2020 · Bedienungsanleitung Stand: 03 / 2021 Änderungen in Konstruktion oder Ausführung sind vorbehalten. Keine Gewähr für eventuelle Fehler. Beachten Sie die rechtlichen Erwerbs- und Nutzungsbedingungen für Wärmebildoptiken in Ihrem Land bzw. Bundesland. Änderungen in Design, technischer Ausführung, Lieferumfang und Preise vorbehalten. Für die jeweils neueste Version dieser Bedienungsanleitung besuchen Sie: https://liemke.
LIEMKE GmbH & Co.KG Detmolder Straße 629b D – 33699 Bielefeld Germany Blaser Group Wetzlar GmbH & Co. KG Liemke Service Wilhelm-Loh-Straße 1 D-35578 Wetzlar +49 (0) 6441 56691 700 service.bgw@blaser-group.com © 2020 Kontakt technischer Service Contact technical service Contactar con el servicio técnico Contactez le service technique Skontaktuj się z serwisem technicznym KEILER PRO 2020 − 03 / 2021 +49 (0) 521 329 695 - 0 office@liemke.com www.liemke.
interference in a residential installation. This equipment generates uses FCC Statement and can radiate radio frequency energy and, if not installed and used in FCC ID: 2AYGT-22X accordance with the instructions, may cause harmful interference to radio communications. However, there is no guarantee that interference will not Labeling requirements This device complies with part 15 of the FCC Rules.
be maintained between the user's body and the handset, including the antenna. Third-party belt-clips, holsters, and similar accessories used by this device should not contain any metallic components. Body accessories that do not meet these requirements may not comply with RF exposure requirements and should be avoided. Use only the supplied or an approved antenna. We, IRay Technology Co., Ltd.