
Installation Sheet


5
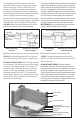
Before nishing
material
Antes que el material
esté terminado
After nishing
material
Después que el material
esté terminado
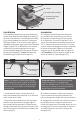
7. Using desired oor material, mark the
thickness of the material along the outside
of the throat (B), so that it will nish 1/16”
above the channel. Spread thinset/mortar
bed up to the marked thickness. Ensure this
bed is pitched all directions toward the center
drain. If using a mortar build up, apply a
bead of silicone caulk around the throat after
mortar is dry. Lay nishing material, and have
material nish to the edge of the throat (B).
DO NOT allow nishing material to nish on
top of the stainless steel channel edge.
7. Usando el material del suelo deseado, marque el
espesor del material a lo largo de la parte exterior
del el cuello (B), de modo que termine 1/16” arriba
del canal. Propagación thinset/mortero hasta el
espesor marcada. Asegure que esto esté lanzado
en todas las direcciones hacia el drenaje del centro.
Si se construye mortero, aplique un cordón de
silicona alrededor del cuello después del mortero
cuando este seco. Coloque material terminado,
y tenga el material hasta el borde de cuello (B).
NO PERMITA que el material termine en la parte
superior del borde del canal de acero.
8. Remove the strainer (A) from the throat (B).
LTDB 5: Set nishing material of a thickness
up to 3/8” directly into strainer using thinset.
RTDB15/TDB15/TDB20: Set nishing material
of a thickness 3/4” directly into strainer using
thinset. If nishing material is less than 3/4”,
spread a layer of mortar into the top frame
of the strainer (A), allowing for thinset and
nishing material to nish 1/16” above the
metal frame. Allow to dry, spread thinset and
lay material. Place top frame of strainer (A)
back into the throat (B).
8. Remueva la parte (A) del cuello (B).
LTDB 5: Coloque el material terminado al
espesor de 3/8” directamente en la parte (A)
usando thinset.
RTDB15/TDB15/TDB20: Coloque material
terminado al espesor de 3/4” directamente a la
parte (A) usando thinset. Si el material esta menos
de 3/4”, propagación una capa de mortero en el
marco superior de la parte (A), permitiendo que el
thinset y el material esté terminado a 1/16” arriba
en el marco. Permita que se seque, propagación
thinsey y colocar el material. Coloque el marco de
la parte (A) de regreso al cuello (B).
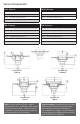
Suboor
Thinset/Mortar
Waste Line Pipe
Bonded Flange Drain Body
Mortar Bed
Liquid/Fabric Waterproong
Finishing Material
Backer Board
Thinset
Mortar Bed
Sub-oor
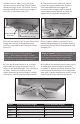
Assurenishing material is NOT installed
over edge of throat
Thinset
Liquid/Fabric
Waterproong
Membrane