
Installation Sheet

8
12. ONLY FOR S-TIFAS 65 INSTALL:
Spread a layer of mortar into the Tile
Insert Frame (TA65), allowing for thinset
and material to finish 1/16” above the
metal frame. Allow to dry, spread thinset
and finishing material.
12. SOLO PARA S-TIFAS 65 INSTALACION:
Extender una capa de mortero en Tile
Insert Frame (TA65), permitiendo el thinset
y material que termine 1/16” arriba del
marco de metal. Permita que se seque,
extienda thinset y material terminado.
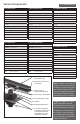
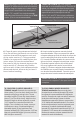
11. Using desired material, mark the thickness
along the channel so that it will nish 1/16”
above the channel. Lay nal mortar bed across
the wet area. Pitch this bed in one plane
toward the linear drain. Allow space for thinset
and nishing material to nish 1/16” above
the channel. After dry, apply a bead of silicone
caulk around the channel. Lay thinset and
nishing material to the edge of the combined
stainless steel channel. DO NOT allow material
to nish on top of the stainless steel channel
edge. (Please refer to gures below)
11. Usando el material que desea, marque
el espesor a lo largo del canal de modo que
termine 1/16” arriba del canal. Coloque mortero
denitivo través de la zona húmeda. Brea esto
en un plano hacia el drenaje lineal. Permita el
espacio para el thinset y material terminado
1/16” arriba del canal. Después que este
seco, aplique una gota de masilla de silicona
alrededor del canal. Colocar thinset y material
hasta el borde del canal de acero. NO PERMITA
el material que termine en el borde del canal de
acero. (Por favor referirse a las cifras inferiores)
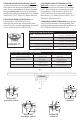
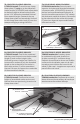
Waterproong Membrane
Stainless Steel
Channel Assembly
Final Mortar Bed
Threaded Outlet
Pre-Pitched Mortar Bed
Suboor
Finishing Material
Backer Board
Caulking
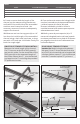
Mortar Bed
Mortar Bed
Sub-oor
Waterproong
Membrane
Finishing Material
Assure that grate is lower
than installed tile
Mortar Bed
Mortar Bed
Sub-oor
Waterproong
Membrane
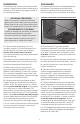
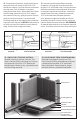
Before nishing
material
Antes que el material
esté terminado
After nishing
material
Después que el material
esté terminado