
Installation Sheet

6
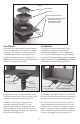
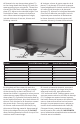
6. LTD 5/RTD 15/TD15/TD20 SERIES ONLY:
Spread a layer of mortar into the strainer (A),
allowing for thinset and nishing material to
nish 1/16” above the metal frame. Allow to
dry, spread thinset and lay material. Place top
strainer (A) into the throat (B) of the drain.
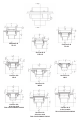
WW 5 SERIES: Place strainer (A) into throat (B).
LW 5 SERIES: Place the strainer (A) into the
throat (B) and fasten using screws at each
corner.
G SERIES: Drill a 1” hole in the marked
location of the factory installed mudguard.
Place your nger into the hole and pull out.
Place the magnetic G-Series strainer (A) into
the throat (B) (Each sold separately)
6. LTD 5/RTD 15/TD15/TD20 SOLAMENTE:
Propagar una capa de mortero en el strainer
(A), permitiendo el thinset y material terminado
que termine 1/16” por encima de la estructura
de metal. Permita que se seque, propagar
thinset y tender el material. Coloque la parte
superior (A) en el cuello (B) del drenaje.
WW 5 SERIE: Coloque el strainer (A) en el cuello (B).
LW 5 SERIE: Coloque el strainer(A) en el cuello
(B) y sujetar con tornillos en cada esquina.
G SERIE: Perfore 1” agujero en la locación
marcada del guardabarros que está
instalado. Coloque su dedo en el agujero y
retírelo. Coloque el magnético G-serie (A) en
el cuello (B) (Cada uno se vende separado)
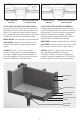
Primary Mortar Bed
Suboor
Clamp Down
Floor Drain
Waterproong
Final Mortar Bed
Finishing Material
Backer Board
Thinset
Before nishing
material
Antes que el material
esté terminado
After nishing
material
Después que el material
esté terminado