
User's Manual


Indyme Solutions, Inc. 8295 Aero Place San Diego, CA 92123 USA +1.858.268.0717 +1.800.829.6141Page 5 of 7
Technical Document
430696-00
Rev. J
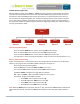
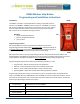
Standard Help button Installation
1. &ŽƌĐŽŵƉůŝĂŶƚůŽĐĂƚŝŽŶƐŵĞĂƐƵƌĞƵƉϰϴĨƌŽŵƚŚĞĨŝŶŝƐŚĞĚĨůŽŽƌDĂƌŬƚŚŝƐŚĞŝŐŚƚĂŶĚƵƐĞ
it for the center of the bottom bracket. (See the Bracket Mounting Diagram below.)
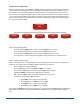
2. Determine mounting style and install the bottom mounting bracket as detailed below.
a. For drywall mounting: Each bracket has three holes. Use the two holes nearest to one
another and secure the bottom bracket to the drywall, using the white plastic drywall
anchors and screws (p/n: 180059-00 & 180060-00) provided.
b. For sheet metal (shelving) or wood mounting: Each bracket has three holes, use the two
holes furthest from one another. Mark the bottom bracket hole locations on the wall. Use
the provided self-tapping TEK screws (p/n: 180200-20) to secure the bracket to the
ŵŽƵŶƚŝŶŐƐƵƌĨĂĐĞ/ĨŶĞĐĞƐƐĂƌLJĚƌŝůůƚǁŽƉŝůŽƚŚŽůĞƐƵƐŝŶŐĂϱϯϮďŝƚƚŚĞŶŝŶƐƚĂůůƚŚĞƐĞůĨ-
tapping TEK screws.
c. For masonry mounting: Mark the bottom bracket holes, using the two holes furthest from
ŽŶĞĂŶŽƚŚĞƌhƐĞĂЬŵĂƐŽŶƌLJďŝƚĂŶĚĚƌŝůůĂŚŽůĞĚĞĞƉĞŶŽƵŐŚ;ĂƉƉƌŽdžŝŵĂƚĞůLJϭΗͿĨŽƌƚŚĞ
green plastic masonry anchors (p/n: 180064-00). Install the masonry anchors, and secure
the bracket with provided anchor-screws.
3. Install the top mounting bracket using the same hardware and technique as used for the bottom
ďƌĂĐŬĞƚDĞĂƐƵƌĞƵƉϮϰĨƌŽŵƚŚĞŵŝĚĚůĞŽĨƚŚĞŝŶƐƚĂůůĞĚďŽƚƚŽŵďƌĂĐŬĞƚĂŶĚƉŽƐŝƚŝŽŶƚŚĞ
middle of the top bracket here. A level should be used to ensure that the installed callbox will be
plumb.
4. ^ƚĂƌƚŽŶĞƐůŽƚƚĞĚϱϴŚĞdž-washer head screw (p/n: 180066-00) into the side of each bracket.
5. Install the signs (if not already installed) into the sign extrusion. Install the top and bottom caps.
6. Install the help button by sliding it over the brackets. Position the bottom of the callbox flush
with the lower edge of the bottom bracket. Verify the red antenna wire (from the PCA inside the
help button) is routed up the back, inside of the sign blade.
7. &ŝƌŵůLJƚŝŐŚƚĞŶƚŚĞƐůŽƚƚĞĚϱϴŚĞdž-washer head screw with a nut-driver. The screws do not have
to be extremely tight to hold the callbox.