
User's Manual


Indyme Solutions, Inc. 8295 Aero Place San Diego, CA 92123 USA
+1.858.268.0717 +1.800.829.6141
Page 8 of 10
Install Document
02-19-2016
14.0 feet
Top View
14.0 feet
Side View
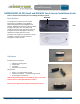
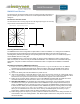
DM9022 Dwell Devices:
The devices have an infrared motion sensor to monitor and notify associates if a
person is loitering in an aisle. The device is mounted pointed down from in the
ceiling tile.
Dwell device detection window
The dwell devices have a viewing angle of about 90 degrees (45 degrees to each side).
They should be centered above the area of interest
Full/Full Curtain Beam
–
Ceiling Mounted Range Specification
14.0 feet
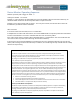
Mounting DM9022 Dwell Devices
The DM9022 devices have a hingeable rear plate which is used for installation. In a ceiling mount installation,
the hinged plate is opened 90 degrees to allow the provided toggle bolts to be inserted through the two
mounting holes (indicated) and through corresponding holes in the ceiling tile. Never use double sticky tape to
mount DM9022 devices to ceiling tiles.
Once the DM9022 device is secured to the ceiling, the hinge is closed, allowing the device to point straight
down. At this point, the device is ready for SmartPortal installation. You will need to be on the ladder with your
smartphone, computer or tablet connected to SmartPortal in order to complete the installation of a DM9022
device.
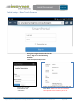
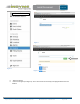
SmartPortal installation of DM9022 Dwell Devices
1)
F
ol
l
o
w
the
f
i
r
s
t
4
i
ns
tr
uc
ti
on
s
above
for
“
Us
i
ng
S
m
artPo
r
tal
”
to
l
og
i
nto
S
m
artPo
r
ta
l
.
Note that
DM9
022
Dwell devices install through SmartPortal in almost exactly the same way as DM9025 touch devices.
2) Insert a small flat bladed screwdriver into the slot on the side of the DM9022 and twist to remove the
cover.
3) Remove the battery tabs from both batteries to power the unit.
4) After a few seconds the unit should appear in green at the top of the list and you can continue with step 5
of the
“Us
i
ng
S
m
artPo
r
ta
l
”
i
ns
tr
uc
ti
on
s
.
When
i
ns
tr
uc
te
d
to
press
the button
i
n
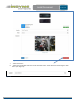
step 8, you will find a small
blue button on the exposed circuit board of the DM9022 at the opposite end from the batteries.
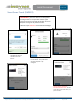
5) When you get to step 9 above, replace the cover on the DM9022 and climb down the ladder and move
the ladder outside the detection area of the device. You are now ready to test the device.
6) TESTING THE DM9022. You will mainly be testing whether the detection zone is adequately covering
the desired area. When you pressed the button on the DM9022 in step 8 and pressed the Next key in
step 9, the DM9022 goes into a special test mode. In this mode, the DM9022 lights and beeps every
time
it
detects motion. Wave your hand (remember that the DM9022 only detects a moving hand) at the edges
of the
d
es
i
r
ed
coverage area
to make
sure
the DM9022
“
s
ee
s
”
your
mov
i
ng
hand and
li
gh
ts
and
b
ee
ps
.
When you are satisfied that the entire area can be seen by the DM9022 press the Next key on your
Smart Phone, Tablet or Laptop in step 10 above and follow the rest of the steps.
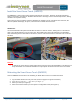
7) When taking a photo in step 11, try to take a photo that includes the device on the ceiling as well as the
merchandise or area it is covering below it. This allows Indyme technicians to verify that the device is in
the correct location.