
User's Manual


Technical Document
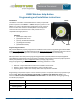
<Tag Here>
Indyme Solutions, Inc. 8295 Aero Place San Diego, CA 92123 USA +1.858.268.0717 +1.800.829.6141 Page 5 of 7
Install the Help button
1. Verify help button placement with the Store Manager and according to provided instructions.
Determine the best mounting method before installing the help button, verify address programming.
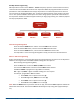
Wall Mount
Counter Top Mount
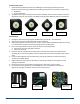
2. The CB932 has four (4) mounting orientation options available; please see pictures below. Choose the
appropriate option for your situation. The CB932 mounting bracket MUST be used for all installations.
Wall Mounting
1. Identify the desired mounting height for the SET button, typically 48” – 54” off the floor.
2. Align the mounting plate at that height and selected orientation.
3. If mounting to glass or a smooth non-porous surface, use the double-sided adhesive ONLY. If mounting
to a solid surface or drywall, mark and drill through the two mounting holes.
4. Insert mounting hardware in the two holes and secure the mounting bracket.
a. wall anchors and screws if drywall or masonry
b. screws only for wood.
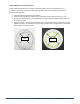
5. Insert the batteries and place the mounting holes on the back of the electronic module over the
mounting tabs on the mounting plate; push the module down onto the mounting tabs until it snaps in
place.
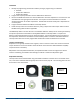
6. Insert the desired graphics into the button dome, paying special attention to the final mounting
orientation (see details below).
7. Replace the button dome back into the electronic module by inserting the two (2) posts into the
openings shown below.
8. Position the cover over the assembly and gently press it down until it snaps into place.
9. From the final mounting location, press the SET button on the help button and verify the
appropriate message is broadcast over the desired output device
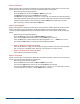
Orientation F
Orientation C
Orientation P
Mounting
holes
Battery
Compartment
Button Dome
Mounting
Orientation R