
User Manual
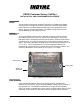
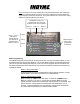
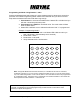
Table Of Contents

Technical Document
Equipment Needed:
These Installation and Programming Instructions
Installation
1. Verify all six screws are tight and the unit is sealed.
2. Follow the Mounting Bracket instructions and mount the bracket in the
desired location.
3. Using the alcohol and cleaning wipes, clean the back of the unit only.
(Do not
use alcohol to clean the front of the call box as it may damage the insert sleeve.)
4. Using the double stick adhesive tape, affix the adhesive tape to the center of
the back of the call box and mount the call box to the bracket.
Programming
The CB550 Customer Survey Box is shipped with the Power Jumper in the "ON"
position. In normal conditions, there is no need to open the unit. The unit is
powered by non-field changeable batteries and programming is done using a
combination of the membrane switches. Buttons 1,2 and 3 are used to increment
the address digits, buttons 10 and 12 are used to start the Address program,
and buttons 7 and 9 are used to start the Mode program.
Address Programming
Press and hold Membrane Switch buttons 10 and 12
(see Figure 2)
at the same
time for approximately seven seconds to place the unit in the Address
Programming Mode. LED 1 will flash and you will hear short beep when the
buttons have been held down long enough.
1. Press button 1 to increment the hundreds digit. Status LED 1 will flash and
you will hear a short beep with each press.
2. Press button 2 to increment the tens digit. Status LED 2 will flash and you
will hear a short beep with each press.
3. Press button 3 to increment the ones digit. Status LED 3 will flash and you
will hear a short beep with each press.
4. Once you have the desired address programmed in, press button 12 to
SAVE it.
5. The address programmed will flash on Status LED’s 1-3
Example: Programming address 159
1. Press and hold buttons 10 and 12 until Status LED 1 flashes and/or you
hear a short beep. (Approximately 7 seconds)
2. Press button 1 once.
3. Press button 2 five times.
4. Press button 3 nine times.
5. Press button 12 to SAVE.
6. Watch the Status LEDs. Verify that LED 1 flashes once, LED 2 flashes
five times and LED 3 flashes nine times.
CB550 Installation/Programming Instructions Page 2 P/N 430563-05 Rev B