
User Manual
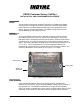
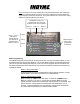
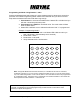
Table Of Contents

Technical Document
CB550 Customer Survey Call Box
INSTALLATION AND PROGRAMMING PROCEDURE
Scope
This document covers all the necessary instructions for installing the CB550
Customer Survey Call Box and how to program the call box using the Status
LEDs indicators. The Status LEDs are illuminated during programming and
various stages of survey box operation. The CB550 is programmed to work
with the Messaging and Telephony Server.
Overview
The Indyme CB550 Customer Survey Call Box includes a membrane switch
panel affixed to the front of the unit, with a Label Insert Sleeve in front of the
Membrane Panel. The Membrane Panel has 24 buttons, divided into two sets of
12 buttons each. The customer designs their survey card and inserts it into the
sleeve. The Label Insert Sleeve is designed to hold heavyweight cardstock cut to
7
15
/
16
" x 5.5". The unit is powered by non-field changeable batteries and
programming is performed using a combination of the membrane switches. The
survey box dimensions are 9.9" wide by 6.5" high by 1.0" in depth.
Figure 1:CB550 Survey Box without Label Insert
Take Inventory
Membrane
Switch(es)
Status LEDs, 1-3
Status LED 4
Verify that all items listed on the Indyme packing list were included in the
shipment as received from Indyme for this installation. Notify Indyme promptly of
any discrepancies. The installer is responsible for bringing all the necessary
tools. The call box is installed at the store using a mounting bracket, which is sold
separately. (The bracket mounting instructions are shipped with the brackets.)
CB550 Installation/Programming Instructions Page 1 P/N 430563-05 Rev B