Indigo 7 Home Automation Server Quick Start Guide
Table of Contents Welcome to Indigo 7! 1 Indigo Software and Mac Requirements! 1 Installing Indigo! 2 Starting Indigo Server! 3 Connecting Interfaces! 5 Connecting Z-Wave Interfaces! 5 Connecting INSTEON and X10 Power Line Interfaces! 6 Plugins! 7 Adding Devices! 8 Where to go Next! 9
November 1, 2016 ! Welcome to Indigo 7 Indigo is a powerful Mac-based home control server that integrates an assortment of popular Z-Wave®, INSTEON® and X10 hardware devices, as well as a variety of other hardware via 3rd party plugins, to provide monitoring and control of your home. Depending on your needs and budget, you can create a simple system that controls only a couple of lights or you can automate your entire home.
November 1, 2016 ! Installing Indigo We recommend getting the latest Indigo version from the downloads section of our web site, particularly if you received a CD when purchasing Indigo. This will ensure that you have the latest version. Once downloaded, you’ll find a file in the Downloads folder on your Mac titled Indigo.dmg – double-click this file and a new window in the Finder will open to show you two files: • ReadMe.
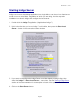
November 1, 2016 ! Starting Indigo Server Indigo can run as a standalone application on a single Mac or can be run in a client/server mode on two or more Macs. Regardless of which you are doing, the first step after installation is to launch Indigo and configure the local server. 1. Double-click the Indigo 7 application (/Applications/Indigo 7). 2. If this is the first time you’ve run Indigo 7 on this Mac, then press the Start Local Server… button in the connection status window. 3.
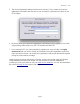
November 1, 2016 ! 5. The Server Registration dialog should now be showing. This is where you enter the registration information that was sent to you via email or is printed on the back of your CD envelope. 6. Be sure to enter your name and registration code exactly as they appear in your email (copy/pasting works best) or on your CD envelope and click OK. 7. If you received a CD, you’ll be prompted to register your copy of Indigo.
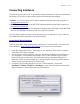
November 1, 2016 ! Connecting Interfaces The next thing you’ll want to do is connect the interface hardware for the home automation technology you’re using. Indigo natively supports the following technologies: • Z-Wave - you can find a list of all Z-Wave hardware interfaces that Indigo supports on our supported devices list. • INSTEON - you can find a list of INSTEON hardware interfaces that Indigo supports on our supported devices list.
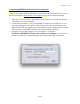
November 1, 2016 ! Connecting INSTEON and X10 Power Line Interfaces There are three basic steps needed when connecting a INSTEON interface. This part of the documentation is best viewed on the website for the most current information: 1. Install the FTDI VCP Drivers - depending on your interface, you’ll need to install the correct Mac OS X driver software. 2. Connecting the Interface - plug your interface (or adaptor) into a USB port on your computer and directly into a power outlet.
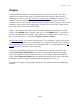
November 1, 2016 ! Plugins Indigo includes the ability to use plugins developed using our server API. This allows developers to integrate other types of devices directly into Indigo just like the built-in interfaces. You can view the growing list of 3rd party plugins available for Indigo on our website. Given the breadth of the capabilities provided by these plugins, it’s entirely possible to build a very complete home automation system without using any of the built-in interfaces.
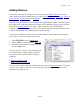
November 1, 2016 ! Adding Devices At this point, we really encourage you to read through the Indigo Overview document, which explains the basic building blocks in Indigo (Devices, Triggers, Schedules, Actions & Action Groups, Control Pages, and Variables). However, if you’re anxious to do something with tangible results, then the next thing you’ll likely want to do is add some devices to Indigo. You’re definitely going to want to go back and read the Indigo Overview document.
November 1, 2016 ! Where to go Next Congratulations! You have installed Indigo, connected your interface, and added a device or two. So, what’s next? If you have a specific question, check out our FAQ - it might very well have the answer to your question. Before you start feeling overwhelmed and frustrated, we strongly recommend reading through the docs. We assure you that you will feel a lot more comfortable if you just read through them.