Warning CAUTION RISK OF ELECTRIC SHOCK DO NOT OPEN WARNING: TO REDUCE THE RISK OF ELECTRIC SHOCK DO NOT REMOVE COVER (OR BACK). NO USER SERVICEABLE PARTS INSIDE. REFER TO QUALIFIED SERVICE PERSONNEL. The lightning flash with arrowhead symbol, within an equilateral triangle, is intended to alert the user to the presence of uninsulated “dangerous voltage” within the product’s enclosure that may be of sufficient magnitude to constitute a risk of electric shock to persons.
Important S afety Ins truc tion S 1) 2) 3) 4) 5) 6) 7) R ead thes e ins tructions . K eep thes e ins tructions . Heed all warnings . F ollow all ins tructions . Do not us e this apparatus near water. C lean only with dry cloth. Do not block any ventilation openings . Ins tall in accordance with the manufacturer's ins tructions . 8) Do not ins tall near any heat s ources s uch as radiators , heat regis ters , s toves , or other apparatus (including amplifiers ) that produce heat.
Contents Warnings Safety Instructions Contents Location and function of controls 2 3-5 6 Basic operation 11-15 16 SSM (Sound Status Memory) Balance AVL (Auto Volume Leveler) 6 32-34 Lock Menu options Lock Menu Setup 35 PC Setup 17 18-20 Hospitality Menu Auto Power Hotel Mode Volume Max / Volume Default Default Ch Caption ES Timer FRONT LOCK TV VERSION 36-39 36 36 37 37 38 38 39 39 21-23 PIP (Picture-In-Picture) Feature CSM (Colour Status Memory) PSM (Picture Status Memory) Manual Picture Cont
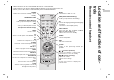
MUTE switches the sound on or off. POWER MUTE SSM (Sound Status Memory) recalls your preferred sound setting. NUMBER BUTTONS PSM (Picture Status Memory) recalls your preferred picture setting. I/II selects the language during dual language broadcast. selects the sound output (option). ARC select your desired picture format. FCR (Favorite Channels Setup) PSM MENU selects a menu. FCR ARC MENU A.SWAP CC Select a closed caption : Off, EZ Mute, and On. PIP Switches the sub picture on or off. A.
Battery installation Location and function of controls 8 - Your remote control handset is powered by two AAA type batteries. 1 To insert batteries, turn the remote control handset over and remove the battery cover. 2 Put the two batteries into the compartment observing battery polarity. 3 Replace the cover. To avoid damage from possible battery leakage, remove the batteries if you do not plan to use the remote control handset for an extended period time. Do not use batteries of differing age or type.
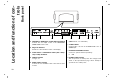
1 2 1. MAIN POWER (I / y) switches the set On or Off. 2. 3. 3 4 5 6 7 8 5. INPUT SELECT Select TV, AV1, AV2, S-VIDEO, COMPONENT, PCRGB, HDMI mode. D / E (Channel Up/Down) selects a programme or a menu item. switches the set On from standby. 6. POWER (r r) switches the set On from standby or On to standby. F / G (Volume Down/Up) adjusts the volume. adjusts menu settings. 7. POWER/STANDBY INDICATOR (r r) illuminates red in standby mode. illuminates green when the set is switched on. 4.
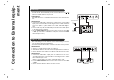
Back panel Location and function of controls 10 R RGB INPUT AUDIO INPUT Magi-Link 1 L AUDIO INPUT 2 Y Pb Pr COMPONENT INPUT (480i/480p/720p/1080i) 3 1. HDMI INPUT / RGB INPUT / AUDIO INPUT SOCKETS Connect the set output socket of the PERSONAL COMPUTER to this socket. 2. Magi-Link SOCKET Interface to allow external control of the display. 3. AUDIO INPUT / COMPONENT INPUT (480i / 480p / 720p / 1080i) SOCKETS 4. AERIAL SOCKET “F” Type, 75 5.
- Typical wall antenna jack used in apartment buildings, connect the antenna cable as shown below. (Use the correct type of antenna cable for the type of wall antenna jack.) Turn clockwise to tighten. 75 Round Cable Bronze Wire Y 300 Pb Pr ANT. IN COMPONENT INPUT (480i/480p/720p/1080i)) Flat Wire AV1 Antenna Converter Apartment Buildings Antenna Jack Wall Connection Jack - If you have a 75 round cable, insert the bronze wire and then tighten the connection nut.
Connection to External equipment 12 VCR Setup - In Video mode, TV automatically reverts to TV mode if the CH D / E button or number buttons are pressed. Connection 1 ANT. IN ANT Set VCR switch to 3 or 4 and then tune TV to the same channel number. Connection 2 1. Connect the audio/video output jacks on VCR to the corresponding input jacks on the TV. When connecting the TV to a VCR, match the jack colors (Video = yellow, Audio Left = white, and Audio Right = red). 2.
Connections Connect the audio/video output jacks on the external A/V equipment to the corresponding input jacks on the TV. When connecting the TV to external A/V equipment, match the jack colors (Video = yellow, Audio Left = white, and Audio Right = red). S-VIDEO AV2 V2 AV1 V1 8 AC INPUT Viewing Setup Camcorder 1. Turn on the external A/V equipment. 2. Use the INPUT SELECT button on the remote control to select AV1 or AV2. 3. Operate the corresponding external equipment.
Connection to External equipment 14 DTV Setup - To watch digitally broadcast programs, purchase and connect a digital set-top box. Connections Connect the digital set-top box video outputs to the COMPONENT (Y, PB, PR) jacks and connect the digital set-top box audio outputs to the AUDIO jacks. R Magi-Link L AUDIO INPUT Y Pb Pr COMPONENT INPUT (480i/480p/720p/1080i) ANT.. IN ANT AV1 V1 Viewing Setup 1. Turn on the digital set-top box. (Refer to the owner’s manual for the digital set-top box.) 2.
Connect the signal cable from the monitor output socket of the PERSONAL COMPUTER to the HDMI INPUT socket of the set. Connect the audio cable from the PC to the AUDIO INPUT sockets of the set. Press the INPUT SELECT button to select HDMI. R RGB INPUT AUDIO INPUT Magi-Link L AUDIO INPUT Switch on the HDMI, and the HDMI screen appears on the set. HDMI-DTV input signal : 480p-60Hz, 576p-50Hz, 720p-50Hz, 720p-60Hz, 1080i-50Hz, 1080i-60Hz.
Basic operation 1 On and Off 2 Channel selection 4 On screen language selection (option) Press the main power button to switch the set on. You can select a channel number with the D / E or NUMBER buttons. Press the MENU button and then use D / E button to select the SETUP menu. If the set is in standby mode, press the POWER, D / E on the remote control handset to switch it on fully. Press the POWER button on the remote control handset. The set reverts to standby mode.
2 Press the MENU button and then use D / E button to display each menu. 3 Press the G button and then use D / E button to select a menu item. 4 Press the G button to display the sub menu or the pull-down menu. Change the setting of an item in the sub or pull-down menu with F / G or D / E. You can move to the higher level menu with F button and to move to the lower level menu press the G button. STATION PICTURE SOUND TIME Auto CSM SSM Clock Manual PSM Balance Off Time Favorite Ch.
Setting up TV stations Memorizing the Channels with Auto - For Auto to work, the programming source must be connected to the TV and the TV must be receiving programming signals either over-the-air or from a cable-type service provider. Press the MENU button and then use select the Station menu. G Press the button and then use D /E button to button to select Auto. Press the G button to begin the channel search. • Wait for auto program to complete the channel search cycle before choosing a channel.
- You can manually include or erase individual channels. Press the MENU button and then use select the Station menu. Press the G button and then use D / E button to Press the G button and then use D /E button to select Channel. D /E button to select Manual. Press the F /G button to select the programme number. Press the D /E button to select Storage. Press the F (delete). /G button to select Memory (add) or Erase Repeatedly press the MENU button to return to normal TV viewing.
Setting up TV stations Fine Tuning Adjustment / BOOSTER - This function adjusts the pictures stability and condition when it is poor. Press the MENU button and then use select the Station menu. G Press the button and then use D / E D /E button to button to select Manual. G Press the button and then use D /E button to select Fine. F /G Use the ence.
To initialize values (reset to default settings), select the Normal option. Press the G button and then D / E button to select CSM. You can adjust red, green, or blue to any colour temperature you prefer. Press the G button and then use D / E button to select User. Press the MENU button and then D / E button to select the PICTURE menu. Press the G button and then D / E button to select the desired colour temperature. Press the MENU button and then use D / E button to select the PICTURE menu.
Picture Menu PSM (Picture Status Memory) Press the MENU button and then use D / E button to select the PICTURE menu. Repeatedly press the MENU button to return to normal TV viewing. You can also recall a desired picture (Dynamic, Standard, Mild, Game or User) with PSM button on the remote control. The picture Dynamic, Standard, Mild and Game are programmed for good picture reproduction at the factory and cannot be changed. Press the G button and then use D / E button to select PSM.
Picture Menu Picture format You can watch TV in various picture formats; 16:9, 4:3, ZOOM, PANORAMA. Repeatedly press the ARC button to select your desired picture format. 1. Press the ARC button to select a desired picture format. • Each press of ARC button changes the screen display as shown below. • You can only select 16:9, 4:3 in PC-RGB / HDMI mode only.
Sound Menu SSM (Sound Status Memory) Press the MENU button and then use D / E button to select the SOUND menu. Sound Frequency Adjustment Press the G button and then use D / E button to select SSM. b. Select a sound band by pressing the F / G button. Press the G button and then use D / E button to select a sound setting on the SSM pull-down menu. c. Make appropriate sound level with the D / E button. Repeatedly press the MENU button to return to normal TV viewing. a. Press the G button in User.
AVL (Auto Volume Leveler) Press the MENU button and then use select the SOUND menu. D / E button to Press the MENU button and then use select the SOUND menu. Press the / E button to select G button and then use D / E button to select On or Off. button to make Repeatedly press the MENU button to return to normal TV viewing. Press the button to D Press the G button and then use appropriate adjustments. G E button and then use AVL.
Sound Menu Stereo/SAP Broadcasts Setup - The TV can receive MTS stereo programs and any SAP (Secondary Audio Program) that accompanies the stereo program, if the broadcaster transmits an additional sound signal as well as the original one. - Mono: The primary language is heard from left and right speakers. Signal mode is mono. - Stereo: The primary language is heard from left and right speakers. Signal mode is stereo. - SAP: The secondary language is heard from left and right speakers.
You must set the time correctly before using on/off time function. Press the MENU button and then the TIME menu. Press the Clock. G button and then D /E D / E TIME button to select button to select Press the hour. G button and then D /E button to adjust the Press the minute. G button and then D /E button to adjust the Time Menu Clock Press the MENU or OK button to save.
Time Menu On/Off Time The off timer automatically switches the set to standby at the preset time. Press the MENU button and then the TIME menu. Press the G button and then Time or On Time. Press the G button and then D /E D /E D /E button to select button to select Off button to select On. To cancel Off/On Time function, press the to select Off. button Press the hour. G button and then D /E button to adjust the Press the minute.
Sleep timer If you select On on the Auto Sleep menu, the set will automatically switch itself to standby mode approximately ten minutes after a TV station stops broadcasting. Press the MENU button and then D TIME menu. Press the G button and then /E D /E button to select the button to select Auto Sleep. Press the Off. G button and then D /E You don’t have to remember to switch the set off before you go to sleep.
Setup Menu Child lock The TV can be set so that the remote control handset is needed to control it. This feature can be used to prevent unauthorized viewing. Press the MENU button and then the Setup menu. D / E button to select Press the G button and then D / E button to select Child lock. Press the G button and then D / E button to select On or Off on the Child lock menu. Repeatedly press the MENU button to return to normal TV viewing.
Caption/Text Use the cc button repeatedly to select Captions. EZ Mute shows the selected captions option (if available on program) when the TV sound is muted. Press the MENU button and then use select the SETUP menu. G D Press the / E button to button and then use D / E button to select Press the G button and then use Off, On or Ez Mute. D / E button to select Press the Press the MENU button and then use select the SETUP menu. Caption.
Lock Menu (option) Lock Menu Options Parental Control can be used to block specific channels, ratings and other viewing sources. The Parental Control Function (V-Chip) is used to block program viewing based on the ratings sent by the broadcast station. The default setting is to allow all programs to be viewed. Viewing can be blocked by the type of program and by the categories chosen to be blocked. It is also possible to block all program viewing for a time period.
: (Parental guidance suggested) • 14+and Above :(Viewers 14 years and older) • 18+ : (Adult programming) • Unblocked Lock Menu (option) Content Categories: • Dialog - sexual dialogue : (applies to TV-PG and Above, TV-14, Unblocked) • Language - adult language : (applies to TV-PG and Above,TV-14 and Above, TV-MA, Unblocked) • Sex scenes - sexual situations : (applies to TV-PG and Above, TV-14 and Above, TV-MA, Unblocked) • Violence : (applies to TV-PG and Above, TV-14 and Above, TV-MA, Unblocked) • F Viole
Lock Menu (option) Lock Menu Setup Press the MENU button and then use select the LOCK menu. Then, press the G D / E button to button. • If Lock is already set, enter the password requested. • The TV is set with the initial password “0-0-0-0”. D /E D /E Press the G LOCK D /E button to select Set password. button and then enter a four digit password. Enter it again when requested. /E button to select type of blocking to be set. Press the G button and then use type of ratings to block .
You can adjust horizontal/vertical position, clock, phase, and auto-configure, reset as you prefer. Press the MENU button and then the SETUP menu. D / Press the G button and then desired picture item. E button to select the Press the F / G D / E button to select button to make appropriate adjustments. H-Position / V-Position This function is to adjust picture to left/right and up/down as you prefer.
Hospitality Menu Auto Power Hotel Mode Function enables display to be operated from a single power control point and forces display to turn-on or enter standby mode automatically following a power failure. Options are configurable via installation setup to control power, volume and channel/input settings. Press the MENU button and then use select the HOSPITALITY menu. G Press the button and then use D / D E / E button to G Press the MENU button and then use select the HOSPITALITY menu.
Default Ch Allows both the default and maximum volume range to set to a pre-determined level, preventing volume from being adjusted too high or too low when in use. Press the MENU button and then use select the HOSPITALITY menu. D / E Feature to assign default channel (pre-determined of previous channel) when TV is turned on. Press the MENU button and then use select the HOSPITALITY menu. button to Press the Press the G Press the F button and then use D / Volume Max or Volume Default.
Hospitality Menu Caption ES Timer Function provides for display of Closed Captioning, a text version of the spoken part of a television, movie, or visual presentation. Closed captioning provides an aid to the hearing-impaired and other purpose. (Where available or where supported – NTSC & PAL) Press the MENU button and then use select the HOSPITALITY menu. Press the G button and then use Caption. D / D E / E button to Press the MENU button and then use select the HOSPITALITY menu.
TV VERSION This feature locks all front panel controls preventing adjustment of display setting after installation. Press the MENU button and then use select the HOSPITALITY menu. D / E button to Ability to display firmware version of TV. Press the MENU button and then use select the HOSPITALITY menu. Press the G button and then use FRONT LOCK. D / E button to select Press the G button and then use On or Off.
PIP (Picture-In-Picture) Feature 40 - PIP lets you view 2 different inputs (sources) on your monitor screen at the same time. One source will be large, and the other source will show a smaller inset image. - PIP is not available in Lock On mode only. Watching PIP PIP Audio Input Press the PIP button to show the sub picture. PIP mode - main and sub picture audio select. • Each press of PIP button changes the screen display as shown below. Press the MENU button and then the PIP menu.
Press the PIP POSITION button. Selecting a Input Signal Source for the PIP Use the PIP INPUT button to select the input source for the sub picture. Press the PIP POSITION button repeatedly until desired position is achieved. The sub pictures move clockwise. Programme scan Swapping the PIP Press the SWAP button to exchange the main and sub pictures. This function enables you to search all the stored stations on 4 or 16 sub pictures and see your favorite station by exchanging the main and sub pictures.
Displayable Monitor Specification RGB Mode / HDMI Mode MODE DOS VGA SVGA XGA SXGA Resolution Horizontal Frequency (KHz) Vertical Frequency (Hz) 640X350 31.5 70.0 31.5 70.0 37.9 85.0 31.5 60.0 37.8 72.0 37.5 75.0 43.2 85.0 35.1 56.0 37.9 60.0 48.0 72.0 46.9 75.0 53.7 85.0 48.4 60.0 56.4 70.0 60.0 75.0 60.0 85.0 63.9 60.0 75.0 70.0 79.9 75.0 91.1 85.0 47.7 60.0 60.1 75.0 720X400 640X480 800X600 1024X768 1280X1024 1280X768 68.5 85.0 1360X768 49.
Check these items and try to adjust these The mains plug-(plugged in and switched on) Is the TV switched on Troubleshooting No picture, no sound Sound OK, poor picture Picture OK, poor sound Picture blurred Lines or streaks in picture Poor reception on some channels No colour Poor colour Remote control does not work Incorrect position Vertical bars or stripes on background Horizontal noise Signal Cable message appears Check list Symptoms Try another channel (weak signal) Check aerial (plugged into TV?)
P/NO : MAN05GDP079 GPN05MA008H, MAGINET)