Test Report No.
Warning CAUTION RISK OF ELECTRIC SHOCK DO NOT OPEN WARNING: TO REDUCE THE RISK OF ELECTRIC SHOCK DO NOT REMOVE COVER (OR BACK). NO USER SERVICEABLE PARTS INSIDE. REFER TO QUALIFIED SERVICE PERSONNEL. The lightning flash with arrowhead symbol, within an equilateral triangle, is intended to alert the user to the presence of uninsulated “dangerous voltage” within the product’s enclosure that may be of sufficient magnitude to constitute a risk of electric shock to persons.
1. Read Instructions All the safety and operating instructions should be read before the product is operated. 2. Follow Instructions All operating and use instructions should be followed. 3. Retain Instructions The safety and operating instructions should be retained for future reference. 4. Heed Warnings All warnings on the product and in the operating instructions should be adhered to. 5. Cleaning Unplug this product from the wall outlet before cleaning. Do not use liquid cleaners or aerosol cleaners.
Safety Instructions 14. Outdoor Antenna Grounding If an outside antenna or cable system is connected to the product, be sure the antenna or cable system is grounded so as to provide some protection against voltage surges and built-up static charges. Article 810 of the National Electrical Code (U.S.A.
Safety Instructions 2 3-4 Contents 5 Installation 6 Location and function of controls Remote control handset Battery installation Front panel / Back panel Connection to External equipment Connecting to an Inside Antenna Setup Connecting to an Outdoor Antenna Setup VCR Setup Cable TV Setup External A/V Source Setup DVD Setup DTV Setup PC Setup 7-9 10-13 Picture Menu PSM (Picture Status Memory) Manual Picture Control CSM (Color Status Memory) Picture Format 19-20 Sound Menu SSM (Sound Status Memory
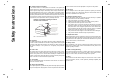
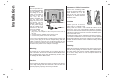
Installation Power This set operates on a DC supply provided by the AC adapter, and the voltage is as indicated on the label on the back of the set. Use only the AC adapter supplied with the set and never apply AC power to the set directly. The AC adapter operates on a an AC power supply, c b and the voltage is as indicated on the label of the AC adapter. a. Connect the DC plug of the AC adapter to the 12V jack on the rear of the set. b. Connect the AC adapter and its power cord. c.
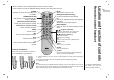
Location and function of controls Note : To avoid damage from possible battery leakage, remove the batteries if you do not plan to use the remote control handset for an extended period time. Do not use batteries of differing age or type. Always discard of batteries safely. You must install the batteries before you use the remote control handset. POWER switches the set on from standby or off to standby. MUTE switches the sound on or off.
Front panel Location and function of controls 3 PR 4 VOL 5 MENU 6 7 INPUT SELECT OK PR 8 VOL MENU INPUT SELECT 1 2 9 1. POWER/STANDBY INDICATOR (r r) illuminates red in standby mode. illuminates green when the set is switched on. 5. F 2. ON/OFF (r r) switches the set ON from standby or OFF to standby. 6. D 3. INPUT SELECT select TV, Video, S-video, Component or PC mode. 4. MENU selects a menu. 8 OK / G (Volume Up/Down) adjusts the volume. adjusts menu settings.
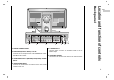
1 RGB IN L/R IN (PC/DTV INPUT) 2 Y Pb Pr (COMPONENT INPUT) 3 1. POWER CORD SOCKET 2. RGB INPUT(PC/DTV INPUT) / L/R IN Connect the set output socket of the PERSONAL COMPUTER to this socket. 3. COMPONENT INPUT (480i/480p/720p/1080i) / AUDIO INPUT R L VIDEO L AUDIO R 4 S-VIDEO 5 ANT IN ( ) 6 5. S-VIDEO INPUT connect video out from an S-VIDEO VCR to the SVIDEO input. 6. ANTENNA SOCKET connect the RF socket of the VCR to the aerial sockets.
External equipment Connection to Connecting to an Inside Antenna Setup - Typical wall antenna jack used in apartment buildings, connect the antenna cable as shown below. (Use the correct type of antenna cable for the type of wall antenna jack.) Turn clockwise to tighten. ANT.. IN ANT 75Ω Round Cable AC INPUT Bronze Wire 300Ω Flat Wire Antenna Converter Apartment Buildings Antenna Jack Wall Connection Jack - If you have a 75Ω round cable, insert the bronze wire and then tighten the connection nut.
- If you connect an S-VIDEO VCR to the S-VIDEO input, the picture quality is improved ; compared to connecting a regular VCR to the Video input. If a 4:3 picture format is used;the fixed image may remain visible on the screen. R L VIDEO L AUDIO R S-VIDEO - To avoid picture noise (interference), leave an adequate distance between the VCR and set. 1.Use the INPUT SELECT button on the remote control to select Video. (If connected to S-VIDEO, select the S-VIDEO external input source.
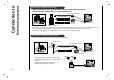
Watching external AV source < Back panel of the set > ( ANT IN ) < Back panel of the set > S-VIDEO VIDEO VIDEO L AUDIO R S-VIDEO L AUDIO R L ANT IN ( L AUDIO R (R) AUDIO (L) VCR Cable AUDIO L VIDEO VIDEO TV RF ) Camcorder VIDEO TV VCR ANT IN ( ) R (R) AUDIO (L) S-VIDEO For cable Box VIDEO External equipment Connection to Watching Cable TV RF Cable < Back panel of the external equipment > Video game set < Cable Box > After subscribing for a local cable TV station
L R Pr Pb L AUDIO R S-VIDEO ANT IN Component ports of the set L/R IN Y (COMPONENT INPUT) VIDEO • Component Input ports You can get better picture quality if you connect DVD player with component input ports as below.
Pr Pb Y L/R IN DTV OUTPUT (PC/DTV INPUT) RGB IN (R) AUDIO (L) < Back panel of the set > DC-12V Pb DC-12V RGB IN L/R IN Y (COMPONENT INPUT) Pr < Back panel of the set > (COMPONENT INPUT) Connecting PC (PC/DTV INPUT) External equipment Connection to Watching DTV < Back panel of a digital SET-TOP BOX > - To watch digitally broadcast programs, purchase and connect a digital set-top box. 1.
Press the POWER, D / E, INPUT SELECT or NUMBER buttons to switch it on fully. Press the POWER button. The set reverts to standby mode. 2 Program selection 4 Quick view You can select a program Press the Q.VIEW button to view the last program you number with the D / E or were watching. NUMBER buttons. Note : This function works only when Favorite program is set to Off. Otherwise each press of this button will select a stored favorite programme. Pull out the AC plugs to switch the set off.
Menu selection On screen menus The dialogue between you and your set takes place on screen with an operator menu. The buttons required for the operating steps are also displayed. 1 2 Repeatedly press the MENU button to display each menu. 3 Press the D / menu item. button to select a The selected menu item changes from white to red. AutoOprogram ManualOprogram FavoriteOch.
Add/Delete Channels with Manual program - For Auto to work, the programming source must be connected to the TV and the TV must be receiving programming signals either over-the-air or from a cable-type service provider. - You can manually include or erase individual channels. 1. Repeatedly press the MENU button to select the Station menu. 1. Repeatedly press the MENU button to select the Station menu. 2. Press the D / 2. Press the 3. Press the G button to begin the channel search.
Setting up TV stations 18 Fine Tuning Adjustment Favorite Channels Setup - This function adjusts the pictures stability and condition when it is poor. - Favorite Channel lets you quickly tune in up to 5 channels of your choice without having to wait for the TV to scan through all the in-between channels. 1. Repeatedly press the MENU button to select the Station menu. 1. Repeatedly press the MENU button to select the Station menu. 2. Press the D / E button to select Manual program. 2. Press the 3.
1. Repeatedly press the MENU button to select the Picture menu. 2. Press the D 3. Press the ments. F E / / G button to select Auto picture. button to make appropriate adjust- 4. Press the EXIT button to save and return to TV viewing. You can also recall a desired picture (Clear, Optimum, Soft or User) with PSM button on the remote control. The picture Clear, Optimum and Soft are programmed for good picture reproduction at the factory and cannot be changed.
Picture Menu CSM (Color Status Memory) Picture format To initialize values (reset to default settings), select the Normal option. When adjusting color temperature options (red, green or blue) manually, CSM is automatically changed to User. You can watch TV in various picture formats; 16:9, 14:9, 4:3, Zoom 1, Zoom 2. Repeatedly press the ARC button to select your desired picture format. 1. Repeatedly press the MENU button to select the Picture menu.
You can select your preferred sound setting; Flat, Music, Movie or Speech and you can also adjust the sound frequency of equalizer, balance. If you switch AVL to on, the set automatically keeps on an equal volume level even if you change programmes. 1. Repeatedly press the MENU button to select the SOUND menu. Sound Frequency Adjustment a. Press the G button in User. b. Select a sound band by pressing the F c. Make appropriate sound level with the / D G / button. E button. d.
Sound Menu Balance AVL (Auto Volume Leveler) 1. Repeatedly press the MENU button to select the SOUND menu. 1. Repeatedly press the MENU button to select the SOUND menu. 2. Press the 2. Press the D / E button to select AVL. 3. Press the D / E button to select On or Off. 3. Press the ments. D F / E / button to select Balance. G button to make appropriate adjust- 4. Press the EXIT button to save and return to TV viewing.
- The TV can receive MTS stereo programs and any SAP (Secondary Audio Program) that accompanies the stereo program, if the broadcaster transmits an additional sound signal as well as the original one. - Mono: The primary language is heard from left and right speakers. Signal mode is mono. - Stereo: The primary language is heard from left and right speakers. Signal mode is stereo. - SAP: The secondary language is heard from left and right speakers.
Time Menu Clock On/Off Time You must set the time correctly before using on/off time function. The off timer automatically switches the set to standby at the preset time. 1. Repeatedly press the MENU button to select the TIME menu. 2. Press the D /E 3. Press the G 2. Press the D / select Clock. E button to 3. Press the G button and then D / E button to adjust the hour. 4. Press the G button and then D / E button to adjust the minute. 5. Press the EXIT button to save and return to TV viewing.
Sleep timer If you select On on the Auto off menu, the set will automatically switch itself to standby mode approximately ten minutes after a TV station stops broadcasting. 1. Repeatedly press the MENU button to select the TIME menu. 2. Press the D / E button to select Auto off. 3. Press the F / G button to select On or Off. 4. Press the EXIT button to save and return to TV viewing. You don’t have to remember to switch the set off before you go to sleep.
Special Menu Caption Captions/Text Use the cc button repeatedly to select Captions. 1. Repeatedly press the MENU button to select the Special menu. EZ Mute shows the selected captions option (if available on program) when the TV sound is muted. 2. Press the 1. Repeatedly press the MENU button to select the Special menu. 3. Use the F / G button to select your caption selection. Your choices are: CC1, CC2, CC3, CC4, Text 1, Text 2, Text3 and Text4. 2.
Parental Control can be used to block specific channels, ratings and other viewing sources. The Parental Control Function (V-Chip) is used to block program viewing based on the ratings sent by the broadcast station. The default setting is to allow all programs to be viewed. Viewing can be blocked by the type of program and by the categories chosen to be blocked. It is also possible to block all program viewing for a time period. To use this function, the following must be set : 1.
Special Menu Key lock Lock Menu Setup 1. Repeatedly press the MENU button to select the Special menu. 2. Press the D / E button to select Key lock. 3. Press the F / G button to select on or off. 4. Press the EXIT button to save and return to TV viewing. 1. Repeatedly press the MENU button to select the Special menu. Then, press the G button. • If Lock is already set, enter the password requested. • The TV is set with the initial password “0-0-0-0”. 2.
1. Connect the signal cable from the monitor output socket of the PERSONAL COMPUTER to the PC input socket of the set. 2. Connect the audio cable from the PC to the PC SOUND sockets of the set. 3. Press the INPUT SELECT button to select PC. 4. Switch on the PC, and the PC screen appears on the set. The set can be operated as the PC monitor.
Connection of PC Picture adjustment You can adjust picture contrast, brightness, horizontal/vertical position, clock, clock phase, auto-configure and reset as you prefer. 1. Repeatedly press the INPUT SELECT button to select the PC monitor mode. 2. Repeatedly press the MENU button to select the Special menu. 3. Press the D / E button to select the desired picture item. 4. Press the F / G button to make appropriate adjustments.
Check these items and try to adjust these Troubleshooting No picture, no sound Sound OK, poor picture Picture OK, poor sound Picture blurred Lines or streaks in picture Poor reception on some channels No color Poor color Remote control does not work Incorrect position Vertical bars or stripes on background Horizontal noise Signal Cable message appears Checklist Symptoms The mains plug-(plugged in and switched on) Is the TV switched on Try another channel (weak signal) Check aerial (plugged into TV? Che