THANK YOU FOR CHOOSING
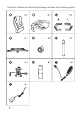
Contents - Make sure that the package contains the following parts: I POW ER HEA T HIG INTE H NSIT Y PUL SE LOW PRE SS WAV E MO AUT O NOR MAL BAC K LUM BAR THIG H LEG 15M in 30M in 60M in J TIME R DE
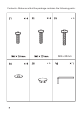
Contents - Make sure that the package contains the following parts: x6 M8 x 30mm x6 S6
Assembly Instructions Step 1: Turn the star base upside down, then press the casters into the holes at the end of each base leg
Step 2: Turn the star base upright and insert the lift into the center hole of the star base. The lift cover should be placed over the lift.Pay attention to the placing order of the three cups, and place them correctly as shown in the figure Step 3: Align the seat plate over the pre-drilled holes underneath the seat cushion. Make sure that the front of the seat plate is facing the front of the seat cushion. Attach the seat plate to the seat cushion using four M6x20mm bolts.
Step 4:Please use four M6*25 screws to connect the backrest, tighten all the screws with a wrench, and be careful not to miss the screws or damage them. Step 5:Turn the seat cushion upright and align the center hole of the seat plate over the lift, then push the seat cushion down onto the lift firmly until the connection is secure.
x6 x6 Step 6:Attach the arms to the seat cushion with four M8x30mm bolts, using the wrench.Note: Arm rests are labeled with an "L" (left) or "R" (right) to show which sides they should be placed on.
x6 Step 7:Press the plastic caps into the arm holes to cover the bolts.
Step 8:Adjusting the seat heightTo raise your seat, pull up the control handle. To lower the seat, pull down the control handle. Step 9:Adjust this handle to make the chair tilt back. If the handle is pulled downward, the chair will not move. If the handle is balanced, it will be unlocked. Please pay attention to the adjustment.
Step 10:Adjusting the tilt tensionTurn the tilt knob clockwise to make it easier to rock your chair backwards.Turn the tilt knob counterclockwise to make it harder to rock your chair backwards.Note: If your chair won't tilt back, pull out the control handle.
WARNING• Use care when handling.• Please read the instructions completely before assembly.• Remove all parts from the carton and ensure all parts are included prior to assembly.• Assemble the chair on the carton or carpet to prevent scratching the chair.• Be careful not to cross-thread bolts.• Do not use power tools.• For your safety, before using your chair, make sure that all of the bolts are fully tightened.