
User Manual
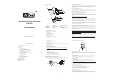

A / C Adaptor
Provided
Provided
Accessories Table
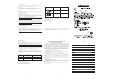
Description
Status
Green LED
dim once every 3 sec
Red LED
dim once every 3 sec
Turn on
Turn off
Under charging
Buzzer
Pendant
Fully charged
Green LED on
Red LED on
13. Battery recharging
13.1 Low battery indication
The Buzzer Pendant LED will flash red instead of green when the battery is low.
There will also be a short beep every few minutes.
13.2 Battery recharging
To recharge the battery, connect the charger cable to the Buzzer Pendant . During
recharging, the LED shows a steady red light if the Buzzer Pendant is turned off but
the red light will dim once every 3 seconds while Buzzer Pendant is on.
13.3 Fully charge
When the battery is fully charged, the indicators of red light will change into green. A
steady green light represents the Buzzer Pendant is off and is fully charged.
Green light dims once every 3 seconds represents the Buzzer Pendant is on and
fully charged.
Notice: When the battery level is too low, the Buzzer Pendant will automatically
power off. It cannot be powered on again unless the battery is charged for 5 minutes.
III. Maintenance and safe use
Use dry cloth to clean the Bluetooth Buzzer Pendant!
Do not expose it to liquid or moisture!
Do not expose it to fire or open flames!
9.2 To end the mute function
When the microphone is muted, press on both S2 and S3 buttons simultaneously
will end the mute function and the periodic beep tone will stop.
While a call is in session on the Buzzer Pendant, pressing S1 will disconnect the
call. After the call is disconnected, the green LED will flash normally.
To reject a call
When the Buzzer Pendant rings, press and hold S1 until you hear a long beep tone.
11.1 Using voice dialing
Press S1 on the Buzzer Pendant shortly. After the beep tone on the Buzzer
Pendant, voice dial as you normally would by saying the name of the person on the
Buzzer Pendant. The call will be connected in a few seconds.
Press S1 on the Buzzer Pendant shortly. After the beep tone on the mobile phone,
voice dial as you normally would and the call will be connected in a few seconds.
11.2 Redialing last dialed number
To redial the last dialed number, press and hold S3 for 2 seconds. Short low tones
will indicate an attempt to redial.
While a call is in session, pressing and releasing S2 will increase the earpiece
volume; pressing and releasing S3 will decrease the earpiece volume on the Buzzer
Pendant. There is a key tone to indicate volume increase or decrease.
10. Ending Calls
11. Making a new call in two ways
12. Adjusting the ear piece volume
When using a Bluetooth mobile phone:
When using a mobile phone without Bluetooth built-in and requiring a Bluetooth
dongle :
Notice: Make sure the voice dialing function is probably set up in the mobile phone
and it is within the range of the Buzzer Pendant.
Notice: Make sure the voice dialing function is probably set up in the mobile phone
and it is within the range of the Buzzer Pendant.
Notice: A warning tone will be heard when the volume level reaches its maximum or
minimum.
Disclaimer:
Talk time and stand-by time of the Buzzer Pendant will vary depending on
mobile phone model being used.
Note:
BQB, CE and FCC approved
The word mark and logos are owned by the SIG, Inc. and any use of
such marks by In-Tech Electronics Ltd. is under license. Other trademarks and trade
names are those of their respective owners.
Bluetooth
Bluetooth Bluetooth
(9)(7)(5)
(10)(8)(6)
Note
IV.
Neck Strap
Federal Communication Commission
Interference Statement
This equipment has been tested and found to comply with the limits for a Class B digital
device, pursuant to Part 15 of the FCC Rules. These limits are designed to provide
reasonable protection against harmful interference in a residential installation. This
equipment generates, uses and can radiate radio frequency energy and, if not installed
and used in accordance with the instructions, may cause harmful interference to radio
communications. However, there is no guarantee that interference will not occur in a
particular installation. If this equipment does cause harmful interference to radio or
television reception, which can be determined by turning the equipment off and on, the
user is encouraged to try to correct the interference by one of the following measures:
- Reorient or relocate the receiving antenna.
- Increase the separation between the equipment and receiver.
- Connect the equipment into an outlet on a circuit different from that to which the
receiver is connected.
- Consult the dealer or an experienced radio/TV technician for help.
This device complies with Part 15 of the FCC Rules. Operation is subject to the following
two conditions: (1) This device may not cause harmful interference, and (2) this device
must accept any interference received, including interference that may cause undesired
operation.
FCC Caution: Any changes or modifications not expressly approved by the party
responsible for compliance could void the user's authority to operate this equipment.
This equipment complies with FCC radiation exposure limits set forth for an uncontrolled
environment. End users must follow the specific operating instructions for satisfying RF
exposure compliance.
This transmitter must not be co-located or operating in conjunction with any other
antenna or transmitter.
IMPORTANT NOTE:
FCC Radiation Exposure Statement: