
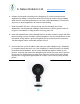
WeatherBoxForPiCam_UserGuide_v4

In Nature Robotics Ltd. www.innaturerobotics.com
6. Prepare the electronics housing for the Raspberry Pi or other microprocessor
equipment by drilling a circular hole about 35 mm wide (it needs to be just slightly
wider than the outer thread diameter on the stem of the WeatherBox). Ensure that
any burrs or other irregularities are removed after drilling.
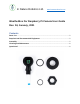
7. Slide the smaller (35 mm x 3.5 mm) O-ring over the threaded stem of the
WeatherBox. We recommend rubbing a small amount of silicone grease on the O-
ring prior to installation, to help preserve it for long-term use.
8. Insert the threaded stem of the WeatherBox into the hole created in step 6 and slide
the hex locking nut over the ribbon cable and tighten it onto the threaded end so that
the smaller O-ring makes a good seal against the top of the electronics enclosure.
Just hand-tighten with a reasonable amount of force.
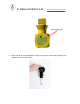
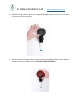
9. Connect the free end of the ribbon cable onto your other equipment (ex: Raspberry
Pi computer board) and test it out. If the Raspberry Pi camera board is not suitably
level within the WeatherBox, the rim of the WeatherBox might be visible in your
pictures. Unscrew and remove the plexiglass plate and O-ring, and use the erasure
from a pencil or similar device to genly poke down the corners of the circuit board.
Replace the O-ring and plexiglass plate as in steps 3 and 4 and try taking another
picture.