SeaLINK DIO-16 User Manual Part Number 8209 www.sealevel.com PO Box 830 Liberty, SC 29657 864.843.
Table of Contents INTRODUCTION......................................................................................................................... 1 OTHER SEALEVEL USB DIGITAL I/O PRODUCTS ......................................................................... 1 BEFORE YOU GET STARTED................................................................................................. 2 WHAT’S INCLUDED ........................................................................................................
Introduction The SeaLINK DIO-16 provides 8 Reed relays that can latch power, data or other electronic signals for control applications and 8 optically isolated inputs to allow monitoring of off board switch closures, relays or for any other general purpose monitoring needs. The adapter is USB 1.1 compliant. The SEALINK DIO-16 is designed to be used under Windows 98/ME/2000/XP.
Before You Get Started What’s Included The SEALINK DIO-16 is shipped with the following items. If any of these items is missing or damaged please contact Sealevel for replacement. SEALINK DIO-16 Adapter USB A to B Cable, Part number CA179 Sealevel SeaI/O Software CD Optional Items Depending upon your application, you are likely to find one or more of the following items useful for interfacing the SEALINK DIO-16 to real-world signals. All items can be purchased from our website (http://www.sealevel.
Software Installation Windows 98/ME/2000/XP Installation Important: Do not connect the SeaLINK DIO-16 adapter to the host USB device until the software has been fully installed. 1. Start Windows. 2. Insert the Sealevel Systems CD in to your CD drive. 3. If ‘Auto-Start’ is enabled for this drive the software will automatically launch. Otherwise, point your browser to the ‘Index.htm’ on the root directory of the CD 4. Select ‘Install Software’. 5. Select the Part Number for your adapter from the listing. 6.
Physical Installation The SeaLINK DIO-16 can be installed in any open USB port. Do not plug the unit into a USB port until the software has been fully installed. 1. Simply connect the SeaLINK DIO-16 to your USB port with the supplied cable. 2. The software drivers installed during setup will automatically recognize and configure the device. 3. You should see one or more “New Hardware Found” windows, indicating the actual device being created. 4. Next, view your system’s Device Manager. 5.
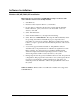
Programming the SEALINK DIO-16 Sealevel’s SeaI/O software is provided to assist in the development of reliable applications for the Sealevel Systems family of digital I/O adapters. Included on the SeaI/O CD are driver functions for use in accessing the I/O as well as helpful samples and utilities. Programming for Windows The SeaI/O API (Application Programmer Interface) provides a variety of useful high-level function calls implemented in a Windows dynamic link library (DLL).
Input Port Port A is an eight bit input port connected to optically isolated input sensors. Each sensor can be used to interface a voltage input and then sense whether the voltage is on or off. Each sensor is isolated (with respect to a common ground) from every other sensor, and also isolated with respect to the host PC ground.
Pin Assignments (Removable Terminal Block) Port A (Input) Bit Port A Terminals 0 0,1 1 2,3 2 4,5 3 6,7 4 8,9 5 10,11 6 12,13 7 14,15 Port B (Output) Bit 0 1 2 3 4 5 6 7 Port B Terminals 0,1 2,3 4,5 6,7 8,9 10,11 12,13 14,15 Side Panel View Port A Port : A E 7 6 5 4 3 2 1 0 3 2 1 0 Side Panel View Port B Port : B 7 © Sealevel Systems, Inc.
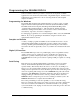
Electrical Characteristics Features 8 SPST Reed relays Eight optically isolated inputs Removable screw terminals Powered by USB port Specifications Input Ports Turn On Current: Isolator Diode Drop: Resistor Power Max: Maximum Input Range: 1mA 1.1 VDC .
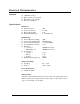
Example Circuits Input Circuit Output Circuit © Sealevel Systems, Inc.
Appendix A - Troubleshooting Following these simple steps can eliminate most common problems. 1. Install software first. After installing the software then proceed to adding the hardware. This places the required installation files in the correct locations. 2. Read this manual thoroughly before attempting to install the adapter in your system. 3. Use Device Manager under Windows to verify proper installation. 4.
Appendix B - How To Get Assistance Begin by reading through the Trouble Shooting Guide in Appendix A. If assistance is still needed please see below. When calling for technical assistance, please have your user manual and current adapter settings. If possible, please have the adapter installed in a computer ready to run diagnostics. Sealevel Systems provides an FAQ section on its web site. Please refer to this to answer many common questions. This section can be found at http://www.sealevel.com/faq.
Appendix C – Silk Screen – 8209 PCB © Sealevel Systems, Inc.
Appendix D - Compliance Notices Federal Communications Commission Statement FCC - This equipment has been tested and found to comply with the limits for Class A digital device, pursuant to Part 15 of the FCC Rules. These limits are designed to provide reasonable protection against harmful interference when the equipment is operated in a commercial environment.
Warranty Sealevel's commitment to providing the best I/O solutions is reflected in the Lifetime Warranty that is standard on all Sealevel manufactured products. We are able to offer this warranty due to our control of manufacturing quality and the historically high reliability of our products in the field. Sealevel products are designed and manufactured at its Liberty, South Carolina facility, allowing direct control over product development, production, burn-in and testing. Sealevel Systems, Inc.