
User guide


© Sealevel Systems, Inc.
- 4 -
SeaLINK+16.VC User Manual
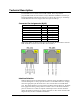
Physical Installation
The SeaLINK+16.VC can be connected to any spare USB port.
Do not connect the device to a USB port until the software has been fully
installed.
1. Connect the SeaLINK+16.VC to external power using the included TR101 power
supply.
2. Connect the SeaLINK+16.VC to a USB port with the supplied CA179 USB
device cable.
3. The software drivers installed during setup will automatically recognize and
configure the device.
4. You should see one or more “New Hardware Found” windows, indicating the
actual device being created.
5. NOTE: The installation will repeat twice for each COM port (a total of 32 times
on the SeaLINK+16.VC). This is a limitation in the way Windows installs
external serial devices.
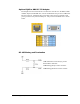
6. Next, view your system’s Device Manager.
7. You should have new COM: ports in the Ports (COM & LPT) Device Class
indicating the installation was successful.
8. You can access your new COM: port by using the assigned COM: identifier. This
assignment will vary from system to system.
9. To verify operation use Sealevel Systems supplied WinSSD diagnostic utility.
WinSSD can be found in the Start, Programs group.
The SeaLINK+16.VC is now ready for use.