
User Manual


Installing One Speedlight
You can use the SR-SHOE-D with a single speedlight and radio remote by mounting
them directly to the L bracket.
To assemble the SR-SHOE-D for a single speedlight, follow these steps:
1. Mount your softbox onto the speed ring by inserting your softbox’s rods into
the corresponding labeled rod mounts (for more information on this, refer to
your softbox’s instruction manual).
2. Mount the speed ring assembly onto a light stand or boom arm, and use the
locking knob to tighten the connection until secure.
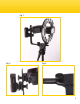
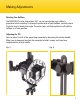
3. Insert the L bracket into the speed ring’s L-bracket mount, and use the
thumbscrew to secure its position. (Fig. 3)
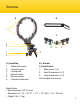
4. On the flash bracket, fully loosen the large thumbscrew from two of the shoe
mounts until the shoe mounts detach. (Fig. 2)
5. Note: When installing a single speedlight and radio remote on the SR-SHOE-D,
you will not need to attach the flash bracket to the L bracket.
6. Slide the large thumbscrews toward the center of the flash bracket to remove
them.
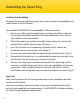
7. Attach the shoe mounts to the L bracket. The top shoe mount should be facing
toward the speed ring, and the bottom one should be facing away from it.
8. Insert your speedlight into the top shoe mount, and your radio remote into the
bottom shoe mount. Use the small thumbscrew on the shoe mounts to loosen
and tighten the mounts. (Fig. 1)
Important!
Make sure the mounts and the locking mechanisms on your speedlight and radio
remote are fully locked.
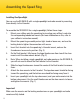
Assembling the Speed Ring
4