
User manual


15
English
intended, if it is not safely installed or not
correctly connected or operated, or if it is not
repaired in an expert way.
If the unit is to be put out of operation
definitively, take it to a local recycling
plant for a disposal which is not harmful
to the environment.
3 Setting the Spotlight
intoOperation
3.1 Installation
•
Always position the spotlight in such a way to
ensure sufficient air circulation during operation.
Never cover the cooling fins of the housing.
•
Always keep a minimum distance of 50 cm to
the illuminated object.
WARNING When the spotlight is installed at
a place where people may walk or
sit under it, additionally secure it,
e. g. via a safety rope. Guide the
safety rope through the eyebolt
on the rear of the spotlight and fasten it in such
a way that the maximum falling distance of the
spotlight will not exceed 20 cm.
1. Install the spotlight via its mounting brackets,
e. g. with a stable mounting screw or a support
for lighting units (C hook) on a cross bar.
To align the spotlight, release the two lock-
ing screws of the mounting brackets. Adjust
the desired inclination of the spotlight and
fasten the screws.
2. Alternatively, set up the spotlight on its own:
Fold out the mounting brackets underneath
the spotlight and use them as a stand. Then
fasten the locking screws.
3.2 Barn doors
To reduce the light beam angle, optional barn
doors are available: PARC-100B. Fasten the barn
doors to the front of the spotlight.
3.3 Power supply
When the spotlight has been connected to the
mains, it is switched on. The display will show
the menu item most recently selected and go out
after 30 seconds. As soon as a button (MENU,
ENTER UP und DOWN) is pressed, the display will
light up again for 30 seconds.
WARNING
To prevent damage to your eyes,
never look directly into the light
source for any length of time.
Please note that fast changes in lighting may
trigger epileptic seizures with photosensitive
persons or persons with epilepsy!
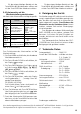
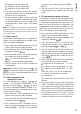
3.3.1 ODC-100 / RGB
Connect the plug (A) of the cable POWER IN to
the inline jack (B) of the mains cable provided.
Then fasten the nut to secure this connection.
POWER IN
230 V/50 Hz
A B
Fig. 3 Mains connection ODC-100 / RGB
CAUTION! The cable POWER OUT carries mains
voltage. If no further unit is connected to the ca-
bles POWER OUT and DMX OUT, always screw the
protective covers supplied onto the inline jacks.
Connect the mains plug to a socket (230 V/ 50 Hz).
Power supply
of multiple ODC-100 / RGB spotlights
If multiple ODC-100 / RGB spotlights are used, the
units can be interconnected for power supply. For
the time being, do not yet connect the first unit
to a mains socket.
1) Use the inline jack of the cable POWER OUT
to connect the first unit to the plug (A) of the
cable POWER IN of the second unit. Proceed
in the same way to connect the second unit
to the third one etc. until all units have been
connected in a chain.
If the mains connection cables between the
spotlights are too short, use suitable extension
cables, e. g.
ODP-34AC length: 2 m or
ODP-34AC / 10 length: 10 m
CAUTION! To reduce the risk of cable fire
caused by overload, the total current in the
connection cables must not exceed 10 A.
Therefore, do not interconnect more than 19
ODC-100 / RGB spotlights.
2)
On the last spotlight, screw the protective
cover supplied onto the inline jack of the cable
POWER OUT. The cable carries mains voltage!
3) Connect the mains plug of the first spotlight
to a mains socket (230 V/ 50 Hz).