DMX-LED-Scheinwerfer DMX LED Spotlight ODC-100/RGB PARC-100/RGB Bestell-Nr. • Order No. 38.7090 Bestell-Nr. • Order No. 38.
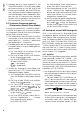
SAFETY ROPE POWER IN POWER OUT DMX IN DMX OUT MENU ENTER UP DOWN ➀ ODC-100/ RGB SAFETY ROPE POWER IN PUSH POWER OUT FU SE DMX IN FUSE MENU ENTER UP DOWN ➁ PARC-100/ RGB 2 DMX OUT
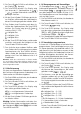
Deutsch . . . . . . . . . . Seite 4 English . . . . . . . . . . Page 14 Français . . . . . . . . . . Page 24 Italiano . . . . . . . . . . Pagina 34 Nederlands . . . . . . . Pagina 44 Español . . . . . . . . . . Página 54 Polski . . . . . . . . . . . . Strona 64 Dansk . . . . . . . . . . . Sida 74 Svenska . . . . . . . . . . Sidan 75 Suomi . . . . . . . . . . .
Deutsch DMX-LED-Scheinwerfer 1 Einsatzmöglichkeiten Diese Anleitung richtet sich an Bediener mit Grundkenntnissen in der DMX-Steuerung. Bitte lesen Sie die Anleitung vor dem Betrieb gründlich durch und heben Sie sie für ein späteres Nachlesen auf. Auf der Seite 2 sind die Modelle ODC100 / RGB und PARC-100 / RGB abgebildet. Das Menü für die Geräteeinstellungen ist auf den Seiten 78 und 79 dargestellt. Dieser LED-Scheinwerfer dient zur Beleuchtung z. B. auf Bühnen, in Diskotheken und Festsälen.
montiert, nicht richtig angeschlossen, falsch bedient oder nicht fachgerecht repariert, kann keine Haftung für daraus resultierende Sachoder Personenschäden und keine Garantie für das Gerät übernommen werden. Soll das Gerät endgültig aus dem Betrieb genommen werden, übergeben Sie es zur umweltgerechten Entsorgung einem örtlichen Recyclingbetrieb. 3 Inbetriebnahme 3.1 Montage • Platzieren Sie das Gerät so, dass im Betrieb eine ausreichende Luftzirkulation gewährleistet ist.
Deutsch entstehen. Darum nur maximal 19 Geräte ODC-100 / RGB miteinander verbinden. 2) Am letzten Gerät auf die Kupplung des Kabels POWER OUT die beiliegende Schutzkappe schrauben. Das Kabel führt Netzspannung! 3) Den Netzstecker des ersten Geräts in eine Steckdose (230 V/ 50 Hz) stecken. 3.3.2 PARC-100 / RGB Zur Stromversorgung ist das Gerät mit Powercon-Anschlüssen ausgestattet. VORSICHT! Ein Powercon-Stecker darf nicht unter Spannung hineingesteckt oder herausgezogen werden.
3) Die Taste ENTER drücken. Das Display zeigt jetzt einen der 11 Speicherplätze an ( … ) und der Scheinwerfer strahlt im zugehörigen Weißton. 4) Mit der Taste UP oder DOWN den gewünschten Weißton wählen oder den Speicherplatz, dessen Einstellungen geändert werden sollen. 5) Zum Ändern einer Einstellung nach dem Anwählen des Speicherplatzes die Taste ENTER drücken. Das Display zeigt jetzt , oder und eine Zahl (0 – 255).
Deutsch 6) Nachdem die erste Szene eingestellt ist, die Taste MENU drücken. Das Display zeigt wieder die Szenennummer an. Mit der Taste UP die zweite Szene anwählen, die Taste ENTER drücken, die Szene einstellen und den Vorgang für alle anschließenden Szenen wiederholen. Werden nicht alle 30 Szenennummern benötigt, bei den nicht verwendeten Szenennummern die Szenendauer auf Null einstellen. 4.
2) Den Ausgang DMX OUT mit dem DMX-Eingang des nächsten DMX-Geräts verbinden. Dessen Ausgang wieder mit dem Eingang des nachfolgenden DMX-Geräts verbinden usw., bis alle DMX-gesteuerten Geräte in einer Kette angeschlossen sind. Sind beim Verbinden von mehreren ODC100 / RGB miteinander die DMX-Verbindungskabel zwischen den Geräten zu kurz, passende Verlängerungskabel verwenden, z. B. ODP-34DMX Länge 2 m oder ODP-34DMX / 10 Länge 10 m.
Deutsch 4.3.4 Unteradressen verwenden Durch die Verwendung von Unteradressen lassen sich über eine einzige DMX-Startadresse bis zu 66 Scheinwerfer (-gruppen) unabhängig voneinander steuern. Die maximal mögliche Anzahl DMX-gesteuerter Geräte wird dadurch erheblich erhöht. Die Anwahl von Scheinwerfern mit einer Unteradresse erfolgt über den DMX-Kanal 10 (Abb. 8).
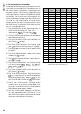
10-Kanal-Betrieb 3-Kanal-Betrieb DMX- Kanal DMXWert Funktion DMX- Kanal DMXWert Funktion 1 000 – 255 Dimmer 0 % 100 % 1 000 – 255 Helligkeit Rot 2 000 – 255 Grundhelligkeit Rot 2 000 – 255 Helligkeit Grün 3 000 – 255 Grundhelligkeit Grün 3 000 – 255 Helligkeit Blau 4 000 – 255 Grundhelligkeit Blau 5* 6 7* 000 – 030 keine Funktion 031 – 255 verschiedene Farben 000 – 010 kein Stroboskop 011 – 255 Stroboskop langsam schnell 000 – 020 keine Funktion 021 – 030 Show
Deutsch 1) Die Taste MENU so oft drücken, bis die oberste Menüebene erreicht ist. 2) Die Taste UP oder DOWN so oft drücken, bis das Display anzeigt. 3) Die Taste ENTER drücken. Das Display springt auf die Anzeige , , , , oder um. 4) Die Taste UP oder DOWN so oft drücken, bis das Display anzeigt.
5.4 Scheinwerfer auf die Werkseinstellung zurücksetzen Ab Werk ist der Scheinwerfer wie folgt eingestellt: Menüpunkt Funktion Werkseinstellung Anzahl der DMX-Kanäle = 10 Kanäle max. Helligkeit Funktion Weißabgleich Funktion Unteradresse träge LED-Reaktion = 100 % = aus = aus = max.
English DMX LED Spotlight 1 Applications These instructions are intended for users with basic knowledge in DMX control. Please read the instructions carefully prior to operation and keep them for later reference. On page 2, you will find the spotlights ODC100 / RGB and PARC-100 / RGB. The menu for the settings of the spotlight can be found on pages 78 and 79. This LED spotlight is used for illumination, e. g. on stage, in discotheques and function rooms.
If the unit is to be put out of operation definitively, take it to a local recycling plant for a disposal which is not harmful to the environment. 3 Setting the Spotlight into Operation 3.1 Installation • Always position the spotlight in such a way to ensure sufficient air circulation during operation. Never cover the cooling fins of the housing. • Always keep a minimum distance of 50 cm to the illuminated object.
English 3.3.2 PARC-100 / RGB For power supply, the unit is equipped with Powercon connections. CAUTION! Never connect or disconnect a Power con plug while voltage is applied. Always make the Powercon connection before making the mains connection. When disconnecting, always disconnect the mains connection before disconnecting the Powercon connection. Connect the mains jack POWER IN to a mains socket (230 V/ 50 Hz) via the mains cable provided.
6) Use the button ENTER to select the colours one after the other, and use the button UP or DOWN to set their brightness. 7) To select another shade of white or to change the settings of another storage location, press the button MENU so that the number of the storage location is shown again. Then repeat steps 4 – 6. Note: If the spotlight is switched off and on again in this mode, the spotlight will remain dark and the shade of white desired or the individual shade of colour will have to be selected again.
English 4.2 Synchronous control of multiple spotlights (master / slave mode) Multiple ODC-100 / RGB and PARC-100 / RGB (also a combination of both) may be connected. The master unit can then control all slave units in sync. 1) Connect the spotlights via their DMX jacks to a chain. Please refer to chapter 4.3.1 “Connection”, ignoring step 1.
4.3.2 Setting the number of DMX channels To operate the spotlight with a light controller, the DMX start address (☞ chapter 4.3.3) and the number of DMX channels must be set. The number of DMX channels depends on the functions required and may also depend on the number of control channels that are available at the light controller. Please refer to chapter 4.3.
English 4.3.4 Using subaddresses With subaddresses, it is possible to independently control up to 66 spotlights (spotlight groups) via one DMX start address. Thus, the maximum number of DMX units that may be controlled is substantially increased. The spotlights with a subaddress are selected via DMX channel 10 (fig. 8). All spotlights with the same subaddress may be controlled in sync if DMX channel 10 is set to a DMX value smaller than 10.
3-channel mode 10-channel mode DMX channel DMX value Function DMX channel DMX value Function 1 000 – 255 dimmer 0 % 100 % 1 000 – 255 brightness red 2 000 – 255 basic brightness red 2 000 – 255 brightness green 3 000 – 255 basic brightness green 3 000 – 255 brightness blue 4 000 – 255 basic brightness blue Fig.
English 2) Press the button UP or DOWN repeatedly until the display indicates . 5) Press the button ENTER and then use the button UP or DOWN to select: = maximum brightness = brightness reduced to 33 % b) Press the button DOWN twice so that the display indicates . c) Press the button ENTER. The display changes to , , , , or . d) Press the button UP or DOWN repeatedly . until the display indicates e) Press the button ENTER.
The factory settings of the spotlight are as follows: Menu item Function Factory setting number of DMX channels = 10 channels max. brightness white balance function subaddress function slow LED response = 100 % subaddress = slowest 01 11 shades of white factory settings white balance R = 255, G = 255, B = 255 DMX / independent mode = DMX / indeor slave mode pendent operation Fig.
Français Projecteur DMX à LED 1 Possibilités d’utilisation Cette notice s’adresse à l’utilisateur ayant des connaissances de base en gestion DMX. Veuillez lire la notice avec attention et conservez-la pour pouvoir, si besoin, vous y reporter ultérieurement. Les modèles ODC-100 / RGB et PARC-100 / RGB sont présentés sur la page 2. Le menu pour les réglages des appareils est présenté sur les pages 78 et 79.
don secteur endommagé ne doit être remplacé que par un technicien spécialisé. • Nous déclinons toute responsabilité en cas de dommages matériels ou corporels résultants si le projecteur est utilisé dans un but autre que celui pour lequel il a été conçu, s’il n’est pas monté d’une manière sûre, s’il n’est pas correctement branché ou utilisé ou s’il n’est pas réparé par une personne habilitée, en outre, la garantie deviendrait caduque.
Français ATTENTION ! Le courant total dans les câbles de branchement ne doit pas dépasser 10 A, sinon une surcharge de câble peut provoquer un incendie. C’est pourquoi, uniquement 19 appareils ODC-100 / RGB au plus peuvent être reliés ensemble. 2) Sur le dernier appareil, vissez sur la fiche femelle du cordon POWER OUT le cache de protection livré. Le câble est conducteur de tension ! 3) Reliez la fiche secteur du premier appareil à une prise 230 V/ 50 Hz. 3.3.
3) Appuyez sur la touche ENTER, l’affichage indique maintenant un des 11 emplacements de mémoire ( … ) et le projecteur émet de la lumière dans le ton de blanc correspondant. 4) Avec la touche UP ou DOWN, sélectionnez le ton de blanc voulu ou l’emplacement de mémoire dont les réglages doivent être modifiés. 5) Pour modifier un réglage une fois l’emplacement de mémoire choisi, appuyez sur la touche ENTER. L’affichage indique maintenant , ou et un chiffre (0 – 255).
Français = luminosité rouge (0 – 255) = luminosité vert (0 – 255) = luminosité bleu (0 – 255) = fréquence des éclairs (0 – 20) du stroboscope = durée de la scène (time) en secondes = durée de transition (fade) Avec la touche UP ou DOWN, réglez la valeur voulue. 6) Une fois la première scène réglée, appuyez sur la touche MENU. L’affichage indique à nouveau le numéro de la scène.
DMX IN C D Schéma 4 Branchement DMX ODC-100 / RGB Reliez la fiche XLR via un cordon prolongateur à la sortie DMX du contrôleur ou, si plusieurs appareils gérés par DMX sont utilisés, à la sortie DMX du dernier appareil géré par DMX. 2) Reliez la sortie DMX OUT à l’entrée DMX du prochain appareil DMX. Reliez sa sortie à l’entrée de l’appareil DMX suivant et ainsi de suite de manière à ce que tous les appareils gérés par DMX forment une chaîne.
Français 3) Appuyez sur la touche ENTER. L’affichage indique maintenant et un nombre entre 1 et 512. 4) Réglez l’adresse de démarrage avec la touche UP ou DOWN. 5) Vous pouvez maintenant utiliser le projecteur avec un contrôleur. – Si cela ne fonctionne pas, allez au point de menu et appuyez sur la touche ENTER. Si l’affichage indique , commutez sur avec la touche UP ou DOWN. 4.3.
Mode 10 canaux Canal DMX Valeur DMX 1 000 – 255 2 3 4 000 – 255 000 – 255 000 – 255 000 – 030 031 – 255 000 – 010 5* 6 011 – 255 000 – 020 021 – 030 031 – 040 041 – 050 051 – 060 061 – 070 071 – 080 081 – 090 091 – 100 101 – 110 111 – 120 7* 8 10 Fonction dimmer 0 % 100 % luminosité de base rouge luminosité de base vert luminosité de base bleu pas de fonction différentes couleurs pas de stroboscope stroboscope lent rapide pas de fonction programme Show AT.01 AT.02 AT.03 AT.04 AT.05 AT.06 AT.
Français 2) Appuyez sur la touche UP ou DOWN de manière répétée jusqu’à ce que l’affichage indique . 3) Appuyez sur la touche ENTER. L’affichage passe à , , , , ou . 4) Appuyez sur la touche UP ou DOWN de manière répétée jusqu’à ce que l’affichage indique . 5) Appuyez sur la touche ENTER et sélectionnez avec la touche UP ou DOWN : = luminosité maximale = uminosité réduite à 33 % 6) Pour que le projecteur puisse être géré par DMX, revenez avec la touche ENTER à la plage supérieure du menu.
6) Pour pouvoir gérer le projecteur par DMX, revenez, avec la touche MENU, à la plage supérieure du menu. Pour le fonctionnement indépendant, sélectionnez le mode de fonctionnement avec la touche MENU et activez le mode avec la touche ENTER. 5.4 Réinitialisation du projecteur sur le réglage usine En usine, le projecteur est réglé comme suit : Point de menu Fonction Réglage usine nombre de canaux DMX = 10 canaux luminosité max.
Italiano Proiettore DMX con LED 1 Possibilità d’impiego Queste istruzioni sono rivolte agli utenti con conoscenze base dei comandi DMX. Vi preghiamo di leggerle attentamente prima della messa in funzione e di conservarle per un uso futuro. A pagina 2 sono illustrati i modelli ODC100 / RGB e PARC-100 / RGB.Il menu per le impostazioni degli apparecchi è rappresentato alle pagine 78 e 79. Questo proiettore con LED serve per l’illuminazione, per esempio sul palcoscenico, in discoteche o in saloni.
Se si desidera eliminare l’apparecchio definitivamente, consegnarlo per lo smaltimento ad un’istituzione locale per il riciclaggio. 3.3 Alimentazione Il proiettore si accende collegandolo con la rete. Il display indica la voce del menu scelta per ultima e si spegne dopo 30 s. Quando si preme un tasto (MENU, ENTER, UP o DOWN si riaccende per 30 s. 3.1 Montaggio AVVERTIMENTO Non guardare direttamente e a lungo nella fonte di luce, per escludere possibili danni agli occhi.
Italiano 2) Sull’ultimo apparecchio, sulla presa del cavo POWER OUT avvitare la copertura protettiva in dotazione. Il cavo è sotto tensione di rete! 3) Inserire la spina del primo apparecchio in una presa di rete (230 V/ 50 Hz). 3.3.2 PARC-100 / RGB Per l’alimentazione, l’apparecchio è equipaggiato con contatti Powercon. ATTENZIONE! Un connettore Powercon non deve essere inserito o staccato sotto tensione.
3) Premere il tasto ENTER. Il display visualizza ora una delle 11 locazioni di memoria ( … ) e il proiettore emette la relativa tonalità del bianco. 4) Con il tasto UP o DOWN scegliere la tonalità del bianco desiderata oppure la locazione di memoria le cui impostazioni devono essere modificate. 5) Per modificare un’impostazione, dopo aver scelto la locazione di memoria premere il tasto ENTER. Il display visualizza ora , oppure e un numero (0 – 255).
Italiano Con il tasto UP o DOWN impostare il valore desiderato. 6) Dopo aver impostato la prima scena, premere il tasto MENU. Il display indica nuovamente il numero della scena. Con il tasto UP scegliere la seconda scena, premere il tasto ENTER, impostare la scena e ripetere la procedura per tutte le scene che seguono. Se non sono richiesti tutti e trenta i numeri di scene, per i numeri non utilizzati impostare la durata della scena con zero. 4.
ImpostaNumero dei canali DMX zione 10 canali (☞ Cap. 4.3.5, Fig. 8) 3 canali 1 = rosso, 2 = verde, 3 = blu 4 canali 1 = dimmer, 2 = rosso, 3 = verde, 4 = blu 5 canali 1 = dimmer, 2 = rosso, 3 = verde, 4 = blu, 5 = stroboscopio 3 canali 1 = colore, 2 = saturazione 3 = luminosità Se nel collegamento di più ODC-100 / RGB, i cavi DMX fra gli apparecchi dovessero essere troppo corti, usare prolunghe adatte, p. es. ODP-34DMX lunghezza 2 m oppure ODP-34DMX/ 10 lunghezza 10 m.
Italiano 4.3.4 Utilizzare sottoindirizzi Tramite l’utilizzo di sottoindirizzi è possibile gestire in modo indipendente e per mezzo di un solo indirizzo di start DMX fino a 66 (gruppi di) proiettori. In questo modo, il numero massimo degli apparecchi con comando DMX è notevolmente aumentato. La scelta dei proiettori con un sottoindirizzo avviene tramite il canale DMX 10 (Fig. 8).
Funzionamento a 10 canali Funzionamento a 3 canali Canale DMX Valore DMX Funzione Canale DMX Valore DMX 1 000 – 255 Dimmer 0 % 100 % 1 000 – 255 Luminosità rosso 2 000 – 255 Luminosità base rosso 2 000 – 255 Luminosità verde 3 000 – 255 Luminosità base verde 3 000 – 255 Luminosità blu 4 000 – 255 Luminosità base blu 000 – 030 Nessuna funzione 5* 6 7* 8 031 – 255 Vari colori 000 – 010 Nessuno stroboscopio 011 – 255 Stroboscopio lento veloce 000 – 020 Nessuna funzio
Italiano 1) Premere il tasto MENU tante volte finché è raggiunto il livello superiore del menù. 2) Premere il tasto UP o DOWN tante volte finché il display indica . 3) Premere il tasto ENTER. Il display passa ora alla visualizzazione , , , , o . 4) Premere il tasto UP o DOWN tante volte finché il display indica .
5.4 Resettare il proiettore all’impostazione della fabbrica Dalla fabbrica, il proiettore è impostato come segue: Voce del menù Impostazione della fabbrica Funzione Numero canali DMX = 10 canali Max. luminosità Funzione correzione del bianco Funzione sottoindirizzo Reazione lenta dei LED = 100 % Sottoindirizzo = off = off = max.
Nederlands DMX-ledschijnwerper 1 Toepassingen Deze handleiding is bedoeld voor de gebruiker met basiskennis van de DMX-besturing. Lees de handleiding grondig door, alvorens het apparaat in gebruik te nemen, en bewaar ze voor latere raadpleging. Op pagina 2 vindt u de afbeelding van de modellen ODC-100 / RGB en PARC-100 / RGB. Het menu voor de apparaatinstellingen vindt u op de pagina‘s 78 en 79. Deze led-schijnwerper wordt gebruikt voor verlichting bv. op podia, in discotheken en feestzalen.
(MENU, ENTER, UP of DOWN) drukt, licht het display weer gedurende 30 seconden op. Wanneer het apparaat definitief uit bedrijf wordt genomen, bezorg het dan voor milieuvriendelijke verwerking aan een plaatselijk recyclagebedrijf. Kijk niet rechtstreeks in de lichtbron gedurende lange tijd, omdat dit de ogen kan beschadigen. Weet dat stroboscoopeffecten en zeer snelle lichtwisselingen bij fotosensibele mensen en epileptici epileptische aanvallen kunnen veroorzaken! 3 Ingebruikname 3.
Nederlands 2) Op het laatste apparaat schroeft u de bijgeleverde beschermkap op de koppeling van de kabel POWER OUT. De kabel voert netspanning! 3) Plug de netstekker van het eerste apparaat in een stopcontact (230 V/ 50 Hz). 3.3.2 PARC-100 / RGB Voor de voedingsspanning is het apparaat uitgerust met Powercon-aansluitingen. OPGELET! Een Powercon-stekker mag niet onder spanning worden ingeplugd of uitgetrokken.
4) Selecteer met de toets UP of DOWN de gewenste wittint of selecteer de geheugenplaats waarvan de instellingen gewijzigd moeten worden. 5) Om een instelling te wijzigen, drukt u na selecteren van de geheugenplaats op de toets ENTER. Op het display verschijnt nu , of en een getal (0 – 255). = helderheid rood = helderheid groen = helderheid blauw 6) Selecteer met de toets ENTER een voor een de kleuren en stel telkens de helderheid in met de toets UP of DOWN.
Nederlands 6) Nadat de eerste scène ingesteld is, drukt u op de toets MENU. Op het display wordt opnieuw het scènenummer weergegeven. Selecteer met de toets UP de tweede scène, druk op de toets ENTER, stel de scène in en herhaal de procedure voor alle volgende scènes. Als niet alle 30 scènenummers nodig zijn, stelt u bij de niet-gebruikte scènenummers de duur van de scène in op nul. 4.
Instelling Aantal DMX-kanalen 10 kanalen (☞ hfdst. 4.3.5, fig. 8) 3 kanalen 1 = rood, 2 = groen, 3 = blauw 4 kanalen 1 = dimmer, 2 = rood, 3 = groen, 4 = blauw 5 kanalen 1 = dimmer, 2 = rood, 3 = groen, 4 = blauw, 5 = stroboscoop 3 kanalen 1 = kleur, 2 = kleurverzadiging, 3 = helderheid Als bij het onderling verbinden van meerdere ODC-100/RGB-apparaten de DMX-verbindingskabels tussen de apparaten te kort zijn, gebruik dan geschikte verlengsnoeren, bv.
Nederlands 4.3.4 Subadressen gebruiken Door het gebruik van subadressen kunt u via één enkel DMX-startadres tot 66 schijnwerpers (schijn werpergroepen) onafhankelijk van elkaar besturen. Het maximaal mogelijke aantal DMX-gestuurde apparaten wordt hierdoor aanzienlijk verhoogd. De selectie van schijnwerpers met een subadres gebeurt via het DMX-kanaal 10 (figuur 8).
3-Kanaalbedrijf 10-Kanaalbedrijf DMX- kanaal DMXwaarde Functie DMX- kanaal DMXwaarde 1 000 – 255 dimmer 0 % 100 % 1 000 – 255 helderheid rood 2 000 – 255 helderheid groen 3 000 – 255 helderheid blauw 2 000 – 255 basishelderheid rood 3 000 – 255 basishelderheid groen 4 000 – 255 basishelderheid blauw 5* 6 7* 8 10 Afb.
Nederlands 1) Druk enkele keren op de toets MENU tot u zich in het bovenste menuniveau bevindt. 2) Druk enkele keren op de toets UP of DOWN tot op het display verschijnt. 3) Druk op de toets ENTER. Op het display verschijnt nu de melding , , , , of . 4) Druk enkele keren op de toets UP of DOWN tot op het display verschijnt.
7) Voor DMX-besturing van de schijnwerper keert u met de toets MENU terug naar het bovenste menuniveau. Voor autonoom bedrijf selecteert u de be drijfsmodus met de toets MENU en schakelt u de modus in met de toets ENTER. 5.4 De fabrieksinstellingen van de schijnwerper herstellen 6 Het apparaat reinigen Af fabriek is de schijnwerper als volgt ingesteld: Menuitem Functie Fabrieksinstelling aantal DMX-kanalen = 10 kanalen max.
Español Proyector LED DMX 1 Aplicaciones Estas instrucciones van dirigidas a usuarios con conocimientos básicos en control DMX. Lea atentamente estas instrucciones antes de funcionamiento y guárdelas para usos posteriores. En la página 2, encontrará los proyectores ODC-100/RGB y PARC-100/RGB. El menú para los ajustes del proyector se puede encontrar en las páginas 78 y 79. Este proyector LED sirve para iluminación, p. ej. en escenarios, discotecas o salas de fiestas.
ENTER, UP o DOWN), el visualizador se iluminará de nuevo otros 30 segundos. Si va a poner el aparato definitivamente fuera de servicio, llévelo a la planta de reciclaje más cercana para que su eliminación no sea perjudicial para el medioambiente. ADVERTENCIA Para prevenir daños oculares, no mire nunca directamente hacia la fuente de luz durante un tiempo prolongado.
Español cable POWER OUT. ¡El cable contiene voltaje de corriente! 3) Conecte el conector de corriente del primer proyector a un enchufe (230 V/ 50 Hz). 3.3.2 PARC-100 / RGB Para la alimentación, el aparato está equipado con conexiones Powercon. ¡PRECAUCIÓN! No conecte o desconecte un conector Powercon mientras exista algún voltaje. Haga siempre la conexión Powercon antes de realizar la conexión a la corriente.
4) Pulse el botón UP o DOWN para seleccionar el matiz de blanco deseado o las memorias cuyos ajustes hay que modificar. 5) Para cambiar un ajuste, pulse ENTER después de seleccionar una memoria. Ahora el visualizador indica , o y un número (0 – 255). = brillo del color rojo = brillo del color verde = brillo del color azul 6) Utilice el botón ENTER para seleccionar los colores uno tras otro, y utilice el botón UP o DOWN para ajustar su brillo.
Español = duración de la escena en segundos = tiempo de fundido Utilice el botón UP o DOWN para ajustar el valor deseado. 6) Después de ajustar la primera escena, pulse el botón MENU. El visualizador muestra el número de la escena otra vez. Utilice el botón UP para seleccionar la segunda escena, pulse ENTER y luego seleccione los ajustes para esta escena. Repita este procedimiento para las escenas siguientes.
2) Conecte la salida DMX OUT a la entrada DMX del segundo aparato DMX. Conecte la salida del segundo aparato DMX a la entrada del tercer aparato DMX, etc. hasta que todos los aparatos controlados por DMX estén conectados en cadena. Si los cables de conexión DMX entre los aparatos son demasiado cortos cuando se interconectan varios proyectores ODC-100/ RGB, utilice cables alargadores adecuados, p. ej.
Español 4.3.4 Utilizar subdirecciones Con las subdirecciones, se pueden controlar independientemente hasta 66 proyectores (grupos de proyectores) mediante una dirección de inicio DMX. De este modo, el número máximo de aparatos DMX que se pueden controlar aumenta substancialmente. Los proyectores con una subdirección se seleccionan mediante el canal DMX 10 (fig. 8).
Funcionamiento con 10 canales Funcionamiento con 3 canales Canal DMX Valor DMX Función Canal DMX Valor DMX Función 1 000 – 255 Dimmer 0 % 100 % 1 000 – 255 Brillo del rojo 2 000 – 255 Brillo básico del rojo 2 000 – 255 Brillo del verde 3 000 – 255 Brillo básico del verde 3 000 – 255 Brillo del azul 4 000 – 255 Brillo básico del azul Fig.
Español 2) Pulse el botón UP o DOWN hasta que en el visualizador aparezca . 3) Pulse el botón ENTER. En el visualizador aparecerá , , , , o . 4) Pulse el botón UP o DOWN hasta que en el . visualizador aparezca 5) Pulse el botón ENTER y luego utilice el botón UP o DOWN para seleccionar: = brillo máximo = brillo reducido al 33 % 6) Para poder controlar el proyector por DMX, utilice el botón MENU para volver al nivel más alto del menú.
Los ajustes de fábrica del proyector son los siguientes: Objeto de menú Función Ajuste de fábrica Número de canales DMX = 10 canales Brillo máximo Función compensación del blanco Función de subdirección Respuesta LED lenta = 100 % = apagado = apagado = muy lenta Subdirección 01 11 matices de blanco Ajustes de fábrica Compensación del blanco R = 255, G = 255, B = 255 DMX / modo independiente o modo Slave = DMX / funcionamiento independientes Fig.
Polski Reflektory diodowe DMX 1 Zastosowanie Niniejsza instrukcja przeznaczona jest dla użytkowników posiadających co najmniej podstawową wiedzę na temat sterowania DMX. Przed rozpoczęciem pracy z urządzeniem, prosimy zapoznać się z instrukcją obsługi, a następnie zachować ją do wglądu. Na stronie 2 pokazano elementy sterujące i połączeniowe reflektorów ODC-100 / RGB oraz PARC-100 / RGB. Strukturę menu przedstawiono na stronach 78 i 79.
Po całkowitym zakończeniu eksploatacji, urządzenie należy oddać do punktu recyklingu, aby nie zaśmiecać ś rodowiska. 3.3 Zasilanie Po podłączeniu zasilania, urządzenie jest włączone. Na wyświetlaczu pokazane zostanie ostatnie wybrane polecenie menu, po 30 sekundach wyświetlacz zgaśnie. Po wciśnięcie dowolnego przycisku (MENU, UP, DOWN lub ENTER) wyświetlacz zapali się ponownie na 30 sekund.
Polski 2) Należy zabezpieczyć gniazdo nakablowe POWER OUT ostatniego reflektora dołączoną zaślepką, gdyż znajduje się ono pod napięciem! 3) Na końcu, podłączyć wtyczkę zasilającą pierwszego reflektora do gniazdka sieciowego (230 V/ 50 Hz). 3.3.2 PARC-100 / RGB Reflektor wyposażony jest w gniazdo zasilania Powercon. UWAGA! Dla bezpieczeństwa, niepodłączony wtyk Powercon nie powinien znajdować się pod napięciem.
2) Wcisnąć przycisk UP lub DOWN kilka razy, aż wyświetlacz pokaże . 3) Wcisnąć przycisk ENTER. Wyświetlacz pokazuje teraz jedną z komórek pamięci ( … ) a reflektor białe światło w danym odcieniu. 4) Wcisnąć przycisk UP lub DOWN aby wybrać żądany odcień lub numer zapisanego ustawienia do modyfikacji. 5) Aby zmienić ustawienie, po wybraniu komórki pamięci wcisnąć przycisk ENTER. W yświetlacz pokazuje teraz , lub oraz liczbę (0 – 255).
Polski 6) Po ustawieniu pierwszej sceny, wcisnąć przycisk MENU. Wyświetlacz ponownie pokaże numer sceny. Przyciskiem UP wybrać kolejną scenę, wcisnąć przycisk ENTER i wprowadzić ustawienia dla tej sceny. Powtórzyć procedurę dla pozostałych scen. Jeżeli dana sekwencja ma mieć mniej niż 30 scen, ustawić wartość 0 dla czasu trwania niewykorzystanych scen. 4.
3) Wcisnąć przycisk ENTER. Wyświetlacz po kazuje teraz bieżące ustawienie: Ustawienie Liczba kanałów DMX 2) Podłączyć wyjście DMX OUT do wejścia DMX następnego urządzenia sterowanego sygnałem DMX. Kolejne urządzenia podłączać analogicznie. Jeżeli dołączone kable DMX są za krótkie do połączenia kilku reflektorów ODC-100/RGB, można zastosować kabel przedłużający 10 kanałów (☞ rozdz. 4.3.5, rys.
Polski 4.3.4 Wykorzystywanie subadresów Dzięki wykorzystaniu subadresów możliwe jest niezależne sterowanie max 66 reflektorami (grupami reflektorów) poprzez pojedynczy adres startowy DMX. W ten sposób ilość sterowanych urządzeń wzrasta diametralnie. Wybór reflektorów z subadresem odbywa się poprzez 10 kanał DMX (rys. 8). Aby sterować równocześnie wszystkimi reflektorami z subadresem, ustawić 10 kanał DMX na wartość DMX poniżej 10. 1) Ustawić reflektory na sterowanie za pomocą 10 kanałów DMX, ☞ rozdz. 4.3.
Praca 10-kanałowa Praca 3-kanałowa Kanał DMX Wartość DMX Funkcja Kanał DMX Wartość DMX Funkcja 1 000 – 255 ściemniacz 0 % 100 % 1 000 – 255 jasność czerwonego 2 000 – 255 podstawowa jasność czerwonego 2 000 – 255 jasność zielonego 3 000 – 255 3 000 – 255 jasność niebieskiego 4 000 – 255 podstawowa jasność niebieskiego 5* 6 7* 000 – 030 podstawowa jasność zielonego brak funkcji 031 – 255 różne kolory 000 – 010 bez stroboskopu 011 – 255 stroboskop wolno szybko 000 – 020
Polski 2) Wcisnąć przycisk UP lub DOWN kilka razy, aż wyświetlacz pokaże . 3) Wcisnąć przycisk ENTER. Wyświetlacz pokaże , , , , lub . 4) Wcisnąć przycisk UP lub DOWN kilka razy, aż wyświetlacz pokaże . 5) Wcisnąć przycisk ENTER i następnie za pomocą przycisków UP oraz DOWN wybrać: = maksymalna jasność = jasność zredukowana do 33 % 6) Aby móc sterować reflektorem poprzez DMX, wcisnąć przycisk MENU dwa razy, w celu przejścia do najwyższego poziomu menu.
Fabryczne ustawienia są następujące: Polecenie Funkcja Ustawienie fabryczne liczba kanałów DMX = 10 kanałów max jasność funkcja balansu bieli funkcja subadresów wolna odpowiedź diod = 100 % = wył. = wył. = n ajwolniejsza subadres 01 11 odcieni bieli ustawione fabrycznie balans bieli R = 255, G = 255, B = 255 DMX / niezależna praca lub tryb slave = DMX / niezależna praca 6 Czyszczenie urządzenia Przedni panel reflektora należy czyścić regularnie, zależnie od warunków pracy.
Dansk Læs nedenstående sikkerhedsoplysninger grundigt igennem før ibrugtagning af enheden. Bortset fra sikkerhedsoplysningerne henvises til den engelske tekst. Vigtige sikkerhedsoplysninger Denne enhed overholder alle relevante EU-direktiver og er som følge deraf mærket . rengøring af linsen kan der benyttes almindelig vindues- / skærmrens. Det vejrbestandige chassis på ODC-100/ RGB rengøres med en fugtig klude, evt. med lidt rengøringsmiddel. ADVARSEL Enheden benytter livsfarlig net spænding.
Svenska Läs igenom säkerhetsföreskrifterna innan enheten tas i bruk. Ytterligare information återfinns på övriga språk i manualen. Säkerhetsföreskrifter Denna enhet uppfyller alla relevanta direktiv inom EU och har därför fått märkning. VARNING Enheten använder hög spänning internt. Gör inga modifieringar i enheten eller stoppa föremål i ventilhålen. Risk för elskador föreligger. VARNING Titta aldrig direkt in i ljuskällan. Risk för permanent ögonskada föreligger.
Suomi Ole hyvä ja tutustu seuraaviin ohjeisiin varmistaaksesi tuotteen turvallisen käytön. Tarvitessasi lisätietoja tuotteen käytöstä löydät ne muun kielisistä käyttöohjeista. Turvallisuudesta Tämä laite täyttää kaikki siihen kohdistuvat EU- direktiivit ja sille on myönnetty hyväksyntä. VAROITUS Tämä laite toimii vaarallisella jännitteellä. Älä koskaan tee mitään muutoksia laitteeseen taikka asenna mitään ilmanvaihto aukkoihin, koska siitä saattaa seurata sähköisku.
oberste Menüebene highest menu level Reaktion der LED Response of the LED sofortige Reaktion • imediate response leicht träge • slightly slow träge 4 • slow 4 träge 3 • slow 3 maximal träge • slowest response Scheinwerfer auf die Werksprogrammierung zurücksetzen Resetting the spotlight to the factory settings Szenenfolgen auf die Nebengeräte kopieren Copying sequences of scenes to the slave units Unteradresse ein Subaddresse on Unteradresse aus Subaddresse off Weiß entspricht der Einstellung Wh
Anzahl der DMX-Kanäle Number of DMX channels Programmierbare Szenenfolgen Programmable sequences of scenes Showprogramme Show programme Musikgesteuertes Stroboskop Music-controlled stroboskope Musikgesteuerter Farbwechsel Music-controlled colour change DMX- oder eingenständiger Betrieb DMX or independent operation Slave-Gerät beim Master-Slave-Betrieb Slave unit in master/slave operation DMX-Startadresse DMX start address 10 3 4 4 3 Unteradresse Subaddress ENTER UP DOWN Fig.
MONACOR INTERNATIONAL GmbH & Co. KG • Zum Falsch 36 • 28307 Bremen • Germany Copyright © by MONACOR INTERNATIONAL. All rights reserved. A-1653.99.02.05.