Model No, IMEL3906.0 Serial No, USER'S MANUAL Write the serial number in the space above for reference. oooo_ ooooo Serial . '_ QUESTIONS? As a manufacturer, we are committed to providing complete customer satisfaction. If you have questions, or if parts are damaged or missing, PLEASE DO NOT CONTACT THE STORE; please contact Care.
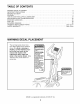
TABLE OF CONTENTS WARNING DECAL PLACEMENT .............................................................. IMPORTANT PRECAUTIONS ................................................................ BEFORE YOU BEGIN ...................................................................... ASSEMBLY ............................................................................... HOW TO USE THE ELLIPTICAL EXERClSER .................................................. MAINTENANCE AND TROUBLESHOOTING ........................
IMPORTANT PRECAUTIONS
BEFORE YOU BEGIN Thank you for selecting the new IMAGE _ 9.5 elliptical exerciser. The iMAGE 9.5 is an incredibly smooth exerciser that moves your feet in a natural elliptical path, minimizing the impact on your knees and ankles. Welcome to a whole new world of natural, ellipticalmotion exercise. For your benefit, read this manual carefully before you use the exercise cycle, If you have questions after reading this manual, please see the front cover of this manual.
ASSEMBLY To hire an authorized service technician to assemble the elliptical exerciser, call 1-800-445-2480. Assembly requires two persons. Place all parts of the elliptical exerciser in a cleared area and remove all packing materials; do not dispose of the packing materials until assembly is completed.
1, Attach the Rear Stabilizer (35) to the Frame (1) with two M10 x 77mm Carriage Bolts (58) and two M10 Nylon Locknuts (84). Attach the Front Stabilizer (3) to the Frame (1) with two M10 x 77mm Carriage Bolts (58) and two M10 Nylon Locknuts (84).
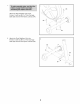
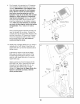
. Apply a generous amount of the included grease to the Ramp Axle (74). Have a second person hold the Ramp (78) near the Frame (1) in the position shown. Insert the Ramp Axle (74) through the Ramp and the Frame. Tighten an M8 x 25mm Patch Screw (70), with an M8 Washer (64) and a Ramp Cover (59), into each end of the Ramp Axle. 78 64 59 Next, pull the Ramp Pin (90) and align the Ramp (78) with one of the three holes in the Frame (1). Then, release the Ramp Pin into the Frame.
5. Orient an Upper Body Leg (6) and a Ramp Wheel (24) as shown. Attach the Upper Body Leg and the Ramp Wheel to the Left Pedal Arm (21) with an M8 x 63mm Bolt Set (67) and two Wheel Covers (97). 5 Repeat this step for the Right Pedal Arm (not shown), j6 I 24 67 21 67 . / Grease Apply a small amount of grease to a Crank Arm Spacer (45). Orient the Crank Arm Spacer so that the flange is on the side shown, and slide it onto the Left Crank Arm (42).
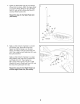
7, Have a second person hold the Upright (2) near the Frame (1) as shown. Next, connect the Upper Wire Harness (18) to the Lower Wire Harness (38). Attach the Upright (2) to the Frame (1) with two M8 x 69mm Button Bolts (91), two M8 Split Washers (95), and two M8 Nylon Locknuts (87). Be careful to avoid pinching the wires. 87 Attach the Water Bottle Holder (17) to the Upright (2) with two M4 x 22mm Screws (66).
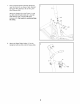
9. The Console (10) requires four "D" batteries (not included); alkaline batteries are recommended. IMPORTANT: If the elliptical exerciser has been exposed to cold temperatures, allow it to warm to room temperature before inserting batteries into the Console. If you do not do this, the console displays or other electronic components may become damaged. Remove the battery cover from the bottom of the Console and 9 11 93 insert four batteries into the battery compartment.
. Orient the Right Upper Body Arm (5) so that the indicated tube is facing inward. Lubricate the upper end of the right Upper Body Leg (6) with high-temperature lubricant. Then, slide the Right Upper Body Arm onto the Upper Body Leg. 11 Then, slide the Pivot Axle (16) through the remaining Upper Body Spacer (29) and the Right Upper Body Arm (5). 16\ Lubricate 12. Apply a small amount of grease to a Wave Washer (27).
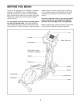
HOW TO USE THE ELLIPTICAL EXERCISER HOW TO MOVE AND LEVEL THE ELLIPTICAL EXERCISER HOW TO EXERCISE ON THE ELLIPTICAL EXERCISER To move the elliptical exerciser, stand in front of it, place one foot against one of the wheels, and firmly hold the upper end of the upright. Pull the upright forward until you can move the elliptical exerciser on the wheels. Carefully move the elliptical exerciser to the desired location and then lower it.
f_ ii[ 20 minules Note: If there is a sheet of clear plastic on the face of the console, remove it before using the console.
HOW TO USE THE MANUAL MODE 1. The Training Zones bar--The Training Zones bar will show Press any button on the console or begin pedaling to turn on the console. Performance the approximate intensity level of your exercise. A few seconds after the console is turned on, the displays will light. A tone will then sound and the console will be ready for use. 2.
your heart rate for up to 30 seconds. The display will then show your heart rate along with the other modes. Note: The console J _ L,I L F==g can show speed and distance in either miles or kilometers. The letters "MPH" or "Km/H" will appear in the lower display to show which unit of measurement is selected. To If your heart rate is not shown, make sure that your hands are positioned as described. Be careful not to move your hands excessively or to squeeze the metal contacts too tightly.
HOW TO USE A PRESET PROGRAM 1. one of the "Too Fast" indicators lights, decrease your pace; when the "On Pace" indicator lights, maintain your current pace. Press any button on the console or begin pedaling to turn on the console. Target Pace See step 1 on page 14. Target Pace Target Pace Too Fast Too Fast On Pace On Pace Too Slow Too Slow Too Fast 2.
4. HOW TO USE A HEART RATE PROGRAM Follow your progress with the matrix, the Training Zones bar, and the displays. 1. Press any button on the console or begin pedaling to turn on the console. See step 4 on page 14. 5. Measure your heart rate if desired. See step 1 on page 14. See step 5 on page 15. 6. 2. Turn on the fan if desired. Select one of the two heart rate programs. To select a heart rate program, press either of the Heart Rate Control buttons. See step 6 on page 15. 7.
4. Hold the handgrip pulse sensor. ment. If your heart rate is too far below or above the target heart rate setting, the resistance of the pedals will automatically increase or decrease to bring your heart rate closer to the target heart rate setting. It is not necessary to hold the handgrips continuously during the program. However, you should hold the handgrips frequently for the program to function properly.
HOW TO CONNECT YOUR PORTABLE STEREO HOW TO CONNECT YOUR CD PLAYER, VCR, OR COMPUTER Note: If your stereo has an RCA-type AUDIO OUT jack, see instruction A below. If your stereo has a 1/8" LINE OUT jack, see instruction B. If your stereo has only a PHONES jack, see instruction C. To use iFIT, com CDs, the elliptical exerciser must be connected to your portable CD player, portable stereo, home stereo, or computer with CD player. See pages 19 and 20 for connecting instructions. To use iFIT.
HOW TO CONNECT YOUR HOME STEREO HOW TO CONNECT YOUR COMPUTER Note: If your stereo has an unused LINE OUT jack, see instruction A below. If the LINE OUT jack is being used, see instruction B. Note: If your computer has a 1/8" LINE OUT jack, see instruction A. If your computer has only a PHONES jack, see instruction B. A. Plug one end of a 1/8" to RCA stereo audio cable (available at electronics stores) into the jack beneath the console.
HOW TO CONNECT YOUR VCR B, Note: If your VCR has an unused AUDIO OUT jack, see instruction A below. If the AUDIO OUT jack is being used, see instruction B. If you have a TV with a built-in VCR, see instruction B. If your VCR is connected to your home stereo, see HOW TO CONNECT YOUR HOME STEREO on page 20. A, Plug one end of a 1/8" to RCA stereo audio cable (available at electronics stores) into the jack beneath the console.
HOW TO USE AN IFIT.COM CD OR VIDEO PROGRAM The program will function in almost the same way as a preset program (see step 3 on page 16). However, an electronic "chirping" sound will alert you when the resistance setting and/or pace setting is about to change. To use an iFIT.com CD or video program, the elliptical exerciser must be connected to your CD player or VCR. See HOW TO CONNECT YOUR CD PLAYER, VCR, OR COMPUTER on pages 19 to 21. To purchase iFIT.
HOW TO USE PROGRAMS DIRECTLY FROM OUR WEBSITE 6. program. Our website at www.iFIT.com allows you to play iFIT.com programs directly from the Internet. To use programs from our website, the elliptical exerciser must be connected to your home computer. See HOW TO CONNECT YOUR COMPUTER on page 20. In addition, you must have an Internet connection and an Internet service provider. A list of specific system requirements is found on our website. When you start the program, an on-screen countdown will begin.
MAINTENANCE AND TROUBLESHOOTING HANDGRIP PULSE SENSOR TROUBLESHOOTING Inspect and properly tighten all parts of the elliptical exerciser regularly. Replace any worn parts immediately. The elliptical exerciser can be cleaned with a soft cloth and mild detergent. Do not use abrasives or solvents to clean the exerciser. To prevent damage to the console, keep liquids away from the console and keep the console out of direct sunlight.
EXERCISE GUIDELINES Burning Fat--To burn fat effectively, you must exercise at a low intensity level for a sustained period of time. During the first few minutes of exercise, your body uses carbohydrate calories for energy. Only after the first few minutes of exercise does your body begin to use stored fat calories for energy, tf your goal is to burn fat, adjust the intensity of your exercise until your heart rate is near the lowest number in your training zone.
SUGGESTED STRETCHES The correct form for several basic stretches is shown at the right. Move slowly as you stretch--never bounce. 1. Toe Touch Stretch Stand with your knees bent slightly and slowly bend forward from your hips. Allow your back and shoulders to relax as you reach down toward your toes as far as possible. Hold for 15 counts, then relax. Repeat 3 times. Stretches: Hamstrings, back of knees, and back. 2. Hamstring Stretch Sit with one leg extended.
NOTES 27
PART LIST--Model Key No. Qty, 1 1 2 3 No. IMEL3906.0 Description Ro2o8A Key No, Qty.
Key No, Qty. 81 82 83 84 85 86 87 88 89 90 2 4 1 7 6 2 4 2 2 1 Description M8 Large Washer M4 Washer M6 Nylon Locknut M10 Nylon Locknut Star Washer M4 x 20mm Screw M8 Nylon Locknut M10 x 60mm Button Bolt Transport Wheel Ramp Pin Key No, Qty. 91 92 93 94 95 96 97 * * * 2 2 4 2 2 2 4 - Description M8 x 69mm Button Bolt M5 x 6mm Screw M4 x 16mm Round Head Screw M3 x 16mm Screw M8 Split Washer M4 Washer Wheel Cover Hex Key Grease User's Manual Note: Specifications are subject to change without notice.
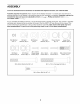
EXPLODED DRAWING A--Model No. IMEL3906.
EXPLODED DRAWING B--Model No. IMEL3906.0 Ro2o8A 89 31 72 59 j 60 72 60 64 78 70 60 95 .
ORDERING REPLACEMENT PARTS To order replacement parts, please see the front cover of this manual.