
FL Studio 20 Getting Started Manual


8
FIRST RUN
OK, so you just finished the installation and started FL Studio. This section explains what you will
see. Don’t forget to check the extensive on-line help that comes with FL Studio (press F1) and
check our ‘Getting Started’ video tutorials:
http://support.image-line.com/redirect/flstudio-start
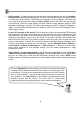
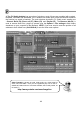
1. The System Settings Screen. When you first run FL Studio, you should press F10 on your
PC keyboard to access it (or Options > Audio Settings). Use the select boxes to choose your
sound card and hardware controllers. For now, the most important one is the Audio section,
accessed as shown below.
2. Select FL Studio ASIO from the list in the pull-down menu. ASIO modes allow lower CPU
load and shorter buffer lengths (more on why that’s a good thing below) compared to the
Primary Sound Driver. You can always come back to this screen (by pressing F10) and
experiment with other options. If you don’t hear sound, open the FL Studio ASIO driver by
clicking ‘Show ASIO panel’ and select your audio playback device in the Output menu (where
it shows [Default output]).
1. Click Here
2. Then Here