
FL Studio 20 Getting Started Manual


72
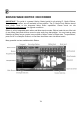
1. Load Edison - Load Edison in an FX slot in the Mixer track that you want to record. Don't
use the Master track (all audio from all tracks is routed there). TIP: Select the Mixer track
and press (Shift+E) to auto-load Edison in the first empty FX slot on the track ready to
record.
2. Input selection - Select an external input (see Audio Recording, page 70).
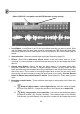
3. Effects - Place Edison before any effects loaded in the same Mixer track for a 'dry'
recording. It is recommended to record all external audio dry as you can always add effects
later on.
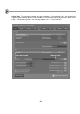
4. Record using Edison – Select ‘On play’ as shown above, so recording starts when
playback is started from the main FL Studio transport controls. 'On play' mode will also
place accurate song start markers when Play starts/stops or the Playlist loops back to the
start of the song. This is useful for recording multiple takes so that you can easily select
the region/s you wish to export to wave files and include in your song. Click the Record
button in Edison then press Play on FL Studio. Press Stop on FL Studio when you are
done.
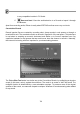
5. Exporting recorded audio - There are three main ways to export audio from Edison into
FL Studio:
A. Send to Playlist button, Left or Right-click to: Left-click: Send to Playlist
as Audio Clip (Shift+C) - Dumps the selection to the Playlist as an Audio Clip.
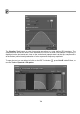
B. Drag / copy sample / move selection - Left-click on the button and drag to
the desired location (e.g. Playlist Clip-track). The selected region in the Sample
Edit Window (or whole sample if no selection is made) will be copied and moved
Select ‘ON PLAY’ and make sure the FOR duration is long enough