
FL Studio 20 Getting Started Manual


68
c. Getting a Feel for It. It takes some practice to master the event editor, and to be able to
get a song to sound exactly the way you want it, but it's definitely worth it. Keep practicing
until you get it right!
d. Live Recording Defeats Static Tweaking. If a knob has some events recorded on it, you
can no longer just set it anywhere you want and expect it to stay there. You have to go
through the Event Editor or start a new live recording session to change it.
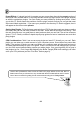
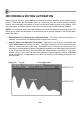
5. Introducing the Event LFO tool. Sometimes you want basic oscillation of a parameter, but
it’s hard to control exactly how this oscillation is going to fit with the song. That problem is
solved with the Event LFO, which lets you simulate the perfect oscillation inside the event
editor and align the peaks/troughs against the tempo grid.
6. Using the Event LFO. Open . the event editor for some control. Make sure you're on the right
pattern in the Pattern Selector or Picker Panel. Now select an area to oscillate using Select
Mode or by right-clicking on the Play Indicator Bar. Now hit ctrl-l or select LFO from the Tools
Menu. This will pop up the LFO Settings window and immediately apply the LFO to the
selected area. See above.
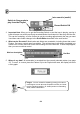
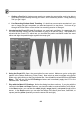
7. Play with the Main LFO Settings. Notice the dialog has three sections. If you play with the
controls in the Start and Shape sections, you should be able to create all kinds of cool effects.
In the Start section, you can alter the value (height), range (depth), and speed (length) of the
waves. In the Shape section you can alter the shape of the wave (sine wave, saw-tooth, or
square) and the phase (basically moves the waves left and right.)