
FL Studio 20 Getting Started Manual


54
MIXING & EFFECTS
One great feature of FL Studio is the Mixer. From here you can mix Channel Rack instruments and
make any arbitrary link between Mixer tracks to create complex mixing chains. Take a deep breath!
One of the best features of the Mixer is that you can add effects to the sounds coming from the
Channel Rack instruments. Effects can range from a simple volume changes to more advanced
effects such as compression, chorus, reverb, phaser, delay, flange, and EQ, among others (you
can also add notebooks, controllers, monitors and all kinds of other goodies!).
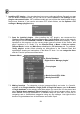
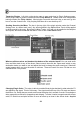
Open the Mixer Window. Bring up the Mixer screen by pressing F9 or by going to View > Mixer.
You'll get a window like the one below…
What are you looking at? All audio in FL Studio passes through the Mixer. Unless specifically re-
directed, newly added Instrument Channels are routed to the Master Mixer track. There are
125 Insert tracks for receiving input from plugins and external audio inputs, 1 x Current track for
hosting tools like Edison (page 71) and Wave Candy and a Master track for master effects
processing. The Mixer has three docks for tracks (left, middle and right) and can be stretched
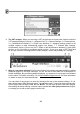
horizontally or vertically by clicking the edges and dragging. In combination with the layout
options (on the Mixer layout menu), the controls visible will change to suit the Mixers size. To see
tracks outside the current view, use the Track Scroll Bar below the 'Send' switches OR roll your
mouse wheel over the track names. Select a track by Left-clicking the pan or fader controls. Select
multiple tracks by holding (Ctrl+Alt). Selected tracks are highlighted with green faders (track 1
above is selected).