
FL Studio 20 Getting Started Manual

28
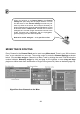
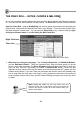
Select (E) - Click notes or Click and drag to make group selections.
Modifier
keys: (Shift) add to or remove notes from the selection.
Zoom to selection (Z) - Left-click and drag to zoom to selection. Left-
click on
background to zoom out.
Play / Pause - Left-click to start/pauses playback. Right-click (while playing)
to stop
and return to the last set start position. Right-click (while stopped) to return the
play
head to the start of the Piano roll. NOTE: There is an option on the Right-click
main
transport Stop button ‘
Remember seek time
’ for the start position to be remembered.
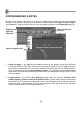
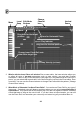
Note Colors. See the colored area beneath the spanner icon? Click it, this let you select the
color of the notes you enter. This may not seem useful now, but color-coding can really help
you out when you're trying to make sense of the notes you entered. Plus, the Edit Menu lets
you Select by color, so you can delete or copy and paste only those notes. Better still, note
colors allow you to control different MIDI Channels (see the main help in FL Studio, press F1).
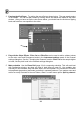
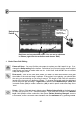
5. Chords and Harmonies. One of the really nice features of the Piano Roll is that you can have
notes sound on top of each other to create chords and harmonies. Here, we're getting into
stuff that you need a musical ear for, but FL Studio does make life a little easier by giving you
a Chord stamp tool - Select the type of chord you want, and click it into the Piano roll.
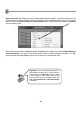
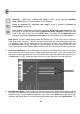
6. Pitch-Bending Notes. This is really cool, but only works for FL Studio native plugins such as
MiniSynth (to pitch bend VST instruments you can automate the pitch knob for the Channel it’s
loaded into, see Event automation, page 63). If you click on the Slide Icon in the top left just
under the Edit Menu Button, you can insert pitch-bending notes (also called Slide Notes). To
Overlapping
notes/chord