
FL Studio 20 Getting Started Manual

23
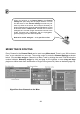
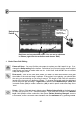
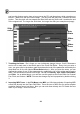
3. Panning the Kick Drum. Try setting the pan effect as shown below. The pan graph centers
in the middle. You can set pan values by clicking above and below the middle of the lower
window. After you have set up the view shown below, you should hear the kick drum flipping
back and forth from one speaker to the other.
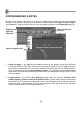
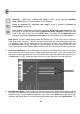
4. Play with the Other Effects. Filter Cut and Filter Res can be used to add or subtract values
to the main cutoff and Resonance knobs in the Instrument settings panel of the Channel
settings dialog box. See the "Tweaking the Channels" section. Pitch makes the sample higher
or lower, like the pitch knob in the Channel settings dialog box.
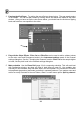
5. Make melodies. Use the Piano Roll (page 24) for composing melodies. This will work best
with Synthesizer plugins, we show you how to load those on page 33. You probably also
noticed you can load both Step and Note data in the same pattern. It’s possible but it’s better
to keep beats (percussion) and notes (melodies) in separate patterns. If you make a mess and
add in too many Channels to the one Pattern, there’s a useful menu option: Split by channel: