FL STUDIO Getting Started Manual IMPORTANT: Write your code above for safe-keeping. See how to use it, page 5.
Information in this document is subject to change without notice and does not represent a commitment on the part of Image Line Software. The software described in this document is furnished under a license agreement or nondisclosure agreement. The software may be used or copied only in accordance of the terms of the agreement. It is illegal to copy this software on any medium except as specifically allowed in the agreement.
TABLE OF CONTENTS HOW TO INSTALL FL STUDIO ...................................................................................................... 5 WELCOME TO FL STUDIO ............................................................................................................ 7 FIRST RUN ...................................................................................................................................... 8 MAKE SOME NOISE .....................................................................
IMPORTANT: This guide is a general Getting Started manual for all FL Studio editions. Some features are not available all editions. For example: Fruity Edition does not include Audio Clips. Please check our site http://flstudio.image-line.com for upgrade options.
THE FL STUDIO BOX DOES NOT CONTAIN INSTALLATION MEDIA Start here http://install.flstudio.com … 1. Download FL Studio and install it using the default install-wizard settings. 2. Register your code – Account creation; Use your real name so we can identify you if you ever lose your login info. Registration; Enter the 20 character code from your box when prompted. Test you can login to your account before the next step. 3. Unlock FL Studio – Start FL Studio and select HELP > About.
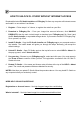
HOW TO UNLOCK FL STUDIO WITHOUT INTERNET ACCESS Download the latest FL Studio installer and FLRegkey file from any computer with internet access and install it on one without it as follows … 1. Register – Follow steps 1 to 3 above, to register the code from your Box. 2. Download a FLRegkey file – From your Image-Line account left-menu, click UNLOCK PRODUCTS, then the main ‘unlock image’ to download your ‘FLRegkey.reg’ file. Save it and the FL Studio installer, to a portable storage device.
WELCOME TO FL STUDIO This guide is a general introduction to using FL Studio. Press F1 while running FL Studio to open the on-line manual for detailed help on specific features or functions. The manual will open showing the last thing you clicked in FL Studio (it’s context sensitive). Lifetime FREE updates of the edition you own: Customers who bought FL Studio 2 (way back in 1999) have received every version up to 20 absolutely free! That’s about $2200 of free updates.
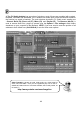
FIRST RUN OK, so you just finished the installation and started FL Studio. This section explains what you will see. Don’t forget to check the extensive on-line help that comes with FL Studio (press F1) and check our ‘Getting Started’ video tutorials: http://support.image-line.com/redirect/flstudio-start 1. The System Settings Screen. When you first run FL Studio, you should press F10 on your PC keyboard to access it (or Options > Audio Settings).
3. Buffer Length? You don’t need to worry about most of the settings here yet, but you definitely should know what the Buffer Length does. The buffer stores audio data from FL Studio before it's sent to your audio interface. This allows your computer to even out spikes in CPU load, that can cause audio glitches and crackles. Longer buffers mean lower CPU load and reduced audio glitching.
4. The FL Studio desktop has a number of windows, most of these are movable (with overlap), resizable, zoomable and switchable, so if a window isn't visible open it with the Shortcut toolbar or the function key noted in brackets. The main windows involved in FL Studio music creation are - Channel Rack (F6), Piano roll (F7). Mixer (F9) and Playlist (F5).
MAKE SOME NOISE Press the Play Button (make sure the switch to the left is in SONG mode) to Play a project. It’s definitely worth checking the demo songs. Open the browser (F8) left-click on the ‘Projects’ folder and right-click on the NewStuff.flp, then select ‘Open’ from the menu. You can also drag the FLP file onto the desktop to open it. FLP files are FL Studio Project files and save entire songs. Press Play and try to work out how the project was made.
HOW TO USE FL STUDIO The following section will guide you through some of the basic, and not so basic, features you’ll use to make music with FL studio. You should also spend some time with the in-line help file (press F1 inside FL Studio) and at least work through the Introduction to FL Studio section. You may have noticed we keep mentioning that, because no-one reads the manual, but you are reading this, so we have hope for you HEY! Don't skip that step.
Open Channel Settings Channel Settings Select Channel Open plugin Channel Rack 1. What are Channels for? Each Channel is represented by a button (shown above) and contains a single instrument plugin or sample. Click the button to open the instrument interface. Channel buttons are usually followed by 16 Step Sequencer steps. If you're musically inclined, these are 16th notes. If not, think of each group of four steps as one beat, so 16 steps are the four beats of a basic 4x4 drum loop.
2. What are Steps for? Click a step to activate it, this tells FL Studio to trigger the instrument at that point in the bar or loop. For instance, steps 1, 5, 9, and 13 in the 1st Kick Channel are selected, telling FL Studio to play the kick drum sound four times during the loop. If you think of each group of four steps as a single beat, FL Studio will play the sound at the start of each beat. Try changing the pattern of steps in the Kick Channel. If you need to turn a step off, right-click it.
3. How do you use patterns? While it’s cool to make a bunch of patterns, it’s not particularly useful to play a single loop over and over. The idea is to place these patterns in the Playlist (page 30). All the note & step data visible in the Change pattern Channel Rack is known as a 'pattern'. You can switch to a new pattern with the Pattern selector panel on the Tool Bar or use the Picker Panel. When you do this, the data visible in the current Pattern will change to show the selected pattern.
HOW TO USE SAMPLER CHANNELS In this section we'll show you how to modify the sound of the samples in each Sampler Channel. FL Studio supports so much of this kind of tweaking that it's possible for two people to create totally different sounds using exactly the same samples. Technically, each Channel contains an Instrument, which could be a sample player or a synthesizer plugin.
2. Open the Channel Settings Window (left-click on a Channel button). OK, let's modify the kick drum sample. Load a Kick sound (shown below) and open the Channel Settings. You can also change samples using the Open file icon to the right of the Sample Name (as shown below) or use the Show in browser icon to show the location of the kick drum samples. As you click on them, FL Studio will automatically play the sounds.
3. Play with the Sampler Channel. It’s worth noting that FL Studio can add audio effects on Mixer tracks (set by the FX selector), but this section is to show you the power of Channel sampler effects. Ok, at this point the best advice is to start the pattern looping, then play with the controls in the sample panel of the Channel Settings Dialog and listen to the difference in sound. Here's a short description of what some of them do. For more info see the on-line help.
4. Play with the Instrument Settings. Let's take a quick look at the Instrument panel before we move on. Click on the Instrument settings tab . Here you can adjust Envelopes and LFO to your sample for the Volume, Pan, Cutoff, Resonance, and Pitch settings. Select this switch to activate the envelope Open instrument settings Control target selector LFO Envelope You won’t hear LFO unless amount is set Right-click along this bar to set the natural pitch (root note) 5.
7. How do I Use Them? Use the Target Selector (see diagram above) to choose the target then turn the knobs on either the Envelope or the LFO. REMEMBER to turn the Envelope on and off for each effect (click the switch as shown). To turn off the LFO, reset the Amount (AMT) to the middle so the knob pointing straight up. 8. Why Can't I Hear the Effect? If you're still on the Kick Drum it will be hard to hear any LFO effect, although the Envelope might make a difference.
When you left-click on a Channel button, the Channel settings will open along with the plugin interface. You will find that some of the Channel settings controls may not have any effect on the sound, this is normal. Generally, for plugin instruments the Channel settings FX selector is used to send the audio to a Mixer track. One tab on the Channel settings that is cool with Plugin Instruments however is the FUNC (Function) tab. Experiment with the Arpeggiator, great for playing live with a MIDI keyboard.
STEPSEQUENCER & NOTES By now you're familiar with some of the ways FL Studio lets you tweak the sound of Sampler Channel. In this section, we'll show you how some of those effects can be applied to each step or note separately. Later we'll also show you how to program melodies in the Piano Roll (page 24). Step vs Piano roll preview Right-click to open the Piano roll Select a target to edit Drag these bars up and down edit 1. Piano roll steps.
3. Panning the Kick Drum. Try setting the pan effect as shown below. The pan graph centers in the middle. You can set pan values by clicking above and below the middle of the lower window. After you have set up the view shown below, you should hear the kick drum flipping back and forth from one speaker to the other. 4. Play with the Other Effects.
Super Important Tip. When you want to play repeated longer samples, you often need to set it up so that each new note cuts off the previous one so they don’t overlap and make a mess. The easiest way to do this is by right-clicking the Channel Name in the Channel Rack and selecting Cut Itself from the popup menu. Remember there are also a Group > Cut and Cut by options (page 20) under the Miscellaneous channel settings? You can go even further and cut one or more Channels by another.
THE PIANO ROLL – NOTES, CHORDS & MELODIES So you have probably already realized that there are some things that the Step Sequencer doesn't do. You can’t use it to make melodies or to play chords. The Piano roll solves all of these problems! Open the Piano Roll. Load up NewStuff.flp and select a pattern that shows some green bars as shown below. Notice that the Channel Rack view is very different. These Channels contain Piano Roll data instead of normal steps.
Menu Local Snap Edit Mode Buttons Change Channel here Vertical Zoom Mode Drag here for Horizontal Drag here for Horizontal Zoom position Play Indicator Drag here for Vertical position Change lower Piano Roll note data editor target here Velocity (volume) 2. What’s with the lower Piano roll window? As we saw earlier, the lower window allows you to adjust all sorts of per-note parameters such as note velocity, pan and also Channel automation.
Man, this thing just keeps getting' better! Using Loop Points Red lines are loop start/end points. You can set or edit them in Edison (right-click the waveform and choose ‘Edit’) 4. Basic Piano Roll Editing Piano roll Snap - You may find the note snaps to a place you didn't want it to go. If so, change the Snap setting on the toolbar. Sometimes you just can't get the note length to snap where you want no matter what you do. In this case, hold the ALT key to override snap and drag the note.
Select (E) - Click notes or Click and drag to make group selections. Modifier keys: (Shift) add to or remove notes from the selection. Zoom to selection (Z) - Left-click and drag to zoom to selection. Left-click on background to zoom out. Play / Pause - Left-click to start/pauses playback. Right-click (while playing) to stop and return to the last set start position. Right-click (while stopped) to return the play head to the start of the Piano roll.
see how this feature works, place a long note on the PR, and then place a slide note above or below it. Make sure the two notes overlap. The long note will play until it reaches the slide portion. Then the pitch will rise towards the Slide Note and stay there until it reaches the end of the original note. The longer the Slide Note, the longer the slide (see example next page). Slide switch Note Starts Slides Up Slides Down Stops 7. Tweaking the Notes.
THE PLAYLIST - FROM PATTERNS TO SONGS Now you've seen the basics of what can be done with a single pattern, we'll show you how to program more than one pattern and link them together into a complete song. 1. The Pattern Selector & Picker Panel. FL Studio lets you create 999 different patterns of any length. You can access the other patterns by changing the number in the Pattern Number box or use the Picker Panel located on the left side of the Playlist (see next page).
To add Clips, drag from the ‘Picker Panel’ to an empty area of the Playlist. 3. What's the Point? Now you can assemble a number of patterns together to make a song. This lets you alter melodies, change beats, insert fills, and reuse some of the early parts of the song later. The clip tracks show information about the data patterns & clips contain. The It’s up to you how you want to work but many composers use separate patterns for drums, bass, lead, etc.
AUDIO, PATTERNS & AUTOMATION CLIPS - EDITING FL Studio Producer Edition lets you work with Audio, Pattern and Automation Clips. Fruity Edition does not include Audio Clips. To place an audio/automation & Pattern Clips, switch to draw or paint mode and left-click in an Clip track. You can also drag a sample onto the Playlist and an Audio clip will be automatically created. Brush mode allows you to draw multiple instances of the audio clip at once (hold the mouse button and drag).
PERFORMANCE MODE Performance Mode allows you to trigger Clips from the Playlist. You can use a mouse on the Playlist, the typing keyboard or a controller to trigger Clips. The purpose is to create new live performances or remixes of a projects Clip content (Audio, Pattern & Automation). Performance mode works by treating the area before the Start Marker as a 'Performance Zone' that allows Clips to be triggered out of sequence between tracks.
INSTRUMENTS - FROM SAMPLERS TO SYNTHESIZERS Until now we've only been playing mainly with Sampler Channels. Useful but fairly basic as far as sound generation goes. FL Studio also supports Channels that contain sounds made in real time by software synthesizers like MiniSynth, GMS, 3xOSC, Harmor etc.. To use the proper terminology, every Channel contains a plugin Instrument, sometimes more broadly called a ‘generator’ as some generate automation data rather than sound.
Preset Sounds 4. Preset Sounds. Most synthesizer instruments have preset sounds available. In most cases, you can get to them from the Preset selector controls by clicking on the little arrows on the top right of the plugin window (right-click to see a big list) OR if that doesn’t work, use the Plugin user interface. You may need to look around carefully for something to click, like the preset selector on MiniSynth (above right).
3xOsc (included) - This is a plain instrument that allows you to mix three Oscillators, each of which generates a tone. The sounds on their own are not exciting, but they are good raw material to be combined with INS panel effects and other plugin effects (explained in a later chapter) and it’s a great place to start if you are new to synthesis. Autogun (included) - is a universe of sounds waiting to be discovered.
BassDrum (included) - is a flexible Bass/Kick drum synthesizer with sample-layer support. Get ready to rumble...your neighbors! BeepMap (included) - This is a weird one. Takes a bitmap image file and turns it into a sound, with strange and wonderful results. This is the same kind of synth that Aphex Twin used to embed an image of himself in a track that shows up when the track is put through a spectrum analyzer.
DirectWave (player version included) - A powerful sampler featuring a fully programmable synthesis section, with all the usual sampler goodies. DirectWave can also 'sample' (record sound) when loaded into a Mixer track on an effect slot. FL Keys (included) - A realistic piano simulator with optimized CPU and memory usage.
FL Studio Mobile (included*) – Is a complete music production environment that works as an App on Android, iOS and Windows platforms plus as an FL Studio *native plugin. In this way you can work on your mobile projects while on-the-go then continue in FL Studio and take them to the next level. FPC (included) - A software plugin similar to the hardware Akai MPC unit, coded & optimized for the FL Studio platform.
Fruity DrumSynth Live (included) - A Drum Synthesizer plugin that lets you define drum hits and control them via a keyboard. Fruity DX10 (included) - An 8-voice polyphonic (that means 8 notes at once) FM Synthesizer. This one’s designed to give high quality sounds without eating up too much CPU.
Fruity Envelope Controller (included) - Allows you to trigger envelopes that may be linked to parameters in FL Studio. Includes an envelope editor, similar to that used in Sytrus and FPC. Fruity Granulizer (included) - This one helps you get cool, choppy and strange sounds out of your samples.
Harmless (Signature) - Performs subtractive synthesis using an additive synthesis engine. All sounds complex but it’s an easy synth to get great sounds out of. GMS, Groove Machine Synth (Included) - Groove Machine Synth is multitimbral hybrid synthesizer & FX channel from Groove Machine.
Harmor - Just like its predecessor Harmless, Harmor is powered by a powerful additive synthesis engine. Its modules will look familiar to subtractive synthesizer enthusiasts: oscillators, filters & phasers. These are featured in Harmor but, because they are performed on additive synthesis data, rather than audio, offer more freedom. Morphine - A powerful Additive Synthesizer with a logical, flexible architecture that allows you to create any sound.
Ogun - can produce exceptionally rich metallic and shimmering timbres, although it's not limited to this genre. Ogun’s distinctive synthesis engine can generate more than 32,000 harmonics, modulated by high-level ‘harmonic mapping’ functions, that hand tonal control directly to the user. Toxic Biohazard - Features a hybrid synthesis engine, combining the best of FM and Subtractive synthesis.
Fruity Keyboard Controller (included) - An automation control which makes no sound of its own, but can be used to control knob and sliders within FL Studio, by mapping note pitch and velocity from the Piano roll or Channel Rack to any automatable parameter or third-party plugin. Fruity Slicer (included) - This one lets you slice up a beat and then play back individual drum hits using the keyboard. You can make cool breaks really quickly with this tool.
Poizone - A subtractive software synthesizer designed to bring you professional quality results, without a learning curve that hinders your creativity. The concept behind PoiZone was to design a synthesizer that had the smallest number of controls while providing the maximum flexibility and features Plucked! (included) - A synthesizer that produces specialized stringed instrument sounds like guitars, harps, mandolins, etc.
Sawer - is a vintage modeling synthesizer that can cut through a mix with precisely articulated and punchy sounds. SimSynth Live (included) - A fully functional digital synthesizer. Use this baby to create phat-sounding analog sounds for your dance and trance tracks.
Slicex (Producer) - Uses advanced beat detection algorithms to slice song/percussion samples into pieces and make them independently playable from the Piano roll or controller. If the wave file contains slice/region data, this will be automatically used instead of the beat-detection algorithm. Slicex offers playback, reordering of slices and time-stretching capabilities optimized for drum loops.
Sytrus (included) - Sytrus is one of the most versatile synthesizers in the FL Studio armory, combining Frequency Modulation (FM), Ring Modulation (RM), plucked string modeling and subtracting synthesis, and featuring a powerful envelope editor. The synth includes a powerful editable unison mode and a comprehensive effects section. Transistor Bass - A subtractive synthesizer in the style of the legendary Roland TB303™ Bassline synthesizer.
WaveTraveller (included) - Create realistic scratches with a full control over the smallest details! MIDI Out (included) - This one isn’t an instrument either. It lets you send a MIDI controller signal to an external (or internal) MIDI device. Speech Synthesizer (included) - This is a wizard to add synthesized speech lines to your song (see page 53). Others - There are a few other instruments, see the FL Studio Help (F1).
7. Installing VST plugins – You can download even more synths and effects. Generally you can use the default installation folder OR you can set a custom Options > File settings > VST plugins extra search folder. VST installers usually ask you to select the install location during the process. However, if you need to set custom VST search folders, use the Options > File settings > Manage plugins dialog: 7.1.
8. The VST wrapper. When you are using a VST plugin there are some extra controls under the VST wrapper settings (6, below). 1 = Wrapper menu. 2 = Channel Settings, 3 = Preset selector, 4 = Close/Minimize interface, 5 = Plugin user interface, 6 = Wrapper settings (useful to set multiple outputs or whip misbehaving plugins into shape). 7 = Channel Misc Settings.
10. Where Can I Get More? There are literally thousands of synth & effect plugins out there to download. Some of them are free, and some you have to buy. Search the web and http://www.image-line.com for deals. A place you should definitely bookmark is http://www.kvraudio.com they have a huge site with details about every VST plugin you could possibly want. Don't deny yourself, dude! You need all the Instruments. Save up your squeegee money and buy them ASAP.
MIXING & EFFECTS One great feature of FL Studio is the Mixer. From here you can mix Channel Rack instruments and make any arbitrary link between Mixer tracks to create complex mixing chains. Take a deep breath! One of the best features of the Mixer is that you can add effects to the sounds coming from the Channel Rack instruments.
The Track Inspector panel shows the properties and effects for the selected track. Controls include a 3 band parametric equalizer, audio Inputs and Outputs (from and to your soundcard) and Plugin Delay Compensation Controls (PDC). Turn Plugins On and Off / Mixing Wet and Dry. Click on the green LED to the right of each plugin slot to turn it on and off. Try this with the loop running to hear the difference.
Tweak the Plugins. Left-click on the plugin name to open and close its Plugin Settings screen. Some plugins have a generic interface like the Fruity Reverb 2. Others have more complicated looking controls (like Fruity Limiter). Most plugins come with their own help, so we won't go into how to use the controls here. Why not play with them all to see what they do? Sending Sound to the Mixer. The box in the top right of the plugin window under the Channel Settings icon, is a Mixer track ‘send’.
way is to place your mouse cursor over the FX slot and scroll your mouse wheel. No wheel? Click the menu arrow at the start and choose ‘Move up/down’. Place your mouse pointer over the FX name and scroll the wheel. A sidechain means a sound from one mixer track can be passed directly to a specific effect on another, a direct connection. Normally sound goes from slot 1 to 10. For VST plugins the sidechain input shows on the VST Wrapper Setting > Processing tab.
What do the Effects plugins do? As mentioned, you can get on-line help for all of the FL Studio Plugins, but here's a quick rundown on what they all do sorted by category – Automation Automation effects generate control data in response to audio or time/tempo input. You can use these to automatically move knobs and sliders on your synths and effects. A helping hand! Fruity Formula Controller (included) - Define your own controller functions using mathematical formula.
Distortion The classic electric guitar sound is heavily based on distortion effects. These add a fuzzy raspy tone to any input. You can even use them to make your voice sound like a guitar. Just hum or ‘Oooo’ into a strong distortion setting on the effect. Fruity Blood Overdrive - Create distorted guitar effects. Fruity Fast Dist - Easy-to-use distortion plugin. Fruity Squeeze - A Bit-reduction and sample skipping plugin. Fruity WaveShaper - Define your own distortion curves.
Fruity Love Philter - Advanced filter plugin. Fruity Vocoder - Sound like a robot or make a synth 'talk'. Vocodex - The last word in vocoding. Phasing/Flanging/Chorus Like filtering these effects provide automated sweeping changes to the sound, but affect only narrow frequency bands. You will instantly recognize all of these effects as they are some of the most popular in music. Fruity Chorus - Create multiple detuned copies of the original sound, adding depth and weight.
Fruity Center - Remove DC offset from waves/plugins. Patcher - Chain instruments & effects and use them again in new projects. Fruity dB Meter - Show volume in a nerdy way. Fruity HTML NoteBook - Add HTML synced to the playback position. Fruity LSD - Access the synthesizer built into your soundcard. Fruity Mute 2 - Turn noises off. Newtone - Pitch editor and correction. Fruity NoteBook - Make notes in your project synced to the playback position.
Preset Effects. If a plugin has built in presets you can access them through the presets section of the effects menu as seen above, or by using the little arrows (top right corner of the plugin window) as with the synthesizer plugins. You can create your own presets by clicking save preset. When you do this, FL Studio saves the positions of all the plugin controls so that you can get that exact effect sound back again later.
RECORDING KNOB MOVEMENTS - AUTOMATION Did you know you can record any movements you make to any knob? It’s called ‘Automation’ and it's the key to making your songs come alive. So, let’s record some automation. Let’s automate the PAN knob for one of the Sampler Channels. Watch the pan move! 1. Choose an Automation Pattern. OK, this is important. Automation is easily misplaced so it can be a good idea to name a Pattern ‘Automation’ and place it at the top of the Playlist.
Intro count in (useful) Switch to Song mode to play from the Playlist Record Switch ON 3. Important Note. When you've got the Recording Switch on and the loop is playing, moving a knob will erase over all the previously recorded tweaks from that point in the song until the end. This can be frustrating, so often it's best to get the recording approximately the way you want it and then make further changes in the Event Editor described in the next section. 4.
LemonBoy's Live Tweaking Recording Advice… 1. Always, always, always check the pattern selector before you start recording. Automation will be recorded into the selected pattern. 2. Right-click on the record button to check Automation, Score (notes) and or Audio is ticked. Depending on what you want to record. 3. Get your song laid out the way you want it before you start live recording. This makes it much easier than trying to align automation to song structure.
RECORDING & EDITING AUTOMATION Unless you're a real pro, you'll probably find that the live knob tweaking doesn’t always sound perfect. That's where the event editor comes in. Each time you move a knob during a recording session, the new setting is stored as an "event" for that knob at that moment in the pattern. With the event editor, you have complete control over how the sound is tweaked during playback. NOTE: You will find an option under the Edit Menu to convert Event data to Automation Clips.
3. Event Editor Modes. The event editor has several modes, explained below: Main Menu - Includes: File, Edit, Tools, View, Snap, Zoom, Target and Smoothing options. Tools Menu - Includes: Scale Levels and LFO tools. Snap - Controls the time resolution (horizontal). E.g. a setting of '(none)' will allow the finest resolution while 'Beat' will only allow value changes on every beat. Draw tool - Left-click and drag to draw curves. Right-click and drag to draw straight lines OR to edit in interpolate mode.
c. Getting a Feel for It. It takes some practice to master the event editor, and to be able to get a song to sound exactly the way you want it, but it's definitely worth it. Keep practicing until you get it right! d. Live Recording Defeats Static Tweaking. If a knob has some events recorded on it, you can no longer just set it anywhere you want and expect it to stay there. You have to go through the Event Editor or start a new live recording session to change it. 5. Introducing the Event LFO tool.
AUTOMATION CLIPS Automation Clips are probably the best way to EDIT and DRAW automation. Automation Clips move (automate) linked controls on the FL Studio interface or plugins. They are closely related to Event automation. But unlike event data they are not bound to a specific Pattern Clip and exist as a special type of Generator, loaded into the Channel Rack. Automation Clip data can be displayed in the Playlist window as a line-graph, as shown below.
AUDIO RECORDING What about Audio recording? You will need FL Studio Producer Edition or higher plus an ASIO soundcard driver selected from the Audio Options (Press F10 on your keyboard to open them). It’s a huge but rewarding area that is carefully covered in the main manual. Press F1 in FL Studio and click on the Contents section ‘Recording Audio, Notes & Automation’, then the ‘Audio Recording’ page. However we will tell you now that external audio inputs come into FL Studio through the Mixer Input menus.
EDISON WAVE EDITOR / RECORDER IMPORTANT: This guide is a general Getting Started guide for all existing FL Studio Editions. Some features however, are not available in some editions. The FL Studio Fruity Edition doesn’t have Audio Track or the Integrated Wave Editor capabilities. Please check our site http://flstudio.image-line.com for upgrade conditions. Edison is a fully integrated audio editor and Mixer-track recorder.
Select ‘ON PLAY’ and make sure the FOR duration is long enough 1. Load Edison - Load Edison in an FX slot in the Mixer track that you want to record. Don't use the Master track (all audio from all tracks is routed there). TIP: Select the Mixer track and press (Shift+E) to auto-load Edison in the first empty FX slot on the track ready to record. 2. Input selection - Select an external input (see Audio Recording, page 70). 3.
to any compatible location in FL Studio. C. Save and load - Save the audio/selection to a file and re-import it through the Browser. Apart from recording audio, Edison is really about EDITING and has some very cool tools: Convolution Reverb Reverb impulse files are created by recording short, sharp sounds in real spaces or through a reverb/effects unit. The recorded reverb is an acoustic ‘fingerprint’ of the real space.
The Equalize Tool boosts or cuts frequencies according to a user defined EQ envelope. The example below shows the effect of the selected EQ curve on a white noise sample. Frequency is displayed on the horizontal axis, time on the vertical axis (sample start is at the top, sample end is at the bottom) while intensity/saturation of color represents frequency amplitude. To open the tool you can either left-click on the EQ Tool button use the Tools > Spectral > EQ option.
The Time Stretch / Pitch Shift tool allows you to alter the duration, pitch and formant of a sample independently. Edison and, more generally the Sampler Channels & Slicer tool, use algorithms to deliver advanced time stretching / pitch shifting that meets the standards of professional production and broadcast applications. To open the tool you can either left-click on the Time Tool button use the Tools > Time > Time stretch / Pitch shift option. Cool! Hit me with your rhythm stick! I live for beats.
EXPORTING AUDIO AND SHARING YOUR WORK So now you’re done with your song – you probably want to get it out of FL Studio so you can put it on a CD, post it on the Internet, or edit it in another program. The Export function exists for this purpose. Here's how to use it. 1. Export to Wav, Ogg. or MP3. This option is available from the Main File menu. Whether you choose Wav, Ogg or MP3, you will be asked to specify the name of the file and then the dialog below will appear.
3. Should I Use "Background Rendering?" Rendering can take a long time and hogs the CPU, especially if you choose the higher-quality options in the Quality section of the window above. But if you click on Background Rendering, FL Studio will minimize and continue to render unobtrusively in the background. It takes longer…but the internet has plenty to see while you wait. 4. Exporting to a Zipped Loop Package. This feature is useful if you want to transmit your FL Studio project over the web.
EXTERNAL & INTERNAL CONTROLLERS Did you know that you already have at least two ‘external controllers’ attached to your PC? One is your typing-keyboard and the other is your mouse. Obviously these don’t make sounds, but send control signals to your PC so you can type and move your mouse.
Other Controllers (advanced use) - If you are serious then the sky is the limit, the best type is something like the nectar Panorama P4 & P6 which has more control action than you are ever likely to need (Keys, pads, knobs and sliders). Similarly if you already have other MIDI hardware, like the Novation Launchpad (shown below) then that can be used to control FL Studio too (the Launchpad is the perfect match for our FPC plugin!). Launchpad Mini + FPC = Bliss! 2. Setting Up Your Controller. a.
select that. Try turning the knobs on your controller. If everything is ok, you should see a green Data indicator show in the Hint Bar of FL Studio every time you turn a knob or hit a key. If that works, great! You can skip steps c to e.
Data input indicator c. Check the Options menu to see if there is a check mark beside Enable MIDI Remote Control. If not, click on it and see if you get the light now. If not, read on. Master FLooper: Yo, check it out. I need a keyboard controller for FL Studio. Computer Store Guy: QWERTY or AZERTY? Master FLooper d. Set Your MIDI Input Device. If the light is still not coming on when you turn knobs on your controller, go into MIDI Settings (from the Options menu or by hitting F10).
The fun part - Linking a knob to Your Controller: a. Right-click on the Control You Want to Link to the hardware controller. In this case, we're trying the main pan control on a sampler Channel. Now right-click on the knob and select Link to controller, to pop up the Remote controlling settings window. b. Move a Knob or slider on Your Controller. You should see the Remote controlling settings window disappear and the Channel Volume knob should now move in response to your hardware knob movements.
Turn OFF Mute a. The Peak Controller allows you to control any target in response to audio signals in the mixer track it’s loaded on. We’ve put it on the Mixer track the Kick is using. We are going to use it to dip the volume of another track when the kick hits. b. Next right-click Mixer track 2s fader and select Link to controller. Choose ‘Peak ctrl – Peak’ from the menu shown below. Peak controller now shows as an option anywhere in FL Studio you link to something. Below that is a ‘Mapping formula’ menu.
Well, that’s it. Have fun! Don’t forget there’s more help available inside FLStudio (F1) and on line at http://flstudio.image-line.com.
CREDITS Image-Line (Boring) Staff Jean-Marie Cannie (CTO) Frank Van Biesen (COO) Ief Goossens Kim De Meyst Myriam Dupont Inventor & Overlord Didier Dambrin (gol) Chief Software Architect Frédéric Vanmol (reflex) Software Engineers Daniel Schaack Eugene Kryukov Mark Boyd Maxx Claster Miroslav Krajcovic Paul Dunn Pierre M Ville Krumlinde (More complete credits and thanks in the product itself.
INDEX Chords in Piano roll, 25 Chorus, 54 Compressor, 54 Computer considerations, 62 Cool features, 7 Copyright, 2 Countdown, 63 CPU load, 62 Cut itself, 24 Cutoff & resonance, 19, 22, 23, 29, 66, 78, 83 3 321 countdown, 63 3xOSC, 34, 36 A Additive synth, 44 Additive Synth, 43 Additive synthesis, 43 Amount (AMT), 19, 20 Aphex Twin, 37 Arpeggiator, 19 Attack (ATT), 19 Audio editor, 71 Audio saving, 76 Audio Settings, 8 Audio Tracks, 31 Autogun, 34, 36 Automation, 63 Knobs, 82 Automation clips, 31 D Decay
Fruity DX10, 34, 40 Fruity Granulizer, 41, 53 Fruity Scratcher, 53 Fruity Slicer, 45, 53 Fruity X-Y Controller, 82, 83 FruityLoops.com, 2 FX plugins, 58 Menu bar, 11 Metallic synth, 44 MIDI controllers, 50, 78, 81, 82 drivers, 8 files, 29 MIDI Out channel, 50 settings, 81 Mixer tracks, 56 Morphine, 43 MP3, 76, 77 G GMS, 42 Graph editor, 22, 23 Groove Machine Synth, 42 N NewStuff.
Speech Synthesizer, 53 Speed (SPD), 19 Step, 15 Step sequencer, 16, 24, 25, 30, 34, 53 Steps, 13, 14, 22, 25 Subtractive synth, 49 Sustain (SUS), 19 Presets, 35, 62 Project bones, 77 Project data files, 77 R Recording automation, 68 Recording countdown, 63 Recording hint icon, 64 Release (REL), 19 Remote control input, 81 Resonance & cutoff, 19, 22, 23, 66, 78, 83 Reverb, 54 RM Synth, 49 T Technical support, 5, 6 Tick beat, 63 Tool bar, 27, 30 Toxic Biohazard, 44 Troubleshooting, 81 TS-404, 34, 63 S U