
User Guide


71
S
S
H
H
A
A
R
R
I
I
N
N
G
G
Y
Y
O
O
U
U
R
R
W
W
O
O
R
R
K
K
So now you’re done with your song – you probably want to bring it out of FL Studio so you can put it on a
CD, post it on the Internet, or edit it in another program. The Export function exists for this purpose. Here's
how to use it.
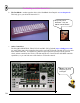
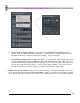
1. Export to Wav or MP3. This option is available from the File menu. Whether you choose Wav or
MP3, you will be asked to specify the name of the file and then the dialog below will appear. There's a
lot to choose from here, and we're not gonna go into it. If you want an explanation of every button, go
to the on-line help under File Formats. It's all there. If you want to just get your song rendered, leave
the settings the way they are (trust us - we picked the defaults for a reason!)
Dude! That looks
complicated…
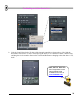
2. Should I Use Wav or MP3? Wav is a raw sound file format. Huge files, excellent sound quality
(expect to use about 10 MB per minute depending on Depth). Wav files are suitable for burning onto
CD. MP3 is a compressed format. Smaller files, but sound quality may be slightly compromised
(expect to use about 1 MB per minute depending on Bit Rate). If you want to share files on the
Internet, MP3 is the way to go.
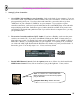
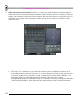
3. Should I Use "Background Rendering?" Rendering can take a long time and hogs the CPU,
especially if you choose the high-quality options in the Quality section of the window above. But if
you click on Background Rendering, FL Studio will iconify itself and continue to render unobtrusively
in the background. It takes longer, though.