
User Guide


7
F
F
I
I
R
R
S
S
T
T
R
R
U
U
N
N
OK, so you just finished the installation and started FL Studio. Read this section for an explanation of what
you're seeing.
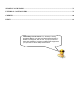
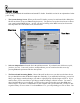
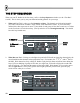
1. The System Settings Screen. When you first run FL Studio, you may be confronted with a dialog box
like the one below (if not, use F10 to bring it up now). You just have to use the select boxes to choose
your sound card and MIDI drivers. At first, you may be looking at the MIDI screen, but for now the
most important one is the Audio screen, shown below.
Click Here
Then Here
2. Select an Output Driver from the list in the pull-down menu. If you don't know which one to pick,
just leave it as it is. Later on if you have sound problems, you can come back to this screen (by
pressing F10) and experiment with the other options.
3. The DirectSound Streaming Buffer. Most of the stuff on this screen you don’t need to know about,
but you should know what the Buffer Length does. Basically, if you make this buffer long, you are less
likely to get choppy sound but changes you make to a playing loop will take longer to kick in. If you
make it short, you are more likely to get choppy sound but changes will kick in faster. You want it
short, but depending on your computer, you may need to come back to this screen later (F10) and
make it longer. If you have a combination of a fast computer and a good sound card, you may be able
to get the latency as low as 10ms. For a SoundBlaster Live, you can probably go as low as 30ms. The