
User Guide


66
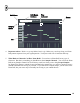
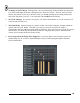
waveform preview inside the tracks. You can cut and split the audio clips in multiple pieces and arrange the
pieces independently on the audio tracks.
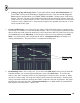
Each audio clip, available in the audio tracks, is in fact an instance of the Audio Clip generator.
Each Audio Clip channel you add in the Step Sequencer becomes available in the audio tracks and vice
versa - dropping samples on the audio tracks generates an Audio Clip channel (unless a channel exists with
the same sample).
To place an audio clip, switch to draw or paint mode and left-click in an audio track (if no Audio Clip
channels exist, you will see a dialog where you can browse for a sample to be used).
Paint mode allows you to draw multiple instances of the audio clip at once (hold the mouse button and
drag).
To erase an audio clip, click it with your right mouse button or use the left mouse button in erase mode.
To switch an audio clip instance to play another Audio Clip channel, open the clip menu (left-click the
arrow in the top left corner of the clip) and from the Select Channel menu, pick an Audio Clip channel to
switch to.
To open the Channel Settings of the channel associated with the audio clip instance, open the clip menu and
select Channel Settings.
From the clip menu, select Preview to listen to the audio clip sample (hit the Stop button in the Transport
panel to stop the preview).
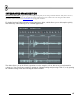
Automation clips can automate any editable parameter over the complete song (instead of pattern based
automation). A common use of these automation clips is to make a fade-in/out for an audio clip by
automating its volume.
However, the use of automation clips has a much bigger scope than controlling the clips volume. Feel free
to experiment with its use.
Use the appropriate switch to switch between Audio clips handling and Automation clips handling.